Denim Skirt with Lace Ruffle Pattern

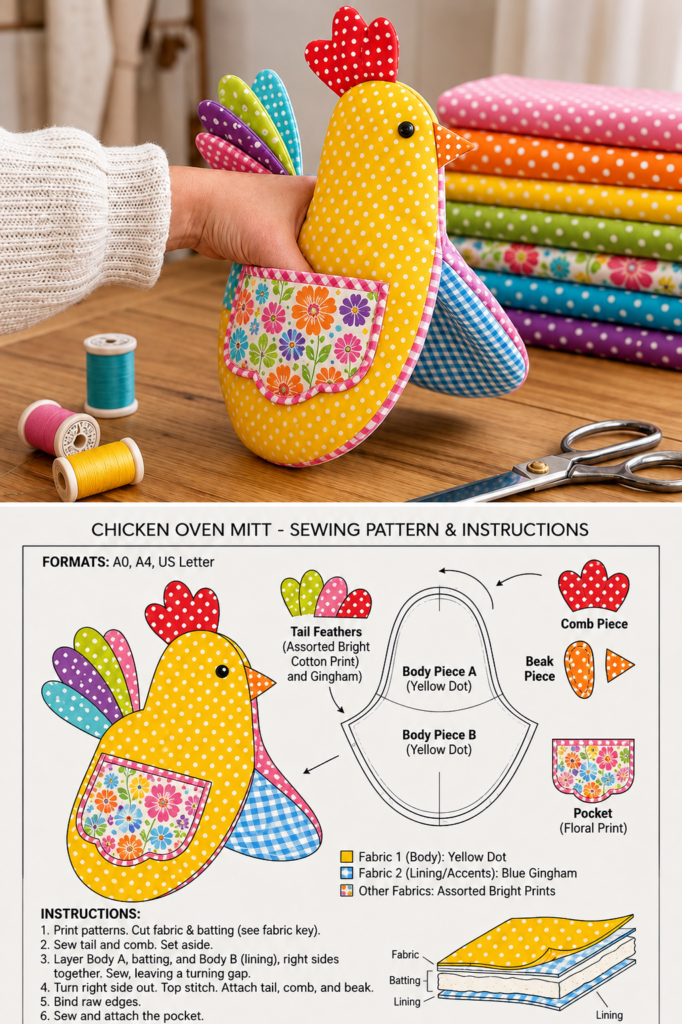
Chicken Oven Mitt Pattern is a cheerful fabric pattern that transforms practical kitchen protection into a charming handmade decoration. Inspired by the colorful chicken shown in the reference image, this project combines a padded chicken-shaped body, bright tail feathers, a contrasting wing, comb, beak, lining, and a useful front pocket. The result is much more decorative than an ordinary oven mitt, yet the construction is approachable when every component is prepared separately before final assembly.
One of the most enjoyable parts of this Chicken Oven Mitt Pattern is choosing the fabrics. The reference design mixes yellow polka dots, pink accents, blue gingham, floral cotton, orange, red, purple, green, and turquoise. This variety gives the chicken a playful patchwork appearance without requiring traditional quilt blocks. It is also a wonderful project for using coordinated cotton remnants left from previous sewing projects.
Although the finished piece is adorable, remember that an oven mitt is intended to protect hands from hot cookware. For a functional fabric chicken oven mitt, use appropriate heat-resistant insulating material designed for kitchen sewing projects, follow the manufacturer’s instructions, and avoid relying on ordinary polyester batting alone for direct heat protection. The decorative button eye shown in the inspiration can also be replaced with embroidery if you prefer a softer finish.
For this Chicken Oven Mitt Pattern, choose good-quality quilting cotton for the exterior and lining. Cotton is easy to sew, presses neatly, and comes in an enormous variety of prints. Medium-scale dots, gingham, florals, and small geometric prints work particularly well because the motifs remain visible on the smaller chicken pieces.
You will need approximately 1/2 yard (46 cm) of main fabric, 1/2 yard (46 cm) of lining fabric, assorted scraps for the feathers and details, coordinating thread, bias binding, pins or sewing clips, fabric scissors or a rotary cutter, marking tools, a sewing machine, and suitable insulated batting. Quantities are approximate because the exact amount depends on your chosen finished size.
For a medium oven mitt, aim for a finished chicken approximately 12–14 inches (30–36 cm) tall and 8–10 inches (20–25 cm) wide at the broadest portion. Before cutting, place your hand over the paper template and confirm that there is enough room around your fingers and wrist.
The main chicken body pattern consists of a rounded head flowing into a wider lower body. Prepare mirrored outer pieces, lining pieces, and insulating layers as required by your chosen construction method. Add approximately 3/8 inch (1 cm) seam allowance unless your template already includes it.
Next, prepare the decorative components. Cut several elongated feather shapes for the tail, one wing for the visible side, a three-lobed comb for the top of the head, a small triangular beak, and a rounded pocket. In the reference design, each tail feather uses a different bright fabric, which makes the finished chicken especially colorful.
Before cutting your best fabric, make a paper or inexpensive fabric test of the main body. Verify the hand opening, depth, and overall proportions. A beautiful oven mitt still needs to be comfortable and practical, so correct sizing and insulation are more important than matching an exact measurement.
Begin with the fabric tail feathers because they are easiest to assemble before attaching them to the body. Place two matching feather pieces right sides together and sew around the curved perimeter, leaving the attachment edge open. Clip or notch the curves carefully without cutting through the stitching.
Turn each feather right side out and gently shape the tip with a blunt turning tool. Press carefully. A narrow row of topstitching approximately 1/8 inch (3 mm) from the edge can give each feather a crisp, professional appearance.
Repeat this method for approximately four or five feathers. Using purple, lime green, pink, turquoise, and red fabric creates the bright fan effect visible in the reference. Arrange the finished feathers before sewing so that each color remains visible.
Construct the comb in the same way. Place the two red comb pieces right sides together, sew around the lobes, clip the curved seam allowances, turn, and press. Leave the bottom edge open because it will eventually be enclosed within the chicken body seam.
The orange beak can be made from a small folded or doubled triangular piece. Sew, turn, and press it before positioning it along the front edge of the head. Because the beak is small, accurate stitching and careful trimming of the seam allowance will prevent unnecessary bulk.
For the front pocket, layer the pocket fabric with the desired support or lining. Finish the upper edge neatly and apply contrasting binding if desired. The floral pocket shown in the inspiration uses pink trim, creating a strong visual separation from the yellow body.
Position the pocket on the outer chicken body before assembling the entire mitt. Topstitch around the sides and curved lower edge while leaving the top open. Reinforce the upper corners with a few extra stitches because these areas receive the greatest stress when the pocket is used.
Now prepare the padded body. Depending on the insulating product you select, your sandwich may include exterior cotton, cotton batting, specialized heat-resistant insulation, and lining. Follow the insulation manufacturer’s recommended orientation and number of layers.
Light quilting helps keep these layers together. Straight lines, gentle curves, or a simple diamond pattern are all suitable. Keep the quilting relatively simple because the colorful fabrics and chicken silhouette already provide plenty of visual detail.
Once the padded body sections are stable, position the tail feathers along the rear edge. Arrange them in a fan, baste them securely, and check that the finished portions point inward while sewing if they will be caught inside a seam.
Baste the red comb along the top of the head and the orange beak along the front. Make certain all raw attachment edges align with the body edge. The decorative sections should face toward the center of the chicken before the opposite body layer is placed over them.
Add the contrasting wing to the visible exterior panel. The blue gingham wing in the reference creates a lovely contrast with the yellow body. You can lightly pad the wing for dimension and finish its perimeter with narrow binding or neat topstitching.
Place the main sections according to your chosen lined-mitt construction method and stitch carefully around the chicken silhouette. Maintain approximately a 3/8-inch (1 cm) seam allowance and sew slowly around tight curves. Leave the designated opening accessible rather than accidentally closing the hand-entry area.
Before turning, trim excess seam allowance and carefully notch inward curves. Clip convex curves where necessary. These small steps are extremely important because they allow the chicken’s rounded head and body to appear smooth after turning.
Turn the piece right side out and gently shape every curve. Do not force the fabric through narrow areas because doing so can weaken the seams. Press only at temperatures appropriate for every material inside the mitt.
After the main Chicken Oven Mitt Pattern has been assembled, inspect the outer perimeter. Uneven areas can often be corrected with careful trimming before binding. A clean silhouette makes the handmade chicken look significantly more professional.
Apply bias binding around exposed raw edges where required by your construction. The pink gingham-style trim shown in the inspiration is particularly effective because it visually outlines the yellow body and coordinates with the floral pocket.
For the eye, embroidery is a practical option for an oven mitt. A small black circle stitched securely onto the exterior provides the same friendly expression without adding a hard plastic component. If the project will be purely decorative, a securely attached button may be used instead.
Additional facial details can be embroidered with black cotton thread. Keep them simple so they complement rather than overpower the colorful fabrics. A tiny curved mouth or additional decorative stitching can give each fabric chicken a different personality.
Press the finished project gently and check every seam. Inspect the attachment points of the comb, beak, wing, and tail feathers. Reinforce anything that feels loose before regular use.
For an especially polished result, coordinate the colors rather than selecting scraps randomly. A main yellow fabric combined with repeating pink, turquoise, orange, green, purple, and red accents creates variety while maintaining a unified palette.
You can also turn the project into a matching kitchen collection. The same chicken shape and fabric combination can inspire coordinating pot holders, decorative towels, table mats, or fabric baskets while keeping the Chicken Oven Mitt Pattern as the centerpiece.
Most importantly, treat the finished item according to its materials. If it is intended for handling hot cookware, ensure that every component—especially insulation, thread, and decorative elements—is appropriate for that purpose.
Is the Chicken Oven Mitt Pattern suitable for beginners?
Yes, an adventurous beginner can make it. The basic sewing techniques are straightforward, although the curved body and small decorative pieces require patience.
What is the best fabric for a chicken oven mitt?
100% cotton quilting fabric is an excellent exterior choice because it is easy to sew, widely available, and works beautifully for patchwork-style designs.
Can I use polyester fabric?
For an item intended to contact hot cookware, it is better to select materials specifically suitable for kitchen heat applications. Decorative versions have more flexibility.
Do I need batting?
Yes. A padded structure helps create the soft body and provides additional thickness. For actual heat protection, use appropriate heat-resistant insulation according to its manufacturer’s instructions.
Can ordinary quilt batting replace heat-resistant insulation?
Do not assume ordinary batting provides adequate protection. If the mitt will handle hot pans, choose materials specifically intended for that application.
How large should the chicken be?
Approximately 12–14 inches (30–36 cm) tall works well for many adults, but always test the paper template against the intended user’s hand.
What seam allowance should I use?
A 3/8-inch (1 cm) seam allowance works well for this project unless your template specifies another measurement.
How many tail feathers should I make?
Four or five feathers create an attractive fan. You can add more if your chicken body is large enough.
Can I use fabric scraps?
Absolutely. This is an excellent scrap fabric sewing project, especially for the tail, comb, beak, wing, pocket, and binding.
Should the pocket be attached before assembling the body?
Yes. It is considerably easier to sew the pocket neatly onto the flat exterior body panel before assembling the complete mitt.
Can I quilt the body?
Yes. Light quilting prevents the internal layers from shifting and gives the finished piece a traditional quilted appearance.
How do I make smooth curves?
Sew slowly, use a consistent seam allowance, and clip or notch the seam allowance before turning.
Can I make the chicken without a pocket?
Yes. The pocket is optional. Removing it creates a simpler design and makes the project faster to sew.
Can I make this as kitchen decoration only?
Certainly. A decorative version can be hung on a wall, displayed near a sewing area, or included in seasonal farmhouse décor. Just avoid presenting a decorative-only version as heat protective.
Can I enlarge the pattern?
Yes. Enlarge every template piece by the same percentage so the proportions remain consistent.
What colors work well together?
The reference palette of yellow, pink, turquoise, blue, green, purple, red, and orange creates a cheerful result. Farmhouse neutrals or traditional red-and-white combinations also work beautifully.
How should I wash the finished mitt?
Follow the care requirements of the most delicate material used, especially the insulating layer. Prewashing cotton before sewing can also help reduce later shrinkage.
The Chicken Oven Mitt Pattern is a wonderful example of how a practical fabric sewing pattern can become a colorful piece of handmade kitchen décor. By combining a rounded chicken body with individually sewn tail feathers, a bright comb, contrasting beak, padded wing, floral pocket, lining, and carefully finished edges, you can create a project that looks detailed without requiring complicated sewing techniques.
The most important part is preparing the individual pieces carefully before final assembly. Sew and turn the feathers, comb, and beak first; prepare the pocket and wing while the body remains flat; stabilize the body layers; then bring everything together in the final seams. This order makes the construction much easier and helps produce clean, professional results.
The project is also highly customizable. Use bright polka dots like the reference, vintage florals for a cottage-inspired chicken, gingham for farmhouse style, or leftover quilt fabrics for a true scrap-friendly version. Every combination gives the Chicken Oven Mitt Pattern a completely different personality.
If the finished chicken will actually be used around hot cookware, prioritize proper heat-resistant materials and insulation rather than appearance alone. Once everything is securely sewn and finished, you will have a charming handmade project that combines creativity and practical sewing. Leave your sincere opinion about this pattern and share what colors, fabrics, or details you would choose for your own chicken oven mitt.