
Hunter's Star Quilt Block - Quick & Easy Tutorial

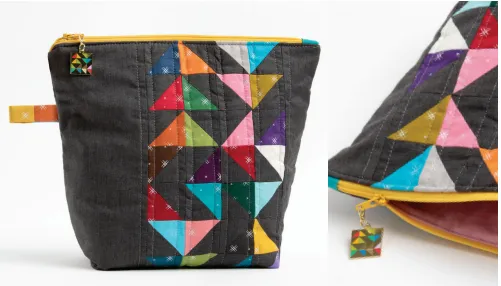
The Zipper Bag – Free Pattern is a practical and stylish sewing project suitable for crafters of all skill levels. This versatile bag can be used for storing makeup, stationery, travel essentials, or small accessories, making it a must-have in any home.
With its simple rectangular design and secure zip closure, the bag combines functionality and aesthetic appeal. Whether you are creating it for yourself, as a gift, or to sell, this pattern allows endless customization in terms of fabrics, colors, and decorative elements.
Starting the Zipper Bag – Free Pattern project is an exciting opportunity to explore your creativity while learning or practicing basic sewing skills.
The pattern is straightforward and forgiving, making it ideal for beginners while still offering opportunities for advanced sewers to experiment with lining, quilting, and decorative stitches.
This bag’s compact design ensures convenience and portability. The Zipper Bag – Free Pattern is lightweight yet durable enough to protect the contents inside. By adjusting the dimensions, you can create small, medium, or larger versions for a variety of uses. In this guide, we will cover fabric selection, cutting, assembly, finishing, and creative variations for making your own zipper bag.
Choosing the right materials is essential when making the Zipper Bag – Free Pattern. Medium-weight fabrics such as cotton, canvas, denim, or laminated fabrics are ideal. They provide structure, durability, and ease of sewing. Avoid extremely flimsy fabrics as they may result in a bag that collapses or doesn’t hold shape well.
For the lining, lighter fabrics like cotton or polyester blends are perfect. The lining should be smooth to allow the bag’s contents to slide in and out easily. If desired, you can add interfacing or batting to give the bag additional structure, which is particularly useful for larger sizes.
You will also need a zipper that matches the width of your bag, coordinating thread, scissors or a rotary cutter, pins or clips, and a sewing machine or hand sewing tools. Optional embellishments include decorative zippers, patches, embroidery, or appliqués to personalize your Zipper Bag – Free Pattern.
Consider coordinating exterior and lining fabrics for a visually appealing combination. Contrast can highlight the zipper and add a professional touch. Pre-washing fabrics is recommended to prevent shrinkage and color bleeding after assembly.
Planning your fabric needs in advance ensures you have enough material for both the bag’s exterior and lining. Proper preparation makes cutting, sewing, and assembly easier, resulting in a polished final product.
Accurate cutting is crucial for a successful Zipper Bag – Free Pattern. Measure and mark your fabric carefully, ensuring the exterior and lining pieces are identical in size. Standard bag dimensions are around 9 inches wide by 6 inches tall, but this can be adjusted based on personal preference.
Cut two rectangles from the main fabric for the front and back exterior pieces. Similarly, cut two rectangles from the lining fabric. If using interfacing, cut pieces to match the exterior rectangles and attach them according to the manufacturer’s instructions.
If you want to add decorative elements like pockets, appliqués, or embroidery, it’s best to attach them before sewing the bag together. This ensures proper alignment and prevents complications during assembly.
Once all pieces are cut, mark centers and corners to assist with accurate sewing. Press fabric pieces to remove wrinkles, which makes stitching smoother and more precise. Proper preparation sets the stage for a professional-looking Zipper Bag – Free Pattern.
Start assembling the Zipper Bag – Free Pattern by attaching the zipper to the top edges of the exterior and lining fabrics. Position the zipper face down onto the right side of the exterior, then place the lining piece on top, right side facing the lining. Pin or clip the layers in place carefully.
Sew along the top edge using a zipper foot to ensure neat, straight stitching. Repeat this process on the other side of the zipper with the remaining exterior and lining pieces. Press the zipper seam open to reduce bulk and ensure smooth operation.
Next, align the exterior pieces right sides together and the lining pieces right sides together. Pin or clip along the edges, leaving a small gap in the lining for turning the bag right side out. Sew around the perimeter, making sure to backstitch at the beginning and end for durability.
Trim corners diagonally to reduce bulk and achieve crisp, square corners when turned. Turn the bag right side out through the gap in the lining. Push out corners gently using a blunt tool to maintain shape.
Finally, stitch the gap in the lining closed either by hand or machine. Press the bag carefully to remove wrinkles and shape the edges. Topstitch along the zipper edge if desired, which enhances both appearance and durability.
The Zipper Bag – Free Pattern offers endless customization opportunities. You can create a simple, classic design using solid fabrics or add personality with patterns, stripes, and textures. Embellishments such as embroidery, appliqués, buttons, or decorative trims make each bag unique.
For added functionality, consider including internal pockets or compartments to organize items like pens, cosmetics, or small accessories. Adjustable dimensions allow you to create larger pouches for travel or smaller ones for coin storage.
You can also make themed bags for holidays, birthdays, or special occasions using seasonal fabrics or motifs. Coordinated sets, such as matching pouches and tote bags, are perfect for gifting.
Experimenting with linings, quilted exterior fabrics, or laminated cotton creates different textures and aesthetics while enhancing the bag’s durability. The Zipper Bag – Free Pattern is versatile, letting your creativity shine while keeping the project practical.
1. Is this pattern suitable for beginners?
Yes, it uses simple shapes and basic sewing techniques, making it beginner-friendly.
2. What fabrics work best for this bag?
Medium-weight fabrics such as cotton, canvas, denim, or laminated fabrics are ideal.
3. Can I add pockets or compartments?
Yes, internal or external pockets can be added for organization and personalization.
4. How do I attach the zipper neatly?
Use a zipper foot and carefully align layers, sewing slowly to maintain accuracy.
5. What are the standard dimensions?
A common size is 9 inches wide by 6 inches tall, but you can adjust dimensions to suit your needs.
6. Can I make multiple bags as a gift set?
Absolutely, coordinated sets are perfect for gifting or personal organization.
7. How should I care for the bag?
Care depends on fabric choice; most cotton or canvas bags can be hand washed or spot cleaned, while laminated fabrics can be wiped clean.
The Zipper Bag – Free Pattern is a versatile, functional, and stylish sewing project suitable for beginners and experienced crafters alike. It offers practical storage, creative design opportunities, and endless customization. From choosing fabrics to adding decorative elements, this pattern allows you to make a personalized accessory for daily use, gifting, or even small-scale selling.
With careful preparation, accurate cutting, and thoughtful assembly, your Zipper Bag – Free Pattern will look professional and polished.
We hope this guide inspires you to create your own bag, experiment with colors and designs, and share your creative projects with others. Leave your feedback, suggestions, and personal tips to help fellow crafters improve and enjoy the process!


