
Hunter's Star Quilt Block - Quick & Easy Tutorial

The Weathervane Quilt Block Pattern is one of the most beloved and timeless designs in the world of quilting. Rooted in early American tradition, this geometric pattern captures the rustic charm and practicality of pioneer craftsmanship.
Whether you’re a beginner looking for your next project or an experienced quilter exploring classic motifs, the Weathervane Quilt Block offers the perfect balance between tradition and creativity.
Its symmetrical layout, clean lines, and bold contrasts make it both visually appealing and highly adaptable to modern color palettes.
When working with the Weathervane Quilt Block Pattern, quilters find themselves immersed in history. The design originated as a reflection of the weathervanes found on barns and homes throughout rural America — symbols of direction, guidance, and resilience.
Each block tells a story, connecting us to generations of artisans who expressed themselves through fabric and thread. The enduring appeal of this pattern lies in its simplicity: just a few repeating shapes come together to form an intricate and captivating design.
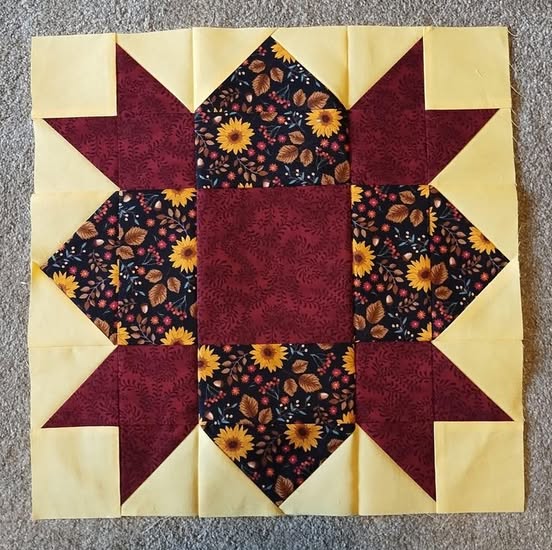
Beyond its visual charm, the Weathervane Quilt Block Pattern is a great example of how geometry and artistry can harmonize. The pattern typically features squares, half-square triangles, and rectangles arranged around a central motif. These shapes create a windmill-like motion that draws the eye inward, symbolizing the movement of a real weathervane turning in the wind. This article will guide you through the meaning, construction, variations, and creative possibilities of the Weathervane Quilt Block Pattern, offering inspiration and practical tips for your next quilting project.
The Weathervane Quilt Block Pattern carries deep cultural significance that reaches back to the early days of American quilting. During the 1800s, quilting served both practical and artistic purposes, helping families repurpose fabric scraps into something useful and beautiful. The weathervane itself was a common sight on farms, symbolizing stability and the ever-changing nature of life. Translating that symbol into fabric allowed quilters to preserve both a piece of their environment and their creativity.
In early communities, quilts often told stories or represented personal values. The Weathervane Quilt Block was seen as a metaphor for guidance — just as a weathervane points to the direction of the wind, it reminded quilters to follow their inner compass. This symbolism made the design a favorite among those seeking meaning in their art, turning each block into more than just a decorative element.
Over time, the Weathervane Quilt Block Pattern became a staple in traditional quilt collections. Its balanced composition and recognizable shape made it easy to replicate, yet versatile enough for individual interpretation. Different regions developed their own color schemes, from deep earthy tones in rural America to softer hues in coastal communities, reflecting local influences.
Modern quilters continue to embrace the Weathervane Quilt Block Pattern because it bridges old and new aesthetics. Whether used in a rustic farmhouse quilt or a contemporary wall hanging, the motif resonates across styles. It’s a testament to how craftsmanship and symbolism can coexist beautifully in fabric art.
Ultimately, the Weathervane Quilt Block is more than a design — it’s a legacy. It carries stories of families, faith, and the enduring human spirit, stitched together by generations who valued both practicality and beauty.
To bring the Weathervane Quilt Block Pattern to life, preparation is key. Start with high-quality cotton fabrics, as they hold their shape and sew easily. Choose three to four complementary colors — one for the background, one for the center, and two for contrast. The interplay of colors is what makes the Weathervane Quilt Block dynamic and visually balanced.
Next, gather the essential tools. You’ll need a rotary cutter, self-healing cutting mat, and a clear quilting ruler. Precision is critical in quilting, especially for a pattern like this, where clean lines and perfect points define the block’s beauty. A good iron and pressing surface will also make a big difference in the final look of your quilt block.
For sewing, use a reliable sewing machine with a ¼-inch presser foot to maintain consistent seam allowances. Thread should match or complement your chosen fabrics. Many quilters prefer high-quality cotton thread for its strength and smooth finish.
Templates or pre-cut guides can also help beginners maintain accuracy. The Weathervane Quilt Block Pattern typically uses pieces that fit together like a puzzle — small errors in measurement can affect alignment. Taking time to cut carefully will save frustration later.
Another helpful tip is to organize your pieces before sewing. Lay out the Weathervane Quilt Block on a flat surface, arranging each section to visualize how it fits together. This preview helps ensure color balance and symmetry, two crucial elements of this design.
Finally, always press your seams as you go. Pressing rather than ironing prevents distortion and gives your Weathervane Quilt Block Pattern a crisp, professional appearance that highlights its clean geometry.
Creating a Weathervane Quilt Block Pattern may look complicated, but it becomes easy once broken into steps. The first step is to prepare your fabric pieces. You’ll need squares and half-square triangles (HSTs) in different colors. Cut your fabrics according to your desired block size, making sure all pieces are accurately trimmed.
Begin assembling the center square, which forms the heart of the weathervane. This piece often features a contrasting color to draw attention to the block’s focal point. Sew your smaller squares or triangles around it, forming a balanced cross-like layout.
Next, focus on the corner units. These are typically made from HSTs paired with smaller squares, creating directional movement. When assembled correctly, the pieces create a visual “spin,” mimicking how a real weathervane turns with the wind.
Join the corner units and center section to form rows. Pin the pieces carefully to align seams, then sew each row with a consistent ¼-inch seam allowance. Press each seam flat before attaching the rows together.
Once your rows are complete, sew them together to complete the Weathervane Quilt Block Pattern. Take time to square up your block by trimming any uneven edges. A perfectly square block ensures easy assembly later if you plan to combine multiple blocks into a full quilt.
Finish by pressing the entire block from the back and front. The result should be a beautifully symmetrical design — a perfect representation of the Weathervane Quilt Block, ready to be used in quilts, table runners, or wall decor.
One of the best things about the Weathervane Quilt Block Pattern is its versatility. Traditional color schemes used muted tones like browns, reds, and blues, but modern quilters experiment with bright, contrasting colors or even gradient fabrics. This flexibility allows you to tailor the block to any aesthetic — rustic, minimalist, or vibrant and modern.
Consider enlarging the Weathervane Quilt Block for a bold statement quilt. A single oversized block can serve as a stunning centerpiece for a bed quilt or throw. On the other hand, smaller blocks can be used to create intricate patchwork designs with repeating symmetry.
Another creative idea is to use the Weathervane Quilt Block Pattern in home decor projects. Cushion covers, wall hangings, and table runners can showcase this iconic design beautifully. Its balanced structure makes it ideal for both traditional and contemporary interiors.
You can also play with texture. Try using different types of fabric such as linen, flannel, or even denim to give the Weathervane Quilt Block a unique feel. Adding embroidery or hand quilting along the seams enhances its visual depth.
For those who enjoy digital crafting, the Weathervane Quilt Block Pattern translates well into digital quilt design software. Experimenting virtually allows you to explore color combinations and layouts before committing to fabric cuts.
Finally, the Weathervane Quilt Block Pattern can be combined with other classic blocks — like the Sawtooth Star or Ohio Star — for a complex, layered quilt design that honors quilting heritage while showcasing personal creativity.
1. What is the finished size of a Weathervane Quilt Block Pattern?
The finished size depends on how large you cut your pieces. Common sizes include 12-inch or 16-inch blocks, but you can scale the pattern to fit your project.
2. Is the Weathervane Quilt Block good for beginners?
Yes! While it looks intricate, the Weathervane Quilt Block Pattern uses basic shapes like squares and triangles, making it ideal for confident beginners looking to expand their skills.
3. Can I make a modern quilt using the Weathervane design?
Absolutely. The block adapts beautifully to modern fabrics and bold colors. Try pairing solid tones with minimalist quilting lines for a fresh look.
4. What fabrics work best for this pattern?
100% cotton quilting fabrics are ideal because they are easy to handle and maintain shape. Pre-washed and ironed fabric ensures precise cuts.
5. How can I make my seams line up perfectly?
Accuracy in cutting and consistent seam allowances are key. Use pins, align points carefully, and press seams flat to maintain symmetry.
6. Can the Weathervane Quilt Block be made by hand?
Yes, traditional hand-piecing methods work just as well. It might take more time, but hand stitching can add a charming, authentic touch to your quilt.
The Weathervane Quilt Block Pattern stands as a beautiful bridge between past and present. Its historical roots, simple geometry, and endless creative possibilities make it a cornerstone of quilting artistry. Whether you’re crafting a heritage quilt, exploring new color schemes, or creating decor pieces, this timeless pattern allows your creativity to shine through every stitch.
We’ve covered its symbolism, tools, step-by-step construction, and modern adaptations — now it’s your turn to bring the Weathervane Quilt Block Pattern to life. Try experimenting with colors and textures to make it your own.


