
Hunter's Star Quilt Block - Quick & Easy Tutorial

Turn 5″ Squares Into a Generously Sized Bag is an exciting and creative project for anyone interested in bag making and fabric crafts.
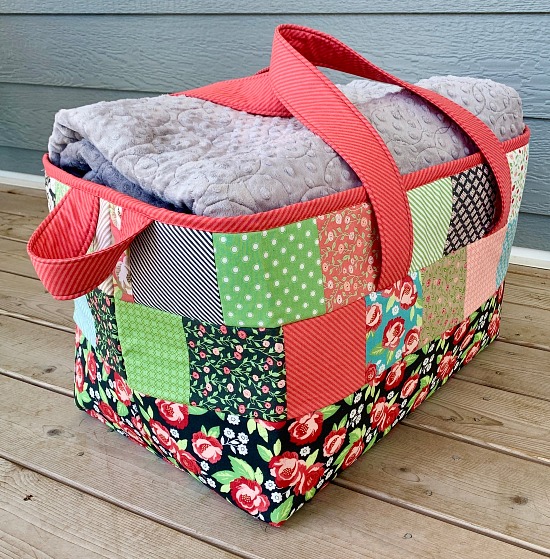
This project is perfect for beginners and experienced crafters alike because it allows you to transform simple 5-inch squares of fabric into a practical and stylish DIY bag.
By carefully selecting your fabrics and following a few key steps, you can create a bag that is not only functional but also visually appealing.
Using 5-inch squares is particularly advantageous because it simplifies the design process and makes it easy to experiment with different patterns and colors.
Whether you are making a quilted bag for yourself, as a gift, or to sell, this project encourages creativity and allows you to repurpose leftover fabrics. The small squares give you endless possibilities for arranging colors, textures, and patterns in unique ways.
Additionally, turning 5″ squares into a generously sized bag is a rewarding project because it combines the satisfaction of sewing with the practicality of producing something useful. Unlike other crafts, this project results in a functional item that can be used daily. By investing time in sewing squares together thoughtfully, you can achieve a professional-looking DIY bag that showcases your skills and creativity.
Selecting the right fabrics is crucial when you turn 5″ squares into a generously sized bag. The type, texture, and weight of the fabric will affect both the look and durability of your bag. Heavyweight cotton, canvas, and denim are excellent choices for bags that need to carry weight. Lightweight fabrics are suitable for decorative bags but may require lining for added strength.
When choosing fabrics, consider how the colors and patterns will interact. Contrasting colors can create striking visual effects, while complementary tones offer a more subtle, cohesive look. Using a mix of solids and prints can make your quilted bag more dynamic and interesting.
Additionally, consider the fabric’s durability. A DIY bag often experiences regular wear and tear, so choosing fabrics that resist fraying and maintain their shape is important. Pre-washing fabrics is also recommended to avoid shrinkage after your bag is completed.
It is helpful to plan your design in advance. Lay out your 5-inch squares on a flat surface to experiment with different arrangements. This step ensures that your color combinations and patterns work harmoniously before sewing begins.
Another tip is to mix textures for added dimension. Pairing smooth cotton with textured linen or subtle quilting patterns can create a visually rich and tactile fabric craft.
Finally, ensure that all your chosen fabrics coordinate with any hardware you plan to add, such as zippers, straps, or buttons. This attention to detail helps create a polished, professional-looking DIY bag.
Proper preparation is the first step when you turn 5″ squares into a generously sized bag. Start by ironing all your squares to remove wrinkles and make sewing easier. Precision is important, so take care to cut your squares accurately if needed. Using a rotary cutter and cutting mat ensures uniformity and cleaner edges.
Sewing the squares together in a grid pattern is a common technique. Place two squares right sides together and sew along one edge using a ¼-inch seam allowance. Press the seams open to reduce bulk, which is essential for a smooth final product. Repeat this process until you achieve the desired width and height of your bag.
Once the squares are joined into panels, consider adding batting for a quilted effect. This layer not only adds structure but also provides a cushioned feel to your quilted bag. Use a simple quilting stitch or decorative patterns to enhance the overall look of your DIY bag.
Adding lining is another crucial step. A well-chosen lining not only improves the bag’s durability but also hides raw seam edges. Select a lightweight cotton or polyester lining and sew it to fit snugly inside the exterior panel of your bag.
When assembling your bag, ensure all seams are aligned and secure. Reinforce stress points, such as the bottom corners or areas where straps will attach. This prevents your bag from losing shape or tearing under weight.
Finally, topstitching along the edges provides a professional finish and adds strength. The combination of careful preparation, precise sewing, and thoughtful reinforcement ensures your bag is both functional and attractive.
The straps are one of the most important features when you turn 5″ squares into a generously sized bag. They provide comfort and functionality while complementing the overall design. Decide whether you want short handles, a shoulder strap, or an adjustable crossbody strap. Each option changes the bag’s use and style.
Straps can be made from fabric, webbing, or even recycled materials. For a DIY bag, sewing the straps from coordinating fabric squares adds a cohesive, custom touch. Reinforce the ends of each strap to ensure they can bear weight without tearing.
Pockets and compartments improve the bag’s practicality. Internal pockets are perfect for organizing small items like keys, phones, or wallets. Exterior pockets can add style while providing easy access to essentials. When adding pockets, ensure they are securely sewn to withstand daily use.
Closures are another consideration. Zippers provide security, while magnetic snaps or buttons offer convenience. Choose a closure that complements the design and purpose of your quilted bag.
Decorative elements, such as appliques, embroidery, or patchwork designs, can further enhance the bag’s appearance. Personalizing your fabric craft makes it unique and special.
Finally, ensure all features are balanced and functional. Test the bag by filling it with items to check weight distribution and durability before considering it complete.
Proper care is essential to prolong the life of your DIY bag. Most fabric bags benefit from gentle washing or spot cleaning. Avoid harsh detergents or bleach, which can weaken fibers and fade colors.
Store your bag in a dry, cool place when not in use. Avoid overloading it to maintain its shape and prevent seams from stretching. For quilted bags, occasional ironing or steaming can help maintain a neat appearance.
Regular maintenance, such as checking for loose threads or repairing small tears promptly, keeps your bag functional and looking fresh. Fabric protectors or sprays can provide additional durability and resistance to stains.
Encourage gentle handling, especially for bags with decorative elements or delicate fabrics. Proper care ensures your bag making efforts continue to shine over time.
Consider rotating between bags to avoid excessive wear on a single piece. This prolongs the usability of all your handmade creations.
Finally, caring for your bag is part of the rewarding experience of fabric crafts. Seeing a handmade bag remain beautiful and functional for years adds to the satisfaction of your creative work.
Q1: Can beginners make this bag?
Yes! This project is suitable for beginners. Using 5″ squares simplifies the sewing process, and clear step-by-step instructions make it manageable.
Q2: What fabrics work best?
Medium to heavyweight fabrics like cotton, canvas, or denim are ideal. These materials provide durability and structure for a functional bag.
Q3: Do I need a sewing machine?
While a sewing machine speeds up the process, hand sewing is possible. A machine ensures stronger, more uniform seams.
Q4: How can I add a quilted effect?
Include a layer of batting between the exterior panel and lining. Stitch through the layers with a decorative pattern for a quilted finish.
Q5: Can I customize the size?
Absolutely! Simply add or remove squares to adjust the height and width of your bag.
Q6: How do I maintain my bag?
Spot clean or gently wash, store in a cool, dry place, and check for loose threads regularly to prolong its life.
In conclusion, turning 5″ squares into a generously sized bag is a creative, rewarding, and practical project. By carefully choosing fabrics, preparing and sewing your squares, adding functional features, and caring for your finished bag, you can create a DIY bag that is both beautiful and durable. This project encourages experimentation with colors, patterns, and textures while resulting in a functional item you can use or gift.
We hope this guide has provided useful insights and techniques for your bag making journey. Feel free to share your experiences, leave honest opinions, and suggest any tips or improvements you’ve discovered. Your feedback helps the crafting community grow and inspires new creative projects.


