
Hunter's Star Quilt Block - Quick & Easy Tutorial

A Shoulder Bag With One Inner Zippered Pocket – Free Pattern is a perfect project for sewing lovers who enjoy creating stylish, functional accessories.
Whether you’re a beginner or an experienced crafter, this pattern allows you to design a beautiful and practical shoulder bag that combines simplicity with elegance.
From carrying your daily essentials to adding a personal touch to your outfit, a handmade shoulder bag offers both fashion and utility.
Creating your own shoulder bag with one inner zippered pocket isn’t just about sewing—it’s about expressing your creativity.
You get to choose your fabric, adjust the size, and add features that make the bag uniquely yours. The free pattern makes it accessible to everyone, even if you’re just starting to explore the world of DIY sewing projects. Plus, the satisfaction of carrying something made entirely by your hands is unmatched.
This guide will walk you through every step of creating your bag, from choosing materials to final assembly. You’ll learn how to install a zippered pocket, how to reinforce the bag’s structure, and how to finish it beautifully. By the end, you’ll not only have a stylish DIY shoulder bag, but also a deeper understanding of bag construction and sewing techniques that can be applied to many other projects.
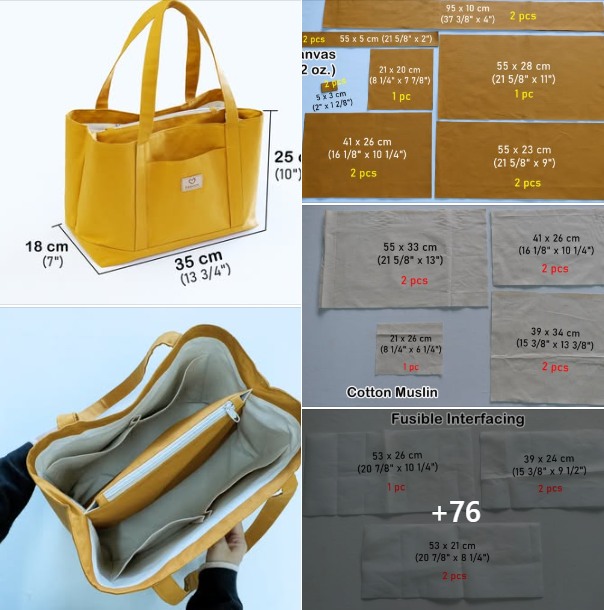
When starting your Shoulder Bag With One Inner Zippered Pocket – Free Pattern, the materials you choose will make a big difference in the final look and durability of your project. The fabric you pick determines how sturdy or flexible your bag will be. Canvas, denim, or cotton duck fabric are excellent options for an everyday bag. If you want a more elegant or professional appearance, consider faux leather or linen blends.
Next, think about the lining. A lining not only makes the bag look polished inside but also strengthens the structure. Choose a lightweight cotton or polyester fabric that complements the outer material. Since this pattern includes one inner zippered pocket, select a smooth, non-fraying fabric for the pocket area to ensure the zipper runs easily and lasts longer.
Interfacing is another key material to consider. It adds firmness and shape to your bag. For example, fusible interfacing can be ironed onto the main fabric to provide structure without adding bulk. If you want your DIY shoulder bag to stand upright, choose a medium- or heavy-weight interfacing.
Don’t forget about the zipper and other hardware. A high-quality nylon zipper for the inner pocket ensures smooth opening and closing. You can also use magnetic snaps or metal rings for attaching the shoulder strap. Small details like these elevate your handmade bag and give it a professional touch.
Finally, always pre-wash your fabrics before cutting. This prevents any shrinkage after sewing and ensures your bag maintains its intended shape and size. Preparation may seem like a small step, but it’s crucial for achieving a clean, polished finish in your bag sewing pattern project.
Once you’ve gathered all the materials, it’s time to work with the free pattern. Print it at full scale and verify measurements before cutting. The pattern usually includes the main body pieces, lining, strap, and zippered pocket pieces. Always cut carefully, ensuring that your pieces are symmetrical—this will make sewing and assembly much easier later on.
Before cutting, lay your fabric on a flat surface, smoothing out wrinkles. Pin the pattern pieces to your fabric and trace around them with fabric chalk or a disappearing pen. This helps keep your cuts precise. For a Shoulder Bag With One Inner Zippered Pocket – Free Pattern, accuracy matters—especially when aligning the zipper or matching seams.
If you want to modify the pattern, this is the stage to do it. You can lengthen the strap for a crossbody version or enlarge the body to create a tote-style bag. That’s one of the advantages of using a DIY shoulder bag project—it’s completely customizable. You can also add decorative stitching, embroidery, or fabric appliqués for a personal touch.
After cutting, fuse your interfacing to the wrong side of the outer fabric pieces. This step adds body and prevents the fabric from stretching during sewing. If your bag design includes outer pockets or panels, mark their placement now. Preparation at this stage ensures a smooth sewing experience later.
Remember to transfer all pattern markings carefully—especially zipper placements, notches, and fold lines. These details are essential for correctly assembling your bag sewing pattern. Taking the time to cut and mark everything accurately will save you frustration and improve the overall look of your finished bag.
The highlight of this project is the inner zippered pocket, which adds functionality and style to your shoulder bag. Begin by preparing the pocket pieces as indicated in the pattern. You’ll have a pocket lining piece and a section of the bag lining where the zipper will be inserted.
Start by marking the zipper opening on the bag lining. Stitch around this rectangular outline, then carefully cut a slit through the center, clipping close to the corners. Fold the edges to the inside and press them flat. Place the zipper underneath this opening and pin it securely. Using a zipper foot on your sewing machine, topstitch neatly around the opening. This creates a clean, professional finish.
Next, place the pocket lining piece behind the zipper and stitch around all four edges, enclosing the pocket. When done, you’ll have a secure zippered pocket that’s perfect for holding keys, cards, or other small items. It’s one of those simple touches that make your DIY shoulder bag both practical and stylish.
If you’re new to installing zippers, take your time. Practice on scrap fabric first to get comfortable with the process. A well-sewn zipper will not only function smoothly but also enhance the appearance of your Shoulder Bag With One Inner Zippered Pocket – Free Pattern.
Once the pocket is complete, you can move on to assembling the main bag body. This part comes together quickly, and seeing your work take shape is incredibly satisfying.
After completing the pocket, it’s time to sew the outer and inner layers of your shoulder bag. Start by stitching the outer fabric pieces together, following the seam allowances indicated in the bag sewing pattern. Reinforce the bottom corners with extra stitching to ensure durability.
Next, assemble the lining, remembering that it already contains your zippered pocket. Leave a small opening at the bottom of the lining—this will allow you to turn the bag right side out later. Once both layers are ready, place the lining inside the outer bag, with right sides facing each other. Align the seams and top edges, then sew around the upper edge.
Turn the bag right side out through the opening in the lining. After adjusting the corners, press the edges flat and topstitch along the top for a polished finish. Finally, sew the opening in the lining closed with a small, invisible stitch.
For the strap, use the same outer fabric or a matching color. Reinforce it with interfacing if needed, then attach it securely using metal rings or by sewing it directly to the bag body. Test the strap’s strength before use—this ensures your bag can handle everyday weight comfortably.
Once complete, your DIY shoulder bag with one inner zippered pocket is ready to use! The final result is a stylish, functional, and handmade accessory that reflects your craftsmanship and creativity.
1. Is this pattern suitable for beginners?
Yes! The Shoulder Bag With One Inner Zippered Pocket – Free Pattern is perfect for beginners. It includes basic sewing techniques and a simple zipper installation.
2. What fabric is best for this bag?
Medium-weight fabrics like canvas, cotton, or denim work best for durability. For a dressier version, try faux leather or linen blends.
3. Can I resize the pattern?
Absolutely! You can enlarge or shrink the pieces to make a tote, clutch, or crossbody version. Just remember to adjust the strap length and zipper size accordingly.
4. Do I need a sewing machine for this project?
While you can sew by hand, a machine will give cleaner seams and make the zippered pocket easier to install.
5. How long does it take to complete the bag?
Most crafters can finish it in 3–4 hours, depending on experience and customization choices.
6. Can I add more pockets?
Yes! You can add extra inner or outer pockets using the same technique described for the zippered pocket.
Creating a Shoulder Bag With One Inner Zippered Pocket – Free Pattern is an enjoyable and rewarding sewing project for all skill levels. You’ve learned how to choose materials, cut and prepare your pieces, install a functional zippered pocket, and assemble the entire bag. The end result is a durable, stylish, and completely customizable accessory that you can proudly use or gift to someone special.
If you followed along with this tutorial, we’d love to hear your thoughts! Share your honest opinion, suggestions, or creative variations in the comments. Your feedback helps inspire others to start their own DIY shoulder bag journey and make sewing even more fun for everyone.


