
Hunter's Star Quilt Block - Quick & Easy Tutorial

The Scrappy Acorn Quilt Block Tutorial is a fun and creative way to incorporate an autumn theme into your quilting projects. Whether you’re a seasoned quilter or just beginning, this block offers an opportunity to experiment with different fabrics while creating a lovely, seasonal design.
With its rustic charm, the scrappy acorn quilt block is a wonderful addition to any quilt, especially for fall-themed projects, gifts, or home décor. In this guide, we’ll take you step-by-step through the process of creating this block, making it easy to follow for quilters of all skill levels.
Quilting with a “scrappy” style means using various leftover fabric scraps to create a cohesive and beautiful design. This approach allows you to get creative, mix and match different colors and patterns, and make the most out of your fabric stash.
The acorn block, with its organic, earthy shape, is ideal for this style. The tutorial below will walk you through selecting fabrics, cutting pieces, and assembling the block with precision.
By the end of this tutorial, you’ll have a beautiful, scrappy acorn block that you can proudly incorporate into your larger quilt projects.
Whether you’re making a whole scrappy acorn quilt or just a few blocks for a seasonal throw or cushion, this project is sure to be a favorite. Let’s get started with everything you need to know to make the scrappy acorn quilt block.
Before diving into your scrappy acorn quilt block tutorial, gather the following materials to ensure your project runs smoothly. Having the right tools and fabrics will make all the difference in creating a beautiful finished block. Here’s what you’ll need:
Once you have these materials, you are ready to begin cutting, sewing, and assembling your scrappy acorn quilt block. The beauty of this block lies in its versatility – you can use whatever scraps you have on hand, and the end result will still be beautiful.
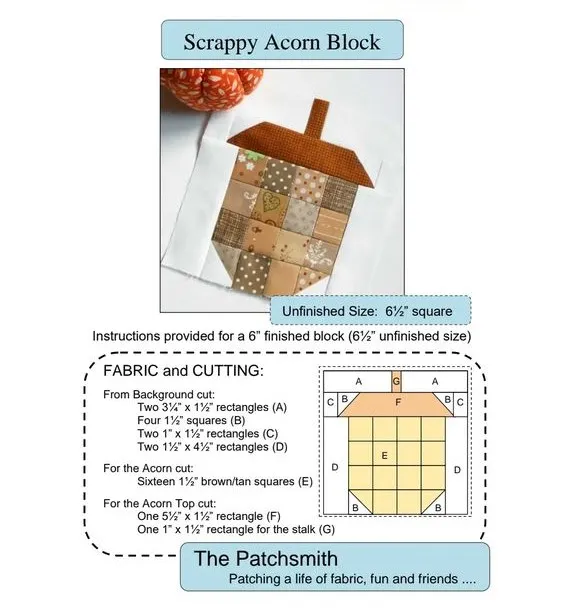
The first step in the scrappy acorn quilt block tutorial is cutting your fabric pieces. You’ll be creating different sections for the acorn’s cap, body, and the background. The scrappy element comes in with the body of the acorn, where you can mix and match different fabric scraps. Here’s how to cut your pieces:
The acorn cap is the top part of the acorn, and it can be made from a darker fabric to give it a natural, realistic look. Cut two pieces in the shape of a rounded triangle (or an oval) for the cap. Aim for about 4.5 inches in width and 3.5 inches in height, but feel free to adjust depending on the size of your quilt block.
For the body of the acorn, you’ll be using multiple fabric scraps. Choose light to medium brown fabrics that reflect the warm colors of fall. Cut your scraps into 2.5-inch strips. You will need at least four strips, each measuring 2.5 inches by 2.5 inches. These will be sewn together to form the scrappy body of the acorn.
The background fabric can be a neutral color, such as light beige, cream, or even a soft pastel, depending on your quilt’s overall look. Cut four pieces for the background, each 5.5 inches by 5.5 inches. These will surround the acorn block and provide a clean frame for your design.
To add the finishing touch to your acorn, you’ll need a small piece of brown fabric for the stem. Cut a 1-inch by 2.5-inch piece. This will be sewn at the top of the acorn cap.
Now that all your fabric pieces are cut, it’s time to assemble the scrappy acorn quilt block. This process involves piecing the fabrics together, sewing, and ironing the seams flat for a polished look.
Start by taking your 2.5-inch fabric strips and arranging them in a way that you like. You can alternate colors and patterns to make the scrappy body of the acorn visually interesting. Sew the strips together, one by one, using a quarter-inch seam allowance. Press each seam as you go to ensure the fabric lies flat.
Once all your strips are sewn together, you’ll have a rectangle that will serve as the base of your acorn’s body. Trim the edges to ensure they are straight, and set the block aside.
Take your acorn cap pieces and sew them together along the edges, right sides facing each other. Use a quarter-inch seam allowance to ensure a snug fit. Once sewn, turn the cap right side out and press it flat.
Now, sew the acorn cap onto the top of the body, aligning the edges. If necessary, trim the cap’s edges to fit the body. Press the seam with your iron to set the stitches.
Sew the small stem piece onto the top center of the acorn cap. Use a small seam allowance to keep the stem in place, and make sure to press it for a crisp finish.
Now, take the background fabric pieces and sew them onto the sides and bottom of the acorn block. First, sew the left and right pieces to the sides, and then attach the top and bottom pieces. Use a quarter-inch seam allowance to join these pieces.
Once the background is attached, press all seams flat, and give the entire block a final press to make sure everything is neatly aligned.
While this scrappy acorn quilt block tutorial gives you the basic steps for a simple acorn design, there are many creative ways to personalize your block. Here are some ideas to consider:
The scrappy nature of this block also means that no two acorns will ever look the same. Mix and match fabric scraps from your stash for a truly unique design each time.
Q: What fabrics work best for the scrappy acorn block?
A: Cotton fabrics work best for quilting. For a fall theme, use browns, oranges, yellows, and greens for the acorn body, and darker fabrics for the cap.
Q: Can I make this block without a sewing machine?
A: Yes! You can hand sew the block, but using a sewing machine will make the process faster and the seams more even.
Q: How do I quilt the block once it’s finished?
A: After finishing your block, you can quilt it by adding batting and backing fabric. Use hand quilting or machine quilting techniques to stitch through all three layers.
Q: Can I make other quilt blocks with this same pattern?
A: Absolutely! You can create an entire quilt using the scrappy acorn quilt block or incorporate them into a larger quilt design.
Q: How do I ensure my seams are accurate?
A: Using a quarter-inch seam allowance is crucial for accurate piecing. Make sure to press each seam flat as you go.
Q: What should I do if my block isn’t perfectly square?
A: Gently trim the edges to ensure the block is square, but don’t worry if it’s a little off. The scrappy nature of the design is meant to have some imperfection!
In this Scrappy Acorn Quilt Block Tutorial, we explored how to create a charming, fall-inspired quilt block using fabric scraps. With its delightful shape and colorful options, the acorn block is a perfect addition to any quilt.


