
Hunter's Star Quilt Block - Quick & Easy Tutorial

If you are looking to improve your quilting skills or embark on a new sewing project, the Schoolhouse Block Tutorial is the perfect guide for you.
This tutorial will help beginners and experienced quilters alike to understand every step of creating a beautiful schoolhouse quilt block.
Using this tutorial, you can bring a nostalgic charm to your quilts, while mastering essential quilting techniques. The Schoolhouse Block is a classic pattern loved by many for its versatility and simplicity, making it an excellent addition to any quilt project.
Learning to make the Schoolhouse Block is more than just following a pattern—it’s about understanding fabric choices, sewing techniques, and design layout.
The block’s structure allows for creative expression while maintaining a traditional aesthetic. Whether you want to make a single block or a complete quilt, this tutorial will guide you through each step with clear instructions and helpful tips. By the end of this tutorial, you will be confident in creating a polished, professional-looking schoolhouse block.
This Schoolhouse Block Tutorial also focuses on important quilting principles like seam allowances, pressing, and accurate cutting. These skills will not only improve your ability to make this particular block but also enhance your overall quilting craftsmanship. Following this tutorial closely ensures that your blocks align perfectly, creating a visually appealing quilt. Let’s dive into the detailed steps of making your very own schoolhouse block and explore tips to make your quilting experience enjoyable and successful.
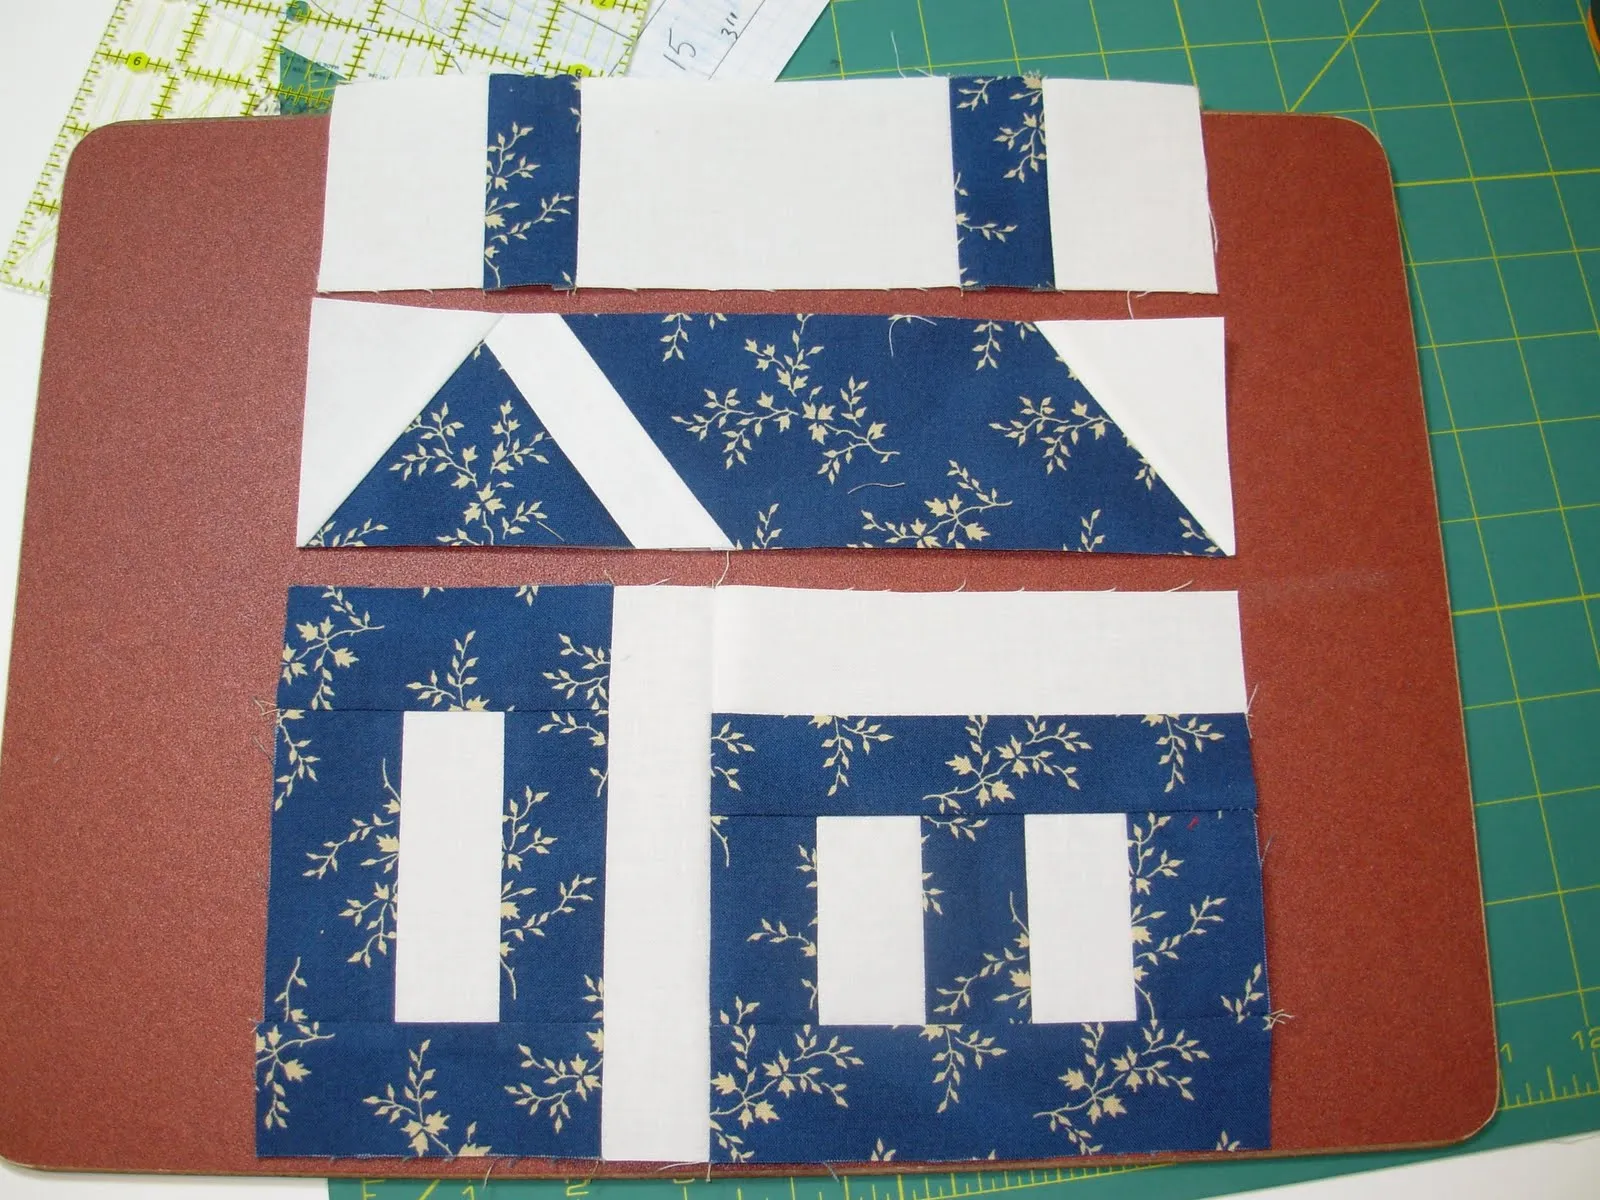
The first step in any Schoolhouse Block Tutorial is understanding the design itself. The schoolhouse block typically consists of a square base representing the building, a roof triangle, and sometimes a small door or window feature. Knowing these components helps you plan your fabric choices and cutting process efficiently.
Choosing the right fabric is crucial. Traditional schoolhouse blocks often use bright colors for the building and neutral shades for the roof. This contrast makes the block visually appealing. Modern variations allow for creative combinations, but sticking to a color scheme that complements your overall quilt design is essential.
Another aspect of the design is the size of the block. Standard blocks are often 12 inches by 12 inches, but you can scale the pattern according to your quilt dimensions. Ensure all pieces are cut accurately to maintain symmetry. Precision in cutting will make your sewing process smoother and help your finished block look professional.
When planning the block layout, consider the placement of seams. Proper alignment of seams ensures that your schoolhouse block maintains its rectangular and triangular shapes. Misaligned seams can distort the block and make assembly with other blocks challenging.
Understanding the design also involves knowing the traditional and modern variations of the schoolhouse block. Some variations include multiple windows or a different roof style, which can add character to your quilt. This flexibility allows quilters to adapt the block to their personal style or project needs.
Lastly, it’s important to study completed schoolhouse blocks to understand proportion and color balance. Observing how experienced quilters combine fabrics and construct blocks can provide inspiration and help avoid common mistakes.
Before starting your Schoolhouse Block Tutorial, gather all necessary materials and tools. The main materials include fabric, thread, and batting, along with basic quilting tools. Using quality materials enhances the final appearance and durability of your block.
Fabric selection should include a main color for the building, a contrasting color for the roof, and optional accent fabrics for windows or doors. Cotton fabric is ideal for quilting due to its stability and ease of handling. Avoid fabrics that are too stretchy, as they can distort the block shape.
Thread choice is another important consideration. Use a high-quality cotton or polyester thread that matches or complements your fabric. This ensures strong seams and a clean finish. Low-quality thread can break during sewing, causing frustration and inconsistent stitching.
The tools needed include a rotary cutter, cutting mat, quilting ruler, sewing machine, pins, and an iron. Accurate cutting and pressing are essential for maintaining the correct shape of each piece. Proper tools make the process faster, safer, and more precise.
For beginners, consider using a small pressing mat or template for the roof triangle and base square. Templates help ensure each piece is cut to the exact dimensions specified in your schoolhouse block pattern, reducing errors during assembly.
Finally, make sure your workspace is organized and well-lit. A clear, comfortable space helps you focus on precise cutting and sewing. Organization also reduces fabric waste and makes the overall quilting process more enjoyable.
Creating a schoolhouse block involves a systematic sewing process. Start by cutting all your fabric pieces according to the pattern dimensions. Precision in cutting is key to a flawless block.
Begin with the roof triangle. Place the right sides of the fabric together and sew along the seam allowance. Press the seam carefully to one side to reduce bulk and maintain a crisp edge. Accurate pressing ensures your block will fit seamlessly with other blocks in a quilt.
Next, attach the roof to the building square. Align the edges carefully and sew with a consistent seam allowance. Press the seam toward the roof to keep the block flat. This step is crucial for maintaining the block’s classic rectangular and triangular shape.
If your schoolhouse block includes additional elements like a door or window, attach these pieces at this stage. Small appliqué techniques or piecing methods can be used depending on your design preference. Take your time to ensure proper alignment and neat stitching.
After all pieces are assembled, check the block dimensions. Trim any excess fabric to ensure the block is uniform and square. Accurate trimming is essential if you plan to combine multiple schoolhouse blocks in a quilt.
Finally, press the completed block carefully. Use a gentle steam setting to remove any creases without distorting the fabric. A well-pressed block not only looks professional but also lays flat when combined with other blocks in your quilt.
Perfecting the schoolhouse block takes practice, attention to detail, and patience. One of the most important tips is to maintain consistent seam allowances throughout the construction process. Consistency ensures all blocks align perfectly when joined in a quilt.
Another tip is to cut fabric pieces slightly larger than the pattern dimensions. This allows for minor adjustments during assembly and reduces the risk of errors caused by small cutting inconsistencies.
Pressing seams properly cannot be overstated. Always press seams in the direction recommended in your tutorial to avoid bulk and puckering. Use a pressing cloth for delicate fabrics to prevent damage.
Consider using pins or fabric clips to hold pieces in place before sewing. This prevents shifting during stitching and helps maintain precise alignment. Careful pinning can save time on corrections later.
When adding small details like windows or doors, use a contrasting color that complements the main block. This enhances visual interest and makes the schoolhouse block stand out in your quilt design.
Finally, practice patience. Quilting is as much about the process as the result. Taking your time with each step ensures accuracy and allows you to enjoy creating a beautiful, lasting schoolhouse block.
Q1: What fabrics are best for a schoolhouse block?
A1: Cotton fabrics are ideal due to their stability and ease of handling. Choose a main color for the building and a contrasting color for the roof. Avoid stretchy fabrics to maintain block shape.
Q2: Can beginners make a schoolhouse block?
A2: Absolutely. This tutorial is suitable for beginners. Following step-by-step instructions and using precise cutting and pressing techniques makes it manageable.
Q3: How big should a schoolhouse block be?
A3: Standard sizes are typically 12×12 inches, but you can scale the block according to your quilt project. Just maintain proportion in all pieces.
Q4: How do I prevent seams from puckering?
A4: Maintain consistent seam allowances and press seams carefully. Use pins or clips to hold pieces in place before sewing.
Q5: Can I add extra details to my block?
A5: Yes, small details like windows, doors, or decorative appliqué can be added. Choose colors that complement your main block for visual appeal.
Q6: How do I combine multiple schoolhouse blocks?
A6: Ensure all blocks are trimmed accurately and pressed flat. Consistent seam allowances help blocks align perfectly in a quilt layout.
The Schoolhouse Block Tutorial provides a comprehensive guide to creating a timeless quilt block that combines charm, tradition, and creativity. By understanding the design, selecting the right materials, following a detailed construction process, and applying helpful tips, you can create a polished and professional schoolhouse block. This tutorial also teaches essential quilting skills that enhance your overall crafting ability.
We hope this guide inspires you to try making your own schoolhouse block. Leave your honest feedback and suggestions for improvements. Sharing your experience helps other quilters and encourages continuous learning within the quilting community.


