
Recycling jeans into beautiful aprons is one of the most creative and sustainable sewing projects you can try. Instead of throwing away old denim, you can transform it into stylish, functional, and long-lasting DIY aprons that are perfect for cooking, gardening, crafting, or even as handmade gifts.
Denim is a durable and easy-to-work-with fabric, making it ideal for beginners and experienced crafters alike. With a simple jeans apron pattern, you can give new life to old clothes while reducing waste and embracing sustainable fashion practices.
This guide will teach you everything you need to know about turning your jeans into a beautiful upcycled apron in a fast, creative, and rewarding way.
Denim has always been loved for its strength and timeless look. When you repurpose jeans into aprons, you’re not only saving fabric from ending up in landfills but also creating something useful that reflects your personal style.
You can experiment with pockets, stitching, embroidery, and different design accents to make each apron unique. Whether your old jeans are light or dark wash, ripped, or faded, they can all be used in this fun DIY apron project. The goal is to turn something worn-out into something you’ll love and use for years to come.
This process of recycling jeans also introduces you to the concept of upcycling, which is all about creatively reusing materials. Unlike recycling, which breaks materials down into raw form, upcycling keeps the original material’s strength and charm intact. Each apron tells a story—it’s made from jeans that once traveled through your life, and now they’re reborn as something functional and stylish. By the end of this guide, you’ll not only have a beautiful apron but also a deeper appreciation for sustainable crafting and thoughtful consumption.
Materials and Tools You’ll Need
Before you start your DIY jeans apron, gather all the necessary materials to ensure a smooth crafting process. The star of this project, of course, is a pair of old jeans. Choose a pair that’s still sturdy enough to sew—denim that’s too thin or frayed may not hold up well. Both men’s and women’s jeans work perfectly, though you might prefer jeans with wider legs if you want a larger apron. The denim color doesn’t matter much; faded, dark, or patterned jeans will each give your apron a unique look.
You’ll also need some basic sewing tools: scissors or a rotary cutter, sewing pins, a ruler, chalk or fabric marker, a seam ripper, and a needle and thread (or a sewing machine for faster work). A sturdy needle is recommended since denim is thick and can be tough to stitch through. If you’re planning to line the apron or add pockets, you can use coordinating fabrics—cotton, linen, or leftover scraps work beautifully. Adding a lining gives your upcycled apron more structure and durability.
Other optional materials include bias tape or ribbon for edging, buttons, decorative patches, or embroidery thread for personalization. Many people also add adjustable straps or metal rings for comfort and flexibility, especially if they plan to use their jeans apron pattern regularly. Make sure to wash and iron your jeans before cutting; this removes dirt, softens the fabric, and ensures your apron has a clean finish. Once your materials are ready, you’re set to begin the transformation from jeans to a beautiful handmade apron that’s both stylish and functional.
Step-by-Step: Turning Jeans into a Beautiful Apron
To begin your recycling jeans project, lay the jeans flat on a clean surface and decide which parts you want to use. The legs of the jeans are perfect for the main apron body, while the back pockets can be reused for extra storage on the front. Cut along the inner seam of both legs and open the denim panels completely. Depending on the jeans’ size, you can use one leg for a half-apron or both for a full-body apron.
Next, shape the top edge of the apron by trimming it into a gentle curve. For a full apron, you can keep part of the waistband to create a natural top edge. Once the basic shape is ready, hem all the raw edges by folding them under twice and stitching neatly. This step not only gives your DIY apron a professional finish but also prevents fraying and adds durability. If you’re using a sewing machine, go slowly and use a denim needle for clean, even stitches.
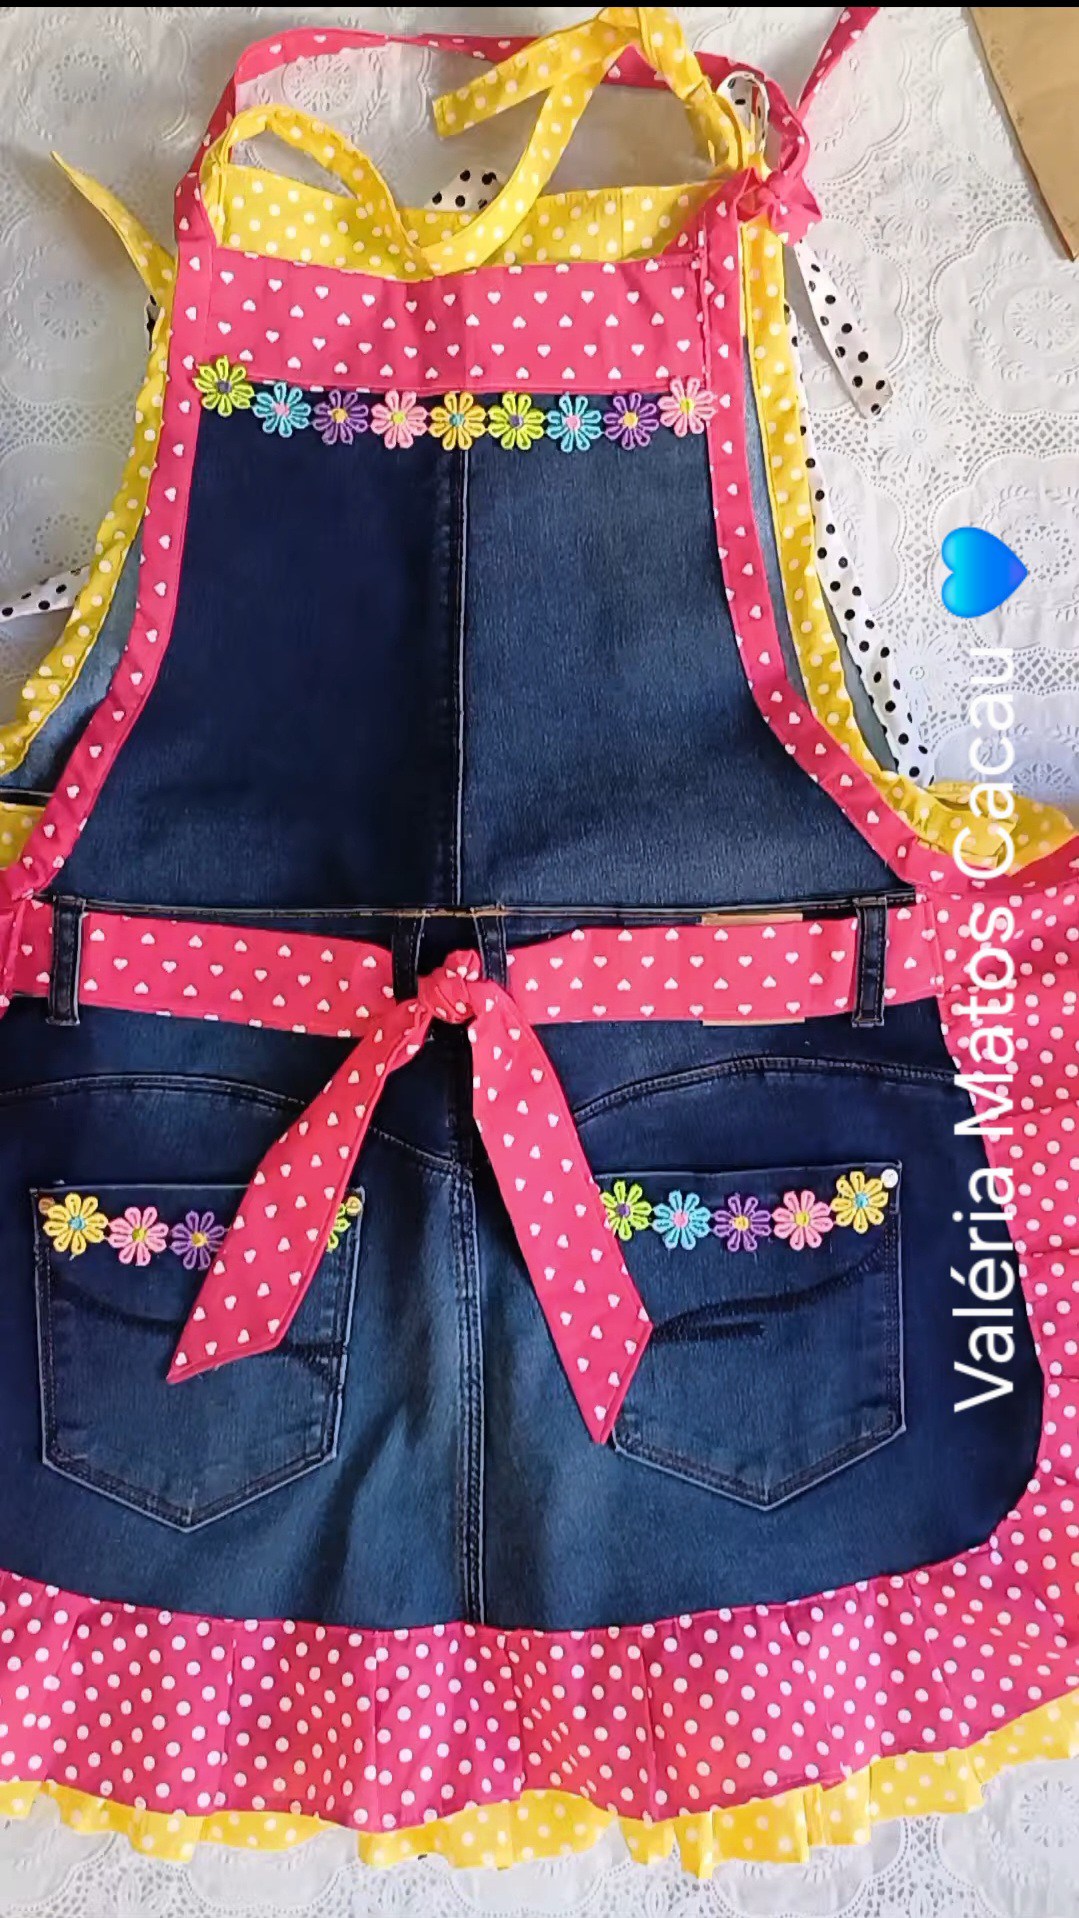
Now comes the fun part—adding personality to your beautiful apron. Sew on the back pockets from the jeans onto the front of the apron for instant storage. You can also use leftover scraps to create custom pockets in different shapes or colors. For the straps, cut long strips from the jeans’ legs or use ribbons, twill tape, or bias binding. Attach one strap to each side of the waist and another behind the neck (for a bib-style apron). Adjust the lengths to ensure a comfortable fit.
To make your apron truly stand out, you can embellish it. Add embroidery, lace trims, or patches for a rustic and charming appearance. Decorative stitching in contrasting thread colors can make the edges pop. You can even sew on buttons or fabric appliqués that reflect your personality or kitchen theme. Once all decorations are done, give your apron a final press with an iron. Congratulations—you’ve successfully completed a jeans apron pattern and turned something old into something new and stylish!
Creative Customization Ideas
One of the best parts of recycling jeans into aprons is the endless room for creativity. Since denim is sturdy and versatile, it can handle all kinds of custom touches without losing its structure. Adding colorful patches or embroidery can instantly upgrade your DIY apron from simple to statement-making. Try stitching floral designs, geometric shapes, or even your initials to personalize it. Embroidery adds a handmade touch that transforms your apron into wearable art.
You can also mix fabrics for contrast. Pair denim with printed cotton or linen for the straps or pocket linings. If you have leftover fabric scraps from other projects, now’s the perfect time to use them. Using complementary patterns—such as polka dots or gingham—adds personality and charm to your upcycled apron. The combination of textures and colors creates a modern and artistic piece that’s perfect for gifting or showing off in your kitchen.
Adding practical features makes your beautiful apron even more functional. Consider sewing a loop on the side for hanging utensils or kitchen towels. You can also design deeper pockets for holding tools, gardening gloves, or craft supplies. Adjustable straps, buckles, or D-rings make the apron more versatile, ensuring it fits comfortably on anyone. For extra durability, reinforce areas that endure the most stress, such as pocket edges and strap joins, with double stitching.
If you enjoy eco-friendly crafts, go one step further and dye your denim naturally using coffee, tea, or fabric-safe dyes before sewing. This not only refreshes faded jeans but gives your DIY apron a unique, vintage look. Add hand-painted designs with fabric paint or stencils for another artistic twist. Each customization makes your apron one-of-a-kind and gives you a sense of accomplishment every time you wear it.
Tips, Tricks, and Common Mistakes to Avoid
Working with denim requires patience and precision. One common mistake beginners make when recycling jeans is skipping pre-washing. Always wash and iron the fabric before sewing to remove any stretch or shrinkage that may occur later. Using dull scissors or incorrect needles can also make sewing difficult. Always opt for sharp fabric scissors and a denim or heavy-duty needle to ensure clean cuts and smooth stitches.
Another tip is to plan your jeans apron pattern layout carefully before cutting. Denim doesn’t stretch much, so accuracy is crucial. Mark your lines with chalk and double-check measurements to avoid waste. When sewing thick seams, like the waistband area, go slowly and adjust your presser foot tension if needed. If your sewing machine struggles, use a handwheel to guide the needle through tough spots.
Avoid over-decorating, which can make your apron too heavy or cluttered. Balance practicality and design—focus on adding a few eye-catching elements instead of overwhelming the piece. Also, ensure straps are long enough for comfortable tying. If you’re a beginner, start with a simple DIY apron and experiment with details as you gain confidence.
Finally, don’t be afraid of imperfections. Handmade items are meant to show character and love. Slightly uneven stitches or quirky design choices only add to your apron’s charm. The most important thing is that your beautiful apron reflects your creativity and personal touch, making it something you’ll enjoy using for years to come.
FAQ – Recycling Jeans into Beautiful Aprons
Q1: Can I make an apron from any type of jeans?
Yes! Almost any denim can be used, though mid-weight jeans are easiest to cut and sew.
Q2: Do I need a sewing machine?
No. You can hand-stitch your DIY apron, though a sewing machine makes the process faster.
Q3: How long does it take to make a jeans apron?
Typically, between 1–2 hours, depending on how detailed your jeans apron pattern is.
Q4: Can I sell my upcycled aprons?
Absolutely! Handmade beautiful aprons are popular in craft markets and online shops.
Q5: Can children help with this project?
Yes, with supervision. They can help cut fabric or design decorations safely.
Q6: How do I wash my denim apron?
Wash gently in cold water and air dry to preserve the fabric’s quality and color.
Conclusion
Recycling jeans into beautiful aprons is more than just a craft—it’s a statement about sustainability, creativity, and personal expression. This simple DIY apron project turns old, unused clothing into something useful and stylish. With just a few materials and imagination, you can follow a jeans apron pattern and create a personalized kitchen or crafting accessory that reflects your unique style.
Whether you keep it for yourself or gift it to someone special, your upcycled apron will be both practical and meaningful. Every stitch you make helps reduce waste and supports a more sustainable world. We hope this guide inspires you to give your old jeans a new life!
VIDEO TUTORIAL
Share your thoughts, leave a sincere opinion, and tell us how your project turned out. Your creativity makes the world a little brighter—one beautiful apron at a time.