
Hunter's Star Quilt Block - Quick & Easy Tutorial

The Quilt Block Tutorial: Red & White Checkerboard Frame is a perfect starting point for quilters who want to combine simplicity with striking visual appeal.
The red and white color combination has long been a favorite in the quilting world, symbolizing warmth, creativity, and timeless elegance. This pattern captures that charm while also being beginner-friendly, allowing anyone—from first-time quilters to experienced crafters—to create a stunning piece of art.
In this tutorial, we’ll explore how to design, cut, and assemble your checkerboard frame quilt block, step by step. You’ll learn the techniques needed to ensure clean seams, balanced proportions, and precise alignment—essential elements in creating a visually pleasing quilt block.
By the end of this guide, you’ll have a full understanding of how to master the red and white checkerboard look and adapt it for your own quilting projects.
Quilting is more than just stitching pieces of fabric together—it’s an expression of artistry and patience. The Red & White Checkerboard Frame quilt block is a fantastic example of how color contrast and pattern repetition can create depth and movement within a simple design. Whether you plan to use this block as part of a full quilt, a decorative pillow, or a wall hanging, the end result will always be uniquely yours.
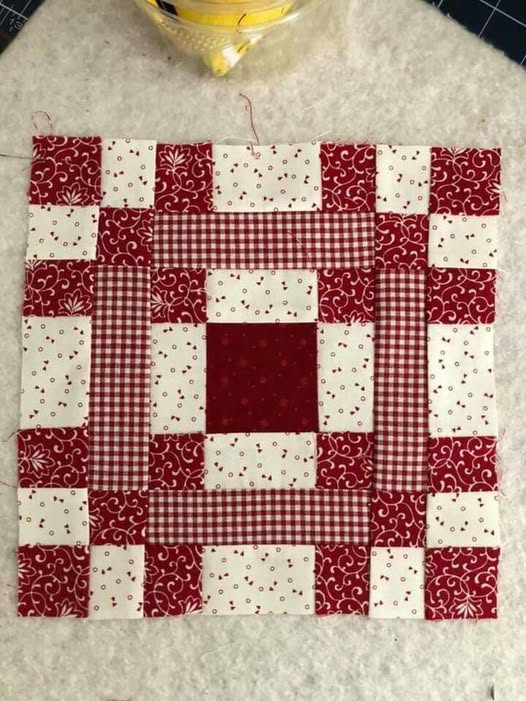
Before you start cutting fabric, it’s important to understand the structure of the checkerboard frame quilt block. This block features alternating red and white squares arranged in a grid pattern that frames a central focal point. The simplicity of this layout makes it easy to adjust the size and design while still maintaining its classic appeal.
One of the most charming aspects of this pattern is its color contrast. The bold red against the clean white background creates a crisp, eye-catching effect that immediately draws attention. The red symbolizes passion and energy, while the white represents purity and balance—making this combination both traditional and visually powerful.
You can create variations of this design by experimenting with different shades of red or substituting white with cream or light gray tones. The checkerboard frame structure remains versatile enough to accommodate personal creativity without losing its defining style.
When planning your layout, remember to maintain even spacing and accurate seam allowances. Precision is crucial for the checkerboard effect to appear symmetrical and professional. Using a rotary cutter, ruler, and cutting mat will help you achieve the clean lines necessary for a flawless quilt block.
Another important factor is fabric selection. Choose high-quality cotton fabrics that have minimal stretch, ensuring your squares retain their shape throughout the sewing process. Prewashing your fabric before cutting can also prevent color bleeding and shrinkage later.
Lastly, consider your quilt’s overall design. The Red & White Checkerboard Frame block can be repeated to form a cohesive quilt, or combined with other blocks to add texture and dimension. Its balance and simplicity make it a wonderful addition to both modern and vintage quilt styles.
To make a Red & White Checkerboard Frame block, you’ll need a few essential tools and materials. Proper preparation is key to achieving accurate results and ensuring your quilting experience is enjoyable from start to finish.
Start by gathering your fabrics: a bright red cotton and a crisp white cotton. For one block, cut equal numbers of 2½-inch squares from each color. You’ll also need a center square—this can be a patterned or solid fabric, depending on your preference.
Here’s a basic materials list:
After cutting, arrange your pieces on a flat surface to visualize the checkerboard frame design. This step helps you confirm the color placement before stitching. A small design board or photo reference can assist in maintaining consistency if you’re creating multiple blocks.
Accuracy is essential. When cutting, ensure your ruler is aligned perfectly with the fabric grain to avoid skewed edges. Consistent sizing will make your assembly process smoother and result in cleaner joins between each square.
Ironing your pieces after cutting is another key step. Pressing—not ironing back and forth—helps set the seams and keep edges crisp. Press seams toward the darker fabric (in this case, red) to prevent shadowing through the lighter sections.
Finally, organize your pieces by rows before you start sewing. This simple step saves time and prevents mix-ups during assembly. Keeping your workspace tidy allows you to focus entirely on the creative process without unnecessary interruptions.
Now comes the most rewarding part: assembling your Quilt Block Tutorial: Red & White Checkerboard Frame. Begin by sewing together the small red and white squares in rows, alternating colors to achieve the checkerboard effect. Use a ¼-inch seam allowance for consistent and professional results.
After stitching each row, press the seams carefully in opposite directions—this technique ensures that your intersections align neatly when the rows are joined. Proper pressing can make a dramatic difference in how polished your final block looks.
Once all rows are sewn, begin attaching them one by one, ensuring the color sequence alternates correctly across both directions. The central square should be framed evenly on all sides by your red and white pieces, forming the signature checkerboard frame.
For quilters who enjoy precision, chain piecing is a great method to speed up the process while maintaining accuracy. This technique involves feeding multiple fabric pairs through the sewing machine consecutively, saving both time and thread.
As you assemble the frame, periodically measure your block to confirm that it remains square. If any sides appear uneven, gently trim them to restore the correct dimensions. Remember that slight inaccuracies can compound when assembling multiple blocks into a larger quilt.
When the sewing is complete, give the finished block a final press. Admire the clean lines, balanced symmetry, and vivid color contrast of your completed Red & White Checkerboard Frame. It’s a beautiful and versatile block that can stand alone or form part of a more intricate design.
Once you’ve mastered the basics of this quilt block tutorial, it’s time to get creative. The Red & White Checkerboard Frame pattern is incredibly adaptable—you can use it to craft a variety of quilted items beyond traditional bed quilts.
One popular option is transforming your block into a decorative pillow cover. By adding a simple fabric border and backing, you can create a charming accent piece that brightens up any room.
Another great use is in table runners or placemats. The bold contrast of red and white instantly adds a festive touch to your dining space, especially during holidays like Christmas or Valentine’s Day.
For larger projects, consider alternating the checkerboard blocks with solid or patterned blocks to create visual balance across the entire quilt top. This method provides rhythm and variety while maintaining cohesion through consistent color choices.
You can also experiment with scale. Try using smaller squares for a more intricate look or larger ones for a bold, modern effect. Changing the size of your squares is a simple way to refresh the pattern without redesigning it completely.
Finally, embellish your finished quilt with decorative stitching, embroidery, or appliqué. These details add personality and depth, turning your Red & White Checkerboard Frame into a true work of art.
1. Is this pattern suitable for beginners?
Yes! The Red & White Checkerboard Frame quilt block is beginner-friendly. It uses simple straight-line sewing and easy-to-cut squares, making it perfect for learning precision and color coordination.
2. What size should each square be?
A common size is 2½ inches, but you can adjust depending on your desired block dimensions. Smaller squares create a more detailed look, while larger ones give a bold, graphic feel.
3. How can I prevent fabric from shrinking or colors from bleeding?
Prewash all fabrics before cutting, especially red tones. This prevents bleeding and ensures that your finished block maintains its color and size after washing.
4. Can I use different colors instead of red and white?
Absolutely! The checkerboard frame design works beautifully with other color combinations—try navy and cream, black and gold, or pastel shades for a softer touch.
5. How do I make sure my seams align correctly?
Press seams in opposite directions for adjoining rows. When joining rows, the seams will “nest,” helping you achieve perfect intersections.
Creating a Red & White Checkerboard Frame quilt block is both rewarding and inspiring. This classic pattern combines simplicity with visual impact, making it an excellent project for quilters of all skill levels. By following the steps in this quilt block tutorial, you’ll learn the essentials of fabric cutting, seam alignment, and block assembly while exploring your creative expression through color and design.
Whether you use this block in a full quilt or as a standalone piece, it will always stand out with its timeless beauty. Now that you’ve mastered the technique, share your results and let your creativity flourish.
Leave your honest opinion and suggestions below—I’d love to hear how your checkerboard frame project turned out!


