
Hunter's Star Quilt Block - Quick & Easy Tutorial

If you’re looking for a practical and stylish way to carry your groceries, personal items, or daily essentials, a large shopping bag is the perfect solution.
This quick and simple bag project allows you to create a DIY shopping bag that is not only roomy but also durable and reusable.
With a well-planned sewing tutorial, you can customize the size, fabric, and features to suit your everyday needs. Having a roomy tote bag means you can carry more without compromising on comfort or style.
Creating a large shopping bag is both fun and rewarding. Unlike store-bought bags, a DIY shopping bag lets you choose the materials, colors, and design, making it a personalized accessory.
This quick and simple bag is designed to be beginner-friendly, ensuring that even those new to sewing can complete the project successfully. The process is straightforward, and the end result is a functional and versatile bag.
The beauty of a roomy tote bag lies in its practicality. You can use it for shopping trips, beach days, or as a carry-all for crafts and hobbies. With the guidance of a sewing tutorial, you’ll learn not only how to construct a durable bag but also techniques to enhance its structure and appearance. By the end of this project, you’ll have a bag that combines functionality, style, and your personal touch.
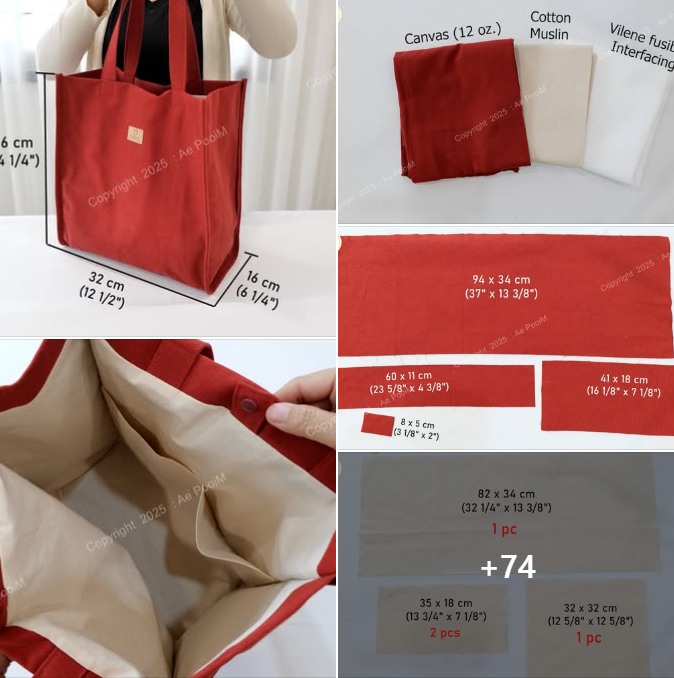
Selecting the right materials is the first step in creating a large shopping bag. The fabric should be durable enough to hold heavier items while still being flexible and easy to sew. Canvas, denim, or heavy-duty cotton are excellent choices for a DIY shopping bag.
A quick and simple bag benefits from sturdy straps or handles. Webbing or reinforced fabric can be used to ensure the bag can carry weight without tearing. The sewing tutorial will guide you on the placement and attachment of handles to maximize strength and comfort.
Consider lining your roomy tote bag with a complementary fabric. Linings not only enhance durability but also give the bag a professional finish. Lightweight cotton or polyester works well for lining and prevents smaller items from getting lost inside.
Color choice and pattern can add personality to your DIY shopping bag. Bold prints or bright colors can make a statement, while neutral tones offer versatility. Combining different fabrics for the body and lining can elevate the aesthetic appeal of your quick and simple bag.
Accessories like zippers, buttons, or magnetic snaps can add extra functionality. For example, a zipper closure ensures items remain secure, making your roomy tote bag more practical for everyday use.
Finally, consider reinforcement techniques. Double stitching seams or adding interfacing at the bottom of the bag helps the large shopping bag maintain its shape and carry heavier loads. Proper material selection is key to both durability and style.
Before starting your DIY shopping bag, it’s important to understand the bag design. A well-planned sewing tutorial ensures that each step is clear, reducing mistakes and ensuring a functional end product.
Review all components of your quick and simple bag. This includes the main body, handles, bottom panel, and any pockets or compartments. Knowing how these parts interact will make assembly easier and prevent frustration during sewing.
Patterns or measurements are essential. Even for a straightforward roomy tote bag, following accurate dimensions ensures consistency and functionality. Take the time to plan your layout and cut your fabric carefully.
Optional design features, such as interior or exterior pockets, can enhance usability. The sewing tutorial will guide placement and size, ensuring your DIY shopping bag is both practical and aesthetically pleasing.
Digital or printed guides are useful for beginners. They provide visual references and allow for adjustments, such as resizing or altering features, making your quick and simple bag fully customizable.
Finally, understanding the bag design allows you to add creative touches. Decorative stitching, contrasting fabric panels, or embroidery can make your large shopping bag uniquely yours while retaining its functionality.
Begin your large shopping bag by cutting all fabric pieces according to your measurements or pattern. Accuracy in cutting ensures your DIY shopping bag pieces align perfectly during assembly.
Start sewing the main body panels together, leaving the top open for handles. Reinforce seams, especially at corners and stress points, to make your quick and simple bag strong and durable.
Attach handles according to the sewing tutorial. Handles can be sewn inside or outside the bag, depending on your preference. Ensure they are secure, as these will bear the weight of your items.
Add the bottom panel, reinforcing the corners if necessary. A flat, reinforced base allows your roomy tote bag to stand upright and carry heavier objects without sagging.
Sew the lining into the bag, leaving a small opening for turning it right-side out. This gives your DIY shopping bag a polished interior and protects seams from wear.
Finally, topstitch the edges and close any openings used for turning. Add any finishing touches, like buttons, snaps, or decorative stitching, to complete your quick and simple bag with a professional look.
Customization makes your large shopping bag more functional and stylish. Adjust dimensions to create a bigger or smaller roomy tote bag depending on your needs.
Experiment with fabric textures and colors. Combining patterned and solid fabrics can create a visually appealing DIY shopping bag that reflects your personal style.
Add pockets or compartments for better organization. Small interior pockets are ideal for keys, wallets, or phones, enhancing the functionality of your quick and simple bag.
Consider reinforcing heavy-use areas. Double stitching the bottom or adding interfacing ensures that your roomy tote bag lasts longer and carries more items comfortably.
Decorative elements like embroidery, patches, or appliqué can add personality. These small touches elevate a simple DIY shopping bag into a unique accessory.
Finally, consider everyday uses. Your large shopping bag can be used for groceries, gym gear, crafts, or as a casual carry-all, making it a versatile addition to your collection. Proper customization enhances both style and utility.
Q1: Can beginners make this large shopping bag?
Yes! The quick and simple bag project is beginner-friendly, especially when following the sewing tutorial step by step.
Q2: What fabric is best for a durable bag?
Canvas, denim, or heavy-duty cotton works best. These materials provide strength and structure for a DIY shopping bag.
Q3: Can I make the bag larger or smaller?
Absolutely. Adjusting the dimensions allows you to create a custom-sized roomy tote bag suitable for your needs.
Q4: How do I reinforce handles for heavier items?
Use double stitching, webbing, or reinforced fabric. Ensure handles are securely sewn into stress points for durability.
Q5: Can I add pockets or compartments?
Yes! Pockets enhance functionality, providing storage for smaller items in your DIY shopping bag.
Q6: Is this bag suitable for everyday use?
Definitely. A large shopping bag is versatile for groceries, gym gear, crafts, or daily carry-all needs.
Creating a large shopping bag with room for lots of your things is a practical and rewarding project. By following this sewing tutorial, selecting the right materials, and customizing your DIY shopping bag, you can craft a functional and stylish quick and simple bag that suits your everyday needs. From reinforced handles to organized compartments, each feature enhances usability and durability.
We’ve covered material selection, understanding the bag design, step-by-step sewing instructions, and customization tips to ensure your roomy tote bag is perfect for any occasion. Now it’s your turn to create your own bag and share your honest feedback, tips, and suggestions. We’d love to hear how your large shopping bag turned out!


