
The Pumpkin Parade – Quilt Pattern is a delightful way to bring the warmth and charm of autumn into your home. This quilt pattern is perfect for both experienced quilters and beginners looking to create a cozy, seasonal project.
With its vibrant pumpkins and playful design, the Pumpkin Parade quilt pattern captures the spirit of fall, making it an ideal centerpiece for your home décor or a heartfelt handmade gift.
In this guide, we’ll walk you through creating this beautiful quilt, sharing tips and techniques that ensure your project turns out perfectly.
Quilting is more than just sewing—it’s an opportunity to express creativity, learn new techniques, and produce something functional and beautiful.
By following the Pumpkin Parade quilt pattern, you can make a quilt that’s visually stunning and comfortable, combining the joy of crafting with the satisfaction of completing a thoughtful project. The pattern’s design allows for customization, giving you the freedom to choose fabrics, colors, and sizes that fit your needs.
This DIY quilt project is also a wonderful way to spend quality time with family and friends. Working on a quilt together encourages creativity and patience, while also teaching valuable skills. Whether you are making a quilt for yourself, a loved one, or as part of a seasonal display, the Pumpkin Parade – Quilt Pattern ensures that your project will be both meaningful and visually striking.
Selecting the Perfect Fabrics
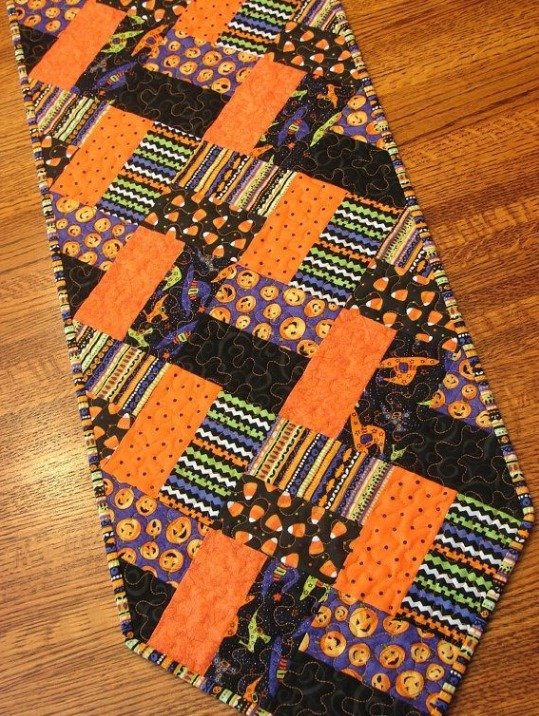
Choosing the right fabrics is key to bringing the Pumpkin Parade quilt pattern to life. Autumn-inspired colors such as orange, yellow, brown, and deep reds are ideal, as they evoke the essence of fall. Complementary neutral shades can balance the design and allow the pumpkins to stand out.
Quilting cotton is a popular choice for most projects because it’s easy to work with and maintains its shape after washing. Mixing solid fabrics with subtle prints or textures adds depth to the quilt and enhances the visual interest. The Pumpkin Parade quilt pattern allows for playful experimentation with patterns while keeping the overall design cohesive.
Pre-washing your fabrics is an important step to prevent shrinking and color bleeding. Ironing the fabrics beforehand ensures accurate cutting and precise seams, which are crucial for a polished finish. Following these preparation steps makes the quilting process smoother and more enjoyable.
Consider the weight and texture of your fabrics. Lightweight cotton is ideal for most quilts, but adding flannel or textured fabrics can create a warmer, cozier quilt. Pay attention to grainlines and directional prints to ensure proper alignment and a professional look.
Gather all necessary supplies before starting, including a rotary cutter, cutting mat, quilting ruler, thread, and pins. Having everything ready prevents interruptions and helps you maintain focus on your project.
Finally, lay out your fabric pieces according to the Pumpkin Parade quilt pattern before stitching. This allows you to visualize the final design and make adjustments for balance and harmony. Proper fabric planning sets the foundation for a beautiful finished quilt.
Cutting and Piecing the Quilt Top
Cutting and piecing the quilt top is the next essential step in the Pumpkin Parade – Quilt Pattern. Accurate cutting ensures clean seams and a professional appearance. Use a rotary cutter and quilting ruler to follow the pattern measurements precisely.
Begin piecing the quilt by joining smaller blocks to create the larger quilt top. Pinning each seam before stitching prevents misalignment and ensures the blocks fit together perfectly. Sewing slowly and steadily helps maintain clean, straight lines.
The pumpkin motifs in this pattern may involve applique or patchwork. Applique pieces can be attached using fusible webbing or basting stitches before machine stitching. This adds dimension and charm, bringing the pumpkin design to life.
Pressing seams is crucial for a polished appearance. Press seams open or to one side according to the pattern instructions, which helps the quilt top lie flat and reduces bulk at intersections. Proper pressing ensures crisp lines and a professional finish.
Assembling the quilt top is also a creative opportunity. Play with color placement and block orientation to enhance the visual flow of your DIY quilt. The Pumpkin Parade quilt pattern allows for personal touches while maintaining structural integrity.
Before moving on, inspect your quilt top for uneven seams, loose threads, or misaligned blocks. Correcting issues at this stage saves frustration later and ensures a high-quality finished quilt.
Quilting and Layering
Once the quilt top is complete, it’s time to layer it with batting and backing fabric. The Pumpkin Parade – Quilt Pattern works well with cotton or cotton-blend batting, which provides warmth and structure without excessive bulk. Cut the batting slightly larger than the quilt top for full coverage.
The backing fabric should complement the quilt top while being strong enough to support stitching. Lay the backing fabric right side down, place the batting on top, then layer the quilt top. Use pins or basting spray to secure all layers and prevent shifting during quilting.
Choose a quilting technique that suits your skill level and desired look. Simple straight-line quilting is ideal for beginners, while free-motion or decorative stitching adds flair for more advanced quilters. Follow the quilt pattern recommendations for the best results.
Quilting from the center outward helps prevent puckering and ensures even stitching. Regularly check that the layers remain flat and aligned, maintaining a smooth and consistent finish.
Trim any excess batting and backing to match the edges of the quilt top. This prepares the quilt for the final finishing steps, including binding, which secures all layers and frames the quilt beautifully.
After quilting, inspect the layers for any missed stitches or uneven areas. Fixing minor issues now ensures a flawless finished quilt. Completing the quilting process provides a sense of accomplishment and sets the stage for a polished final product.
Binding and Final Touches
Adding binding is the final step in completing your Pumpkin Parade – Quilt Pattern. Cut binding strips, usually 2.5 inches wide, and join them to create a continuous strip. Attaching the binding protects the quilt edges and gives a professional finish.
Sew the binding to the quilt edges, folding over the raw edges. Hand-stitch or machine-stitch the binding on the back for a neat finish. Properly applied binding ensures durability and frames the quilt beautifully.
Consider adding decorative touches such as embroidery, appliques, or stitched patterns. These enhancements personalize your DIY quilt and add extra charm to the autumn theme.
Press the quilt carefully with a warm iron to smooth wrinkles and create crisp edges. Avoid using steam on delicate appliques or textured fabrics to prevent distortion. A well-pressed quilt looks professional and refined.
Once finished, admire your completed Pumpkin Parade quilt pattern. Whether it decorates your home or is given as a gift, the quilt reflects creativity, skill, and care.
Regularly inspect and maintain your quilt to ensure longevity. Proper washing, gentle handling, and careful storage will keep your quilt looking beautiful for years.
FAQ about Pumpkin Parade – Quilt Pattern
Q1: Is the Pumpkin Parade quilt pattern suitable for beginners?
Yes, the pattern includes step-by-step instructions designed to be accessible for all skill levels.
Q2: What fabrics are best for this autumn quilt?
Cotton or cotton-blend fabrics are ideal, especially in warm autumn tones like orange, yellow, brown, and red.
Q3: Can I adjust the size of the quilt?
Absolutely. The pattern can be scaled up or down to create lap quilts, twin-size quilts, or larger projects.
Q4: Do I need a sewing machine for this quilt?
While a sewing machine speeds up the process, hand-sewing is also an option for those who prefer traditional techniques.
Q5: How should I care for my Pumpkin Parade quilt?
Wash gently in cold water, tumble dry on low, or air dry to maintain the quilt’s colors and softness.
Q6: Can I sell quilts made using this pattern?
Yes, but be sure to check the pattern’s licensing if it’s commercially available.
Conclusion
The Pumpkin Parade – Quilt Pattern is a charming, creative project that captures the essence of fall. From selecting fabrics to cutting, piecing, quilting, and binding, each step provides an opportunity for creativity and skill-building. Following this DIY quilt tutorial ensures a beautiful, functional, and cozy quilt perfect for decorating your home or gifting to loved ones.
We invite you to share your honest feedback and suggestions. Your experiences and tips can inspire other quilters and help the community grow. Creating a Pumpkin Parade quilt is more than a craft—it’s a celebration of autumn, warmth, and handmade artistry.