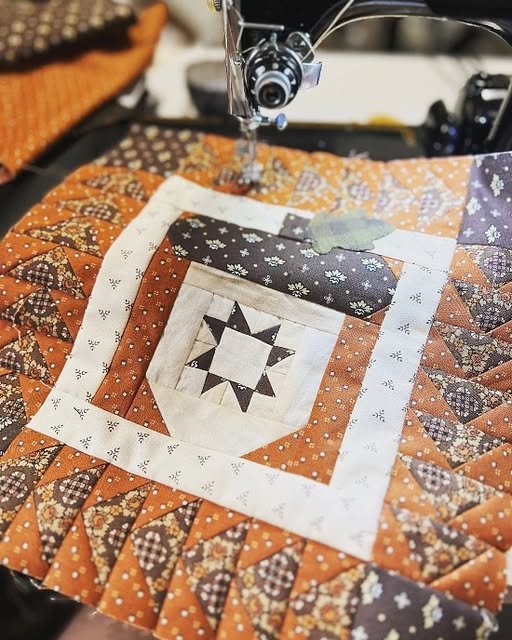
Mini Acorn Quilt Pattern is a charming and creative quilting project that captures the cozy essence of autumn through delicate patchwork design.
Whether you’re an experienced quilter or a passionate beginner, this pattern allows you to transform simple fabric pieces into a delightful mini quilt that embodies warmth, comfort, and seasonal beauty.
The acorn motif, often associated with growth and renewal, makes this quilt an ideal decorative piece for fall or a thoughtful handmade gift for loved ones.

With its combination of earthy tones, crisp lines, and whimsical shapes, the Mini Acorn Quilt Pattern adds a touch of rustic elegance to any space.
Making your own Mini Acorn Quilt is not only rewarding but also an opportunity to refine your quilting techniques. This project focuses on precision piecing, color coordination, and clean finishing — essential skills for any quilter looking to improve. The mini format makes it manageable and quick to complete, yet it’s versatile enough to be adapted into larger quilts, wall hangings, or even table runners. It’s a wonderful way to use fabric scraps creatively while mastering fabric cutting, stitching, and pressing techniques in a small, contained project.
One of the best aspects of the Mini Acorn Quilt Pattern is its versatility. You can play with color schemes, textures, and layouts to make each piece unique. Whether you prefer modern neutrals, warm fall hues, or playful pastels, this design accommodates every style. In this article, we’ll explore all the essentials — materials, cutting instructions, step-by-step assembly, creative variations, and expert tips — to help you bring your acorn quilt to life beautifully and confidently.
Before beginning your Mini Acorn Quilt Pattern, gather the following materials and tools. Having everything ready makes the process smoother and more enjoyable.
Start with 100% cotton quilting fabric — it’s durable, easy to handle, and presses beautifully. You’ll need several fabric colors: one for the acorn cap (dark brown or tan), one for the acorn body (beige, orange, or gold), and a background fabric (light cream, white, or patterned). Scraps work wonderfully for this mini project, so it’s a great stash-buster.
You’ll also need batting to give your quilt texture and volume. Choose lightweight cotton or polyester batting depending on your preferred thickness. For backing, select a coordinating fabric that complements the front design.
Essential tools include a rotary cutter, cutting mat, and acrylic quilting ruler for precise cuts. A sewing machine with a ¼-inch foot is ideal for accurate seam allowances, but you can also sew by hand if you prefer a slower pace. Don’t forget thread, pins or clips, and an iron for pressing seams as you go.
Optional but helpful tools include a quilting pen or chalk marker for marking pieces, and binding clips for securing the edges when finishing. With your materials and workspace organized, you’re ready to start assembling your Mini Acorn Quilt.
Now it’s time to bring your Mini Acorn Quilt Pattern to life. This simple, step-by-step process guides you through cutting, piecing, and assembling your quilt.
Step 1: Cut Your Fabric Pieces
Begin by cutting your fabrics into squares and rectangles based on your pattern dimensions. For a mini quilt (approximately 12″ x 12″), cut two small rectangles for the acorn cap, two squares for the body, and a few strips for the background. Accurate cutting ensures crisp seams and a professional finish.
Step 2: Assemble the Acorn Block
Sew the smaller rectangles for the acorn cap together along the long edge. Press the seam open or to one side. Next, attach the body pieces below the cap using a ¼-inch seam allowance. You’ll now see the acorn shape forming.
Step 3: Add the Background Fabric
Sew the background strips around the acorn block, framing it evenly on all sides. This gives the design a clean, finished look. Press all seams carefully to keep the block flat and precise.
Step 4: Create Additional Blocks (Optional)
If you’d like to make a larger mini quilt or a wall hanging, repeat the process to create multiple acorn blocks using different fabric combinations. This variation adds depth and visual interest.
Step 5: Layer the Quilt
Once your top is complete, layer it with batting and backing fabric. Make sure all layers are smooth and aligned, then pin or baste them together.
Step 6: Quilt and Bind
Quilt through all layers using straight-line stitching, free-motion quilting, or any design you prefer. Finally, bind the edges with bias binding for a neat finish. Your Mini Acorn Quilt is now ready to display or gift!
The Mini Acorn Quilt Pattern offers endless opportunities for creativity. Here are a few ideas to make your project truly one-of-a-kind.
Experiment with Colors:
Go traditional with browns, oranges, and golds for autumn, or try pastel acorns for a whimsical spring version. Modern quilters might prefer bold monochromes or geometric prints.
Play with Backgrounds:
Use contrasting backgrounds like deep navy or forest green to make the acorns pop, or keep it soft and neutral for a classic farmhouse look.
Add Embellishments:
Stitch tiny embroidered leaves, vines, or initials around your acorns for extra personality. You can also add hand-quilted details to give a more textured finish.
Vary the Scale:
Create mini acorns for mug rugs or coasters, or enlarge the pattern for a pillow cover or table runner. Adjusting the block size is an easy way to make this pattern more versatile.
Incorporate Patchwork Techniques:
Combine your acorn blocks with nine-patch or flying geese blocks for a more complex quilt layout. Mixing techniques adds charm and sophistication to the finished design.
Seasonal Themes:
Create a series of mini quilts for each season — acorns for fall, snowflakes for winter, flowers for spring, and suns for summer — and rotate them throughout the year.
To achieve a professional finish for your Mini Acorn Quilt Pattern, follow these helpful quilting tips.
Keep your seam allowance consistent. A ¼-inch seam throughout the project ensures the blocks align perfectly.
Always press seams after each step. Pressing, rather than ironing, sets the stitches and prevents fabric distortion.
Use neutral thread colors that blend with your fabric to give your quilt a clean look.
Before quilting, make sure your layers are smooth and flat. Any wrinkles or uneven areas can cause puckering during stitching.
When binding, miter the corners neatly for a polished edge. You can hand-stitch the binding for a traditional finish or machine-stitch it for speed.
Lastly, take your time. Quilting is as much about the process as the result, so enjoy every stitch of your Mini Acorn Quilt.
Q1: Is the Mini Acorn Quilt suitable for beginners?
A: Yes! The Mini Acorn Quilt Pattern uses basic piecing and straight-line sewing, making it beginner-friendly while still being fun for experienced quilters.
Q2: What fabric works best for this quilt?
A: 100% cotton quilting fabric is recommended. It’s easy to handle, durable, and provides crisp seams.
Q3: Can I make this pattern larger?
A: Absolutely. You can easily resize your acorn blocks or repeat them in rows to create larger quilts, runners, or wall hangings.
Q4: How do I choose colors for the acorns?
A: Use natural fall colors like browns, golds, and oranges, or customize them with pastels or bright prints for a playful version.
Q5: Do I need a sewing machine?
A: While a sewing machine speeds up the process, this pattern can also be sewn by hand with careful stitching and patience.
Q6: Can I quilt this by hand?
A: Yes, hand quilting adds a beautiful, traditional touch and highlights your craftsmanship.
The Mini Acorn Quilt Pattern is a delightful project that blends simplicity with creativity, resulting in a beautiful handmade piece that captures the warmth of autumn. From choosing fabrics and assembling the blocks to quilting and binding, every step offers an opportunity to practice your skills and enjoy the art of quilting. This small project is perfect for experimenting with colors, techniques, and designs — whether for home décor or as a meaningful handmade gift.
Now that you’ve learned how to make your own Mini Acorn Quilt, it’s time to start creating! Let your imagination guide your color choices and layouts, and remember that every quilt tells its own story.
Share your honest opinion and suggestions in the comments — your feedback could inspire other quilters to bring their own acorn creations to life!
