
Hunter's Star Quilt Block - Quick & Easy Tutorial

The Lady of the Lake Quilt Block is a classic and elegant design that has fascinated quilters for decades. This intricate pattern, inspired by traditional quilting artistry, brings a sense of sophistication to any quilt.
Following this tutorial, even beginners can learn to create this quilt block, step by step, with clarity and precision. With proper guidance, the Lady of the Lake Quilt Block can transform a simple quilt into a visually stunning centerpiece, combining history, technique, and creativity.
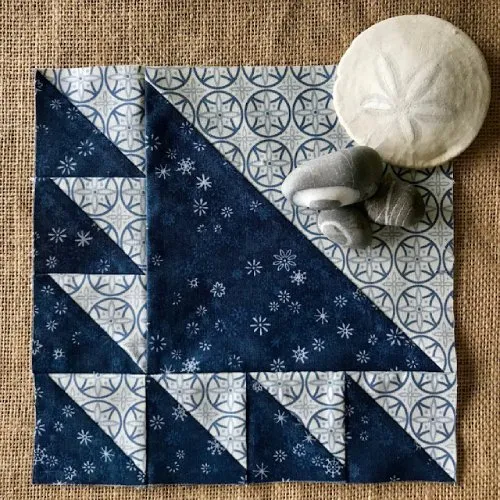
The beauty of the Lady of the Lake Quilt Block lies in its symmetry and geometric elegance. Characterized by a central diamond shape surrounded by carefully pieced triangles, this block exemplifies precision and artistry.
Whether used in a full quilt, as a single accent block, or in combination with other blocks, the Lady of the Lake Quilt Block adds timeless charm. With the right fabric selection, color contrast, and meticulous sewing, quilters can achieve a professional-looking result that enhances any quilt project.
This tutorial will guide you through every step of creating the Lady of the Lake Quilt Block. From understanding essential quilting terms to selecting fabrics, cutting accurately, piecing precisely, and finishing your block with clean seams, this guide ensures success. By the end, you’ll not only have a beautiful quilt block but also the confidence to tackle more advanced patterns.
Before starting your Lady of the Lake Quilt Block, gather all the necessary materials to ensure a smooth quilting experience. Using the right supplies improves accuracy, efficiency, and overall satisfaction.
Having these materials ready before you start ensures your project progresses smoothly and your finished block looks professional.
Creating the Lady of the Lake Quilt Block may seem challenging, but breaking it down into clear steps makes it approachable for beginners and advanced quilters alike.
Accurate cutting is the foundation of the Lady of the Lake Quilt Block. Begin by cutting squares and triangles according to your block size. For a standard 12-inch block, cut your central diamond, corner triangles, and surrounding smaller triangles carefully. Use your ruler and rotary cutter for precise angles.
The central diamond is the focal point of the block. Align your fabric pieces carefully and sew them using a quarter-inch seam allowance. Press the seams open or to one side depending on your preference. Accuracy in this step ensures all surrounding triangles fit perfectly.
The triangles surrounding the central diamond create the “lake” effect. Arrange them symmetrically around the diamond, paying attention to fabric placement for contrast. Sew each triangle individually and press seams neatly.
Corner triangles complete the block’s geometric design. Align carefully and attach them to the already assembled diamond and side triangles. Consistent seam allowance is key to maintaining block dimensions.
Once the block is fully assembled, press all seams flat. Check for alignment, square edges, and consistent measurements. Trim edges if necessary to ensure the block measures exactly 12 inches (or your chosen size).
Your Lady of the Lake Quilt Block is now ready to be incorporated into a quilt top. Consider adding sashing, borders, or complementary blocks to complete your quilt design.
The Lady of the Lake Quilt Block is versatile and can be used in a variety of quilting projects.
Each application allows quilters to experiment with color, fabric, and scale, making this block a timeless addition to any quilting repertoire.
To create a flawless Lady of the Lake Quilt Block, keep these tips in mind:
Following these tips ensures your Lady of the Lake Quilt Block is professional, clean, and visually stunning.
Q1: Is the Lady of the Lake Quilt Block suitable for beginners?
Yes, while it requires attention to detail, the block can be made by beginners with patience and careful measurement.
Q2: Can I change the block size?
Absolutely! Adjust the cutting dimensions proportionally to create smaller or larger blocks.
Q3: What fabrics work best?
High-quality quilting cotton is ideal, but other fabrics like linen or blends can be used with careful handling.
Q4: Can I combine this block with other designs?
Yes, it works well with sampler quilts or paired with complementary geometric blocks.
Q5: How do I maintain accuracy?
Use a rotary cutter, quilting ruler, and consistent seam allowance. Press seams carefully after each step.
Q6: Can I make this block in multiple colors?
Yes, using multiple colors creates depth and highlights the intricate geometric design.
The Lady of the Lake Quilt Block – Tutorial provides a step-by-step approach to mastering this classic quilting design. From selecting fabrics to precise cutting, piecing, and finishing, this block enhances any quilt with elegance and style. By following this tutorial, quilters of all levels can create beautiful blocks for quilts, pillows, or wall hangings.
Share your projects, leave your feedback, and offer suggestions to inspire others. Your creativity and input help preserve the art of quilting while allowing for personal expression and innovation.


