
Hunter's Star Quilt Block - Quick & Easy Tutorial

If you are looking to enhance your quilting skills, the Jack in the Box Quilt Block Tutorial is a perfect starting point. This tutorial will guide you step by step, from understanding the materials to mastering the techniques needed to create a visually stunning quilt block.
Quilting enthusiasts often seek creative and engaging projects, and the Jack in the Box Quilt Block offers a balance of fun, challenge, and artistry.
By following this guide, you will not only learn a new quilting method but also gain confidence to explore other quilt block designs.
The Jack in the Box Quilt Block Tutorial is designed for quilters of all skill levels. Whether you are a beginner or have years of quilting experience, this tutorial will help you grasp essential quilting techniques while focusing on precision, color coordination, and block assembly.
Quilting is more than just a craft; it’s a form of self-expression. This project encourages creativity while teaching you how to carefully plan and execute each step for a polished final product.
One of the most appealing aspects of this Jack in the Box Quilt Block Tutorial is its versatility. The block can be used individually or combined with other blocks to create intricate quilt patterns. Learning this block allows you to expand your quilting repertoire and introduce geometric shapes, color contrasts, and texture variety into your projects. By mastering the Jack in the Box Quilt Block, you are also investing in a skill that can enhance the visual appeal of any quilt you create, whether for personal use or as a thoughtful gift.
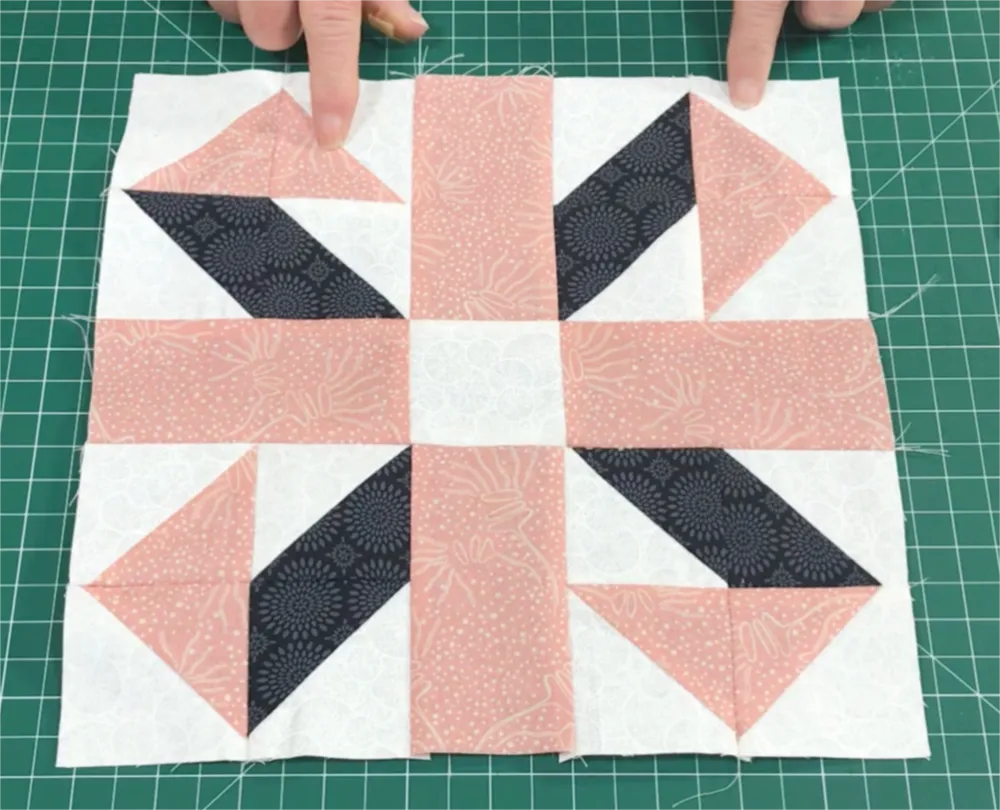
The Jack in the Box Quilt Block is a traditional quilt design known for its distinctive geometric pattern. It typically features a combination of squares and triangles arranged in a way that forms a visually striking design reminiscent of the classic toy, the Jack in the Box. Understanding the structure of this block is essential before you begin cutting your fabric and assembling the pieces. Each unit of the block must be carefully measured and cut to ensure the final quilt maintains a precise, professional look.
Quilters often use a variety of fabrics to bring the Jack in the Box Quilt Block to life. By choosing complementary or contrasting colors, you can create depth and movement within the design. Fabric selection is a critical aspect of this tutorial, as the right combination can highlight the intricate pattern and make the quilt more visually engaging. Beginners may start with simpler color palettes, while more experienced quilters might experiment with bold or unconventional combinations.
Precision in cutting is another key component of creating a perfect Jack in the Box Quilt Block. Small errors can affect the alignment of triangles and squares, resulting in a block that appears uneven. Using a rotary cutter, ruler, and cutting mat ensures accurate measurements and clean edges. This careful preparation will save time during assembly and help produce a professional-quality quilt.
Sewing techniques are equally important when working on the Jack in the Box Quilt Block. Maintaining a consistent seam allowance, usually 1/4 inch, ensures that pieces fit together correctly. Quilters should also press seams strategically to minimize bulk and allow for smoother intersections. Mastering these techniques is essential for both aesthetic appeal and structural integrity of the quilt.
In addition to sewing skills, understanding fabric orientation is crucial. Each triangle or square in the block must be aligned correctly to achieve the intended pattern. Paying attention to the direction of fabric prints or textures can further enhance the design. This step requires patience and a keen eye, but it significantly improves the overall appearance of the Jack in the Box Quilt Block.
Finally, quilters should consider the scale of the block. The Jack in the Box Quilt Block can be created in various sizes, from small accent blocks to large statement pieces. Choosing the appropriate size depends on your project and the overall design of the quilt. Experimenting with block sizes can also create dynamic quilt layouts, adding interest and complexity to your work.
Before starting the Jack in the Box Quilt Block Tutorial, gather all necessary materials. Essential items include high-quality cotton fabric, a rotary cutter, cutting mat, quilting ruler, pins, and thread. Using the right tools makes the sewing process smoother and ensures accurate results. Investing in quality materials not only improves the final look but also enhances your overall quilting experience.
Selecting fabrics is a creative process that influences the quilt’s aesthetic. Typically, you will need at least three different fabric colors or patterns to make the Jack in the Box Quilt Block visually appealing. Consider the contrast between light and dark fabrics, as this contrast emphasizes the geometric design. Coordinating fabrics with complementary colors or textures can produce a cohesive and professional-looking quilt.
Thread choice is another consideration for the Jack in the Box Quilt Block. High-quality cotton or polyester thread in a neutral color usually works best, as it blends with most fabrics. Choosing the right thread helps maintain the strength of seams while minimizing visibility, keeping the focus on the block design itself.
Accurate measurement tools are indispensable for quilting success. A quilting ruler and rotary cutter allow you to cut fabric precisely, which is essential for maintaining consistent block sizes. Any deviation in measurements can affect the alignment of pieces and disrupt the overall pattern. Following proper cutting techniques ensures that each unit of the Jack in the Box Quilt Block fits together seamlessly.
Pins or fabric clips help secure pieces during assembly. Using them strategically prevents fabric from shifting while sewing, which is particularly important for triangular shapes. Proper pin placement maintains accuracy and reduces frustration during the sewing process.
Finally, a sewing machine with adjustable settings is highly recommended for creating the Jack in the Box Quilt Block. While hand-sewing is possible, using a machine speeds up the process and provides more consistent stitching. Adjusting stitch length and tension according to fabric type ensures clean, even seams, resulting in a polished quilt block ready for assembly.
The first step in the Jack in the Box Quilt Block Tutorial is preparing all fabric pieces. Cut squares and triangles according to the measurements specified in your pattern. Accurate cutting is crucial for maintaining symmetry and alignment in the block. Laying out the pieces before sewing helps visualize the final design and ensures correct placement.
Begin assembling the triangles to form half-square units. This involves pairing triangles with corresponding squares and sewing along the diagonal seam. Press seams carefully to one side or open, depending on your preference. Proper pressing reduces bulk and creates clean intersections when joining units.
Once half-square units are prepared, arrange them according to the Jack in the Box Quilt Block pattern. Ensuring proper orientation of triangles and squares is essential to achieve the intended visual effect. Double-check alignment before sewing the units together to prevent mistakes that are difficult to correct later.
Sew the units together row by row, maintaining consistent seam allowances. Pin pieces in place to avoid shifting and ensure even stitching. Press seams after completing each row to maintain a flat and precise block. This methodical approach guarantees a professional finish for the Jack in the Box Quilt Block.
After completing rows, join them carefully to assemble the full block. Check for square corners and correct alignment of seams. Minor adjustments may be necessary to achieve perfect symmetry, but patience and attention to detail will yield a beautifully constructed quilt block.
Finally, press the entire block thoroughly. A well-pressed Jack in the Box Quilt Block lies flat and looks polished, ready to be incorporated into larger quilt projects. This finishing step enhances the overall presentation and prepares the block for quilting, whether in a standalone piece or part of a larger design.
To achieve the best results in your Jack in the Box Quilt Block Tutorial, start with a consistent cutting and sewing routine. Accuracy at each step reduces errors and ensures uniformity across multiple blocks. Developing a systematic approach improves efficiency and contributes to a professional-looking quilt.
Choosing contrasting fabrics can make the block visually striking. Using a combination of dark and light fabrics enhances the geometric pattern, making the Jack in the Box Quilt Block stand out. Experimenting with textures and prints can also add depth and interest to the design.
Maintaining a consistent seam allowance is critical. Even minor variations can cause misalignment, disrupting the overall pattern. Use a guide on your sewing machine or mark your seam allowance on your ruler to maintain precision throughout the project.
Pressing seams carefully cannot be overstated. Whether pressing to one side or opening seams, proper technique reduces bulk and improves the block’s appearance. Avoid ironing over pins to prevent damage and ensure smooth, crisp edges for each unit.
Organization is key when working with multiple blocks. Labeling pieces and arranging them in the correct sequence helps prevent confusion during assembly. Keeping fabric pieces sorted by color or shape streamlines the sewing process and reduces errors in the Jack in the Box Quilt Block layout.
Finally, patience and practice are essential. Mastering the Jack in the Box Quilt Block may take several attempts, but each block contributes to skill development. Embrace mistakes as learning opportunities and focus on gradual improvement, leading to consistently high-quality quilt blocks.
Q1: Is the Jack in the Box Quilt Block suitable for beginners?
Yes, this block can be adapted for beginners by starting with simple color schemes and focusing on accurate cutting and sewing techniques.
Q2: What fabrics work best for this block?
High-quality cotton fabrics are ideal. Using contrasting colors helps emphasize the geometric pattern of the Jack in the Box Quilt Block.
Q3: Can I make the block in different sizes?
Absolutely. The block can be scaled up or down depending on your project, whether you want a small accent or a large statement block.
Q4: How do I ensure the block is square?
Use precise measurements, consistent seam allowances, and a quilting ruler. Pressing seams carefully also helps maintain square corners.
Q5: Can this block be combined with other quilt patterns?
Yes, the Jack in the Box Quilt Block pairs well with other blocks to create intricate quilt designs and dynamic layouts.
Q6: What is the best way to press seams?
Press seams to one side or open depending on preference, using a steam iron. Avoid pressing over pins to maintain smooth edges.
The Jack in the Box Quilt Block Tutorial provides a comprehensive guide to creating a beautiful and versatile quilt block. By understanding the structure, selecting the right materials, and following step-by-step assembly instructions, you can achieve a professional-quality result. Attention to detail in cutting, sewing, and pressing ensures each block is visually striking and accurately aligned. Mastering this block enhances your quilting skills and opens the door to more complex quilt designs.
We hope this tutorial has inspired you to try the Jack in the Box Quilt Block and explore your creativity. Leave your honest feedback and suggestions to help us improve future quilting tutorials. Your input is valuable and encourages the quilting community to grow and share knowledge.


