
Hunter's Star Quilt Block - Quick & Easy Tutorial

Creating your own travel bags is a rewarding and practical project that combines creativity, functionality, and style. With the right materials and techniques, you can craft bags that are durable, spacious, and tailored to your personal needs.
This free tutorial will guide you through the process step by step, making it suitable for both beginners and experienced crafters. By the end, you’ll have a handmade travel bag that’s perfect for vacations, business trips, or everyday use.
The How to Make Travel Bags – Free Tutorial focuses on combining convenience with aesthetic appeal. Travel bags must be sturdy, easy to carry, and organized, yet they also offer a chance to showcase your personal style.
Choosing the right fabrics, reinforcements, and design elements is essential for achieving a professional-looking bag that lasts for years.
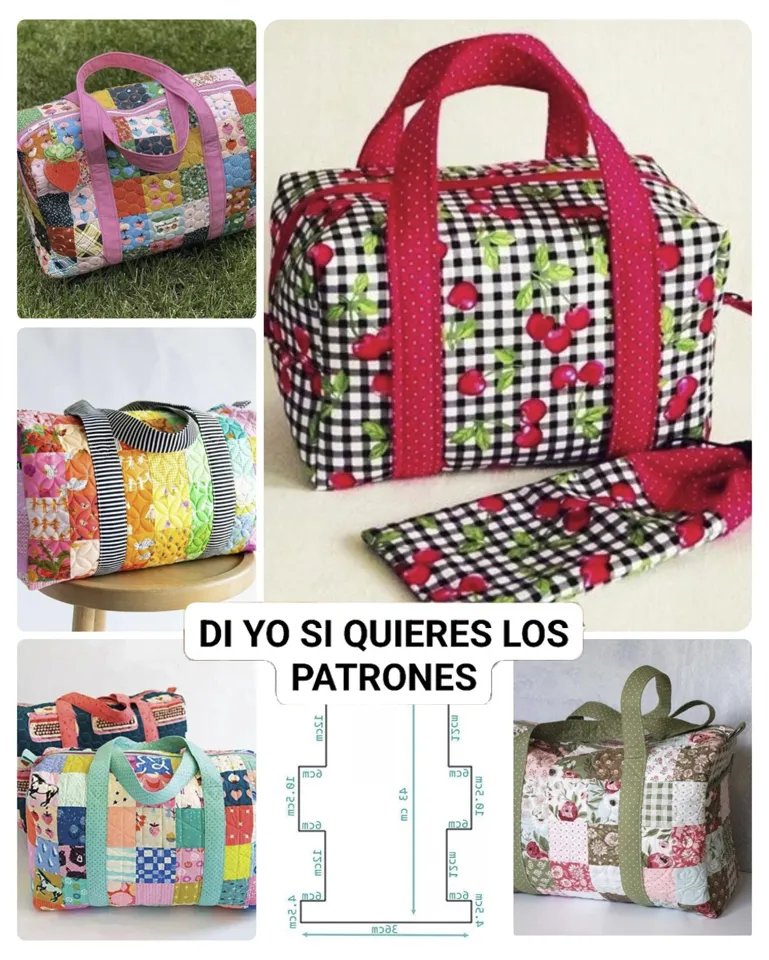
Whether you want a weekender bag, a duffle, or a tote-style travel bag, this tutorial provides flexible instructions that can be adapted to your preferred size, style, and functionality. Making your own bag also gives you the freedom to incorporate pockets, compartments, and features that commercial bags may lack. In this tutorial, we’ll cover materials, cutting, assembly, finishing, and creative variations for your travel bag project.
Selecting the right materials is crucial for creating durable and stylish travel bags. Strong fabrics like canvas, denim, cordura, or heavy-duty cotton are ideal for the exterior because they withstand wear and tear during travel. For a polished appearance, you can also use faux leather or coated fabrics that add water resistance.
The lining fabric should be lighter, such as cotton or polyester, to ensure smooth interiors that don’t add unnecessary bulk. Pre-wash your fabrics to prevent shrinkage and ensure long-term durability. Adding interfacing or stabilizers can provide additional structure, helping your bag maintain its shape even when empty.
Essential materials include matching thread, sturdy zippers, straps, buckles, and optionally, magnetic snaps or hardware for added closure options. Choosing high-quality components ensures your travel bag is not only functional but also long-lasting.
When selecting colors and patterns, consider your personal style and how the bag will be used. Neutral tones like navy, black, or beige are versatile for everyday travel, while vibrant patterns or color blocking can create a fashionable, statement-making piece.
Lastly, ensure you have enough fabric for the main body, lining, straps, and any pockets or compartments. Planning ahead prevents errors during assembly and ensures all pieces fit together neatly, producing a professional-looking travel bag.
Once materials are selected, accurate cutting is key to constructing your travel bag properly. Measure and mark all pieces carefully with a ruler or measuring tape. Standard travel bag dimensions are usually 18 inches long by 10 inches tall and 8 inches wide, but you can adjust based on your needs.
Cut two main pieces for the exterior, two matching pieces for the lining, and additional pieces for the bag base and optional pockets. If you’re adding a zipper, cut strips for the zipper tabs or reinforcements. Attach interfacing to exterior pieces for structure, if desired, by ironing it to the wrong side of the fabric.
Prepare all pockets, compartments, or decorative elements before assembling the bag. Sew them onto the exterior or lining pieces, ensuring correct placement and alignment. This preparation stage makes assembly smoother and reduces the risk of errors.
After cutting and prepping, press all pieces with an iron to remove wrinkles. This ensures that sewing lines are accurate, edges are crisp, and your travel bag will have a clean and polished finish.
To begin assembly, start by constructing the exterior body. Place the exterior fabric pieces right sides together, pinning or clipping the edges. Sew along the sides and bottom, leaving the top open. For a reinforced bottom, sew a separate base piece or add additional fabric layers.
Next, prepare the lining by sewing side and bottom seams in the same manner, leaving an opening for turning the bag right side out. Attach any interior pockets at this stage to enhance organization.
If your travel bag includes a zipper or flap closure, attach it carefully to the top edges before combining the exterior and lining. Make sure the lining is positioned correctly and seams align precisely.
Once the exterior and lining are ready, insert the exterior piece inside the lining with right sides facing each other. Stitch around the top edge, then turn the bag right side out through the opening in the lining. Press the edges neatly and close the lining opening with hand stitching or topstitching.
Attach straps or handles to the bag, ensuring they are securely sewn to support the bag’s weight. For reinforced strength, sew in a square with an “X” pattern at the base of each strap attachment. This step adds durability and prevents wear over time.
Finally, press the completed travel bag thoroughly and check all seams for reinforcement. Your bag is now ready to carry essentials on your next adventure.
The How to Make Travel Bags – Free Tutorial encourages creativity and personalization. You can adjust the size, shape, and style to create weekender bags, duffles, tote bags, or backpacks. Add exterior or interior pockets for organization, or use contrasting fabrics for a fashionable look.
Experiment with closures such as zippers, magnetic snaps, or buckles to suit your style. You can also add decorative touches like embroidery, applique, or piping along seams to enhance visual appeal. Using different textures like faux leather or quilted fabrics gives the bag a luxurious and professional appearance.
For gifting or personal projects, consider adding monograms, themed prints, or embellishments to make your travel bag unique and memorable. Coordinated sets of bags in different sizes are also practical for family travel or as thoughtful presents.
Finally, combining different quilting or stitching techniques on exterior fabrics can add texture and reinforce the bag structure, ensuring it is both stylish and functional. This allows each bag to be a reflection of your creativity while maintaining everyday usability.
1. Is this travel bag tutorial suitable for beginners?
Yes, it’s beginner-friendly. Basic sewing skills are sufficient, and instructions can be adapted for different bag sizes.
2. What fabrics are best for travel bags?
Medium-weight fabrics like canvas, denim, or cotton are ideal. For added durability, use faux leather or coated fabrics for the exterior.
3. Can I include zippers or magnetic snaps?
Absolutely. Zippers provide security, while snaps or buckles add decorative and functional options.
4. What size should the bag be?
Standard sizes are 18 inches long by 10 inches tall and 8 inches wide, but you can customize the dimensions to your needs.
5. Can I add pockets or compartments?
Yes, interior or exterior pockets can be sewn in for better organization.
6. How do I make the bag more durable?
Use interfacing, reinforced stitching, and sturdy fabrics. Double stitching strap attachments increases strength.
7. Is this bag machine washable?
It depends on the fabric. Canvas and cotton can usually be machine washed gently, while faux leather should be spot cleaned.
The How to Make Travel Bags – Free Tutorial provides a complete guide to creating functional, stylish, and customizable travel bags. From choosing materials and cutting pieces to assembling and personalizing, this project is perfect for anyone looking to craft a high-quality handmade bag.
By following these steps, you can create bags that are not only practical for trips but also reflect your personal style. We hope this tutorial inspires you to try the project and share your experience. Leave your honest feedback and suggestions, helping others enjoy the satisfaction of making their own travel bags.


