
Hunter's Star Quilt Block - Quick & Easy Tutorial

The How to Make a Woven Quilt Block – Video Tutorial by Tulip Square is an inspiring resource for quilting enthusiasts who love adding depth, texture, and pattern to their fabric creations.
A woven quilt block creates the illusion of interlacing strips of fabric, making it look intricate while being surprisingly simple to piece together. Whether you’re a beginner or an advanced quilter, this design from Tulip Square offers an easy yet visually captivating way to elevate your next quilting project.
The woven quilt block technique stands out because it mimics the traditional basket-weave appearance but with modern, clean lines.
What’s even better is that the video tutorial by Tulip Square walks you through every step of the process — from fabric selection to cutting, piecing, and pressing — making it accessible to anyone with a sewing machine and a love for creative fabric art.
In today’s world of digital learning, this video tutorial has become an invaluable guide for DIY quilters who prefer visual instructions. The How to Make a Woven Quilt Block – Video Tutorial by Tulip Square is not just about learning a pattern; it’s about building confidence and understanding how colors, textures, and placement work together to form a woven illusion that pops with dimensional beauty.
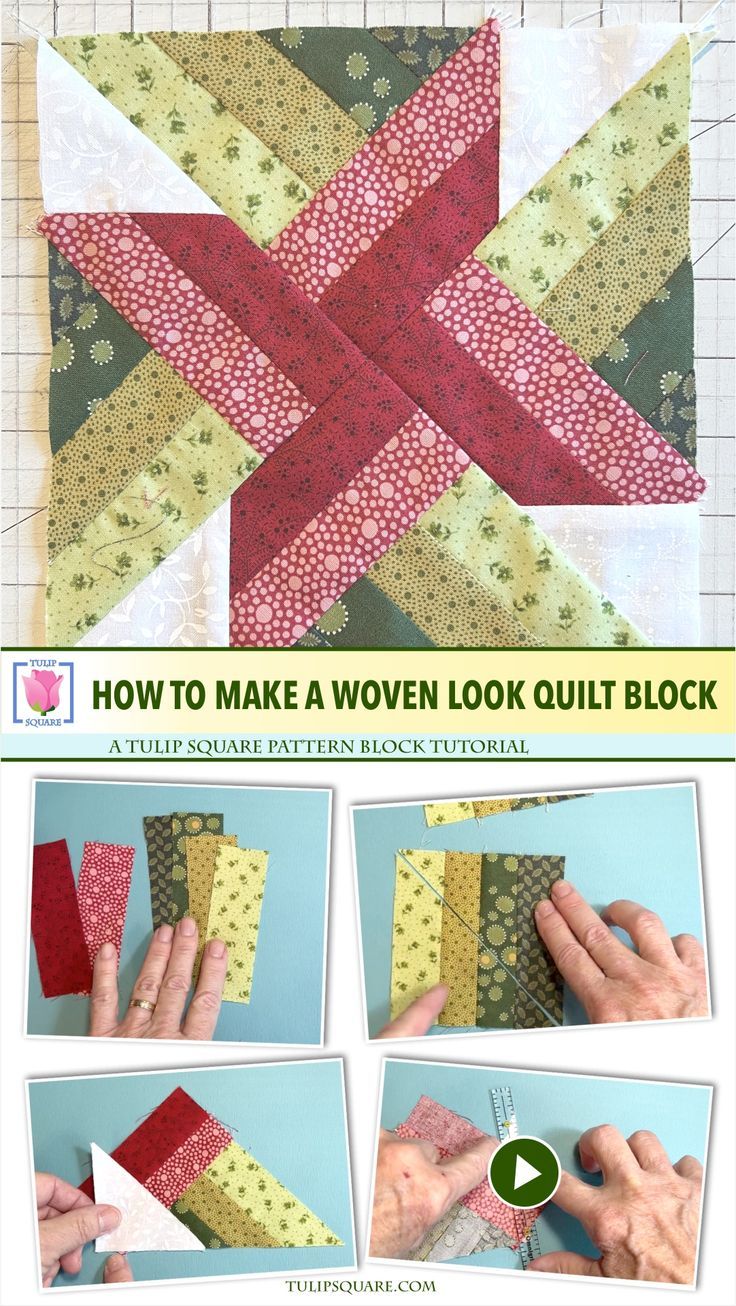
The woven quilt block is a stunning pattern that gives the illusion of fabric strips overlapping and weaving in and out of each other. Although it looks complex, the technique is based on straightforward geometric piecing. By combining light, medium, and dark fabric tones, you can easily create a realistic woven effect without intricate sewing.
What makes the Tulip Square tutorial so effective is its clear explanation of how to organize and sew the strips for precision. Each strip must be cut with accuracy to ensure the pattern aligns perfectly, creating that signature woven appearance. The video shows how even small adjustments in color or angle can dramatically change the visual outcome.
One of the best aspects of this pattern is its flexibility. You can choose fabrics that reflect your personal taste — from bright modern prints to soft pastels or rustic neutrals. This adaptability allows quilters to customize each block to suit different themes or seasons.
Additionally, the woven quilt block can be resized depending on your project. Whether you want to create a mini wall hanging, a pillow cover, or a large bedspread, the design scales beautifully. You simply adjust your fabric strip width and the number of blocks you create.
The Tulip Square tutorial also highlights the importance of pressing seams correctly. Pressing each seam in alternating directions helps the pieces nest together perfectly, resulting in a crisp and professional look. This small detail can make a big difference in the final quilt.
Finally, understanding the woven structure opens doors to endless creativity. Once you master the basics, you can experiment with gradient colors, ombré effects, or even metallic fabrics to enhance the woven illusion.
To get started with the How to Make a Woven Quilt Block – Video Tutorial by Tulip Square, you’ll need a few essential tools and materials. Fortunately, most quilters already have these on hand.
First, you’ll need cotton quilting fabric in at least three contrasting tones: light, medium, and dark. This contrast is key to creating the woven illusion. Using solid fabrics or subtle tone-on-tone prints often works best because they help define the woven look without overwhelming the design.
A rotary cutter, cutting mat, and quilting ruler are essential for achieving straight and accurate cuts. Precise measurements ensure your strips align correctly and that the woven pattern appears balanced.
You’ll also need thread that matches or complements your fabrics, pins or clips for holding pieces together, and a sewing machine with a ¼-inch foot for consistent seam allowances. Having a reliable iron and ironing board nearby is important, as pressing after each step maintains accuracy.
Optional tools include a seam ripper (for small corrections), a design board for arranging your strips, and fabric marking pens to label sections before sewing. These tools help prevent confusion when you start assembling multiple blocks.
For quilters following along with the Tulip Square tutorial, it’s helpful to print or jot down notes as you watch the video. This way, you can pause and review each step at your own pace while keeping track of fabric placement.
Once your workspace is organized, you’ll be ready to dive into the creative process — piecing together your woven block and watching it come to life.
The How to Make a Woven Quilt Block – Video Tutorial by Tulip Square simplifies the process into manageable steps that anyone can follow.
First, begin by cutting your fabric strips. The video demonstrates how to cut each strip to the correct width and length to ensure uniformity. It’s important to stay consistent to maintain a smooth woven effect.
Next, arrange your strips on a flat surface or design board. Lay them out according to the tutorial’s recommended sequence, alternating between light, medium, and dark tones. This arrangement creates the illusion of over-and-under weaving once stitched.
After arranging, start sewing the strips together in pairs. Always check your alignment after each seam to prevent distortion. Press seams open or to one side as demonstrated in the Tulip Square tutorial — both methods work depending on your preferred finish.
Once the pairs are assembled, join them into rows, carefully nesting seams where necessary. The key here is precision; the more accurate your seams, the cleaner your woven appearance will be.
When the block is fully pieced, square it up using a rotary cutter and ruler. Trimming ensures that each block measures correctly and fits perfectly with others if you plan to create a quilt top.
Finally, give your block a good final press. At this stage, you’ll see the beautiful woven texture take shape — a testament to your patience and attention to detail.
The versatility of the woven quilt block design makes it perfect for a variety of creative projects. You can use a single block as a decorative accent or combine several to craft a larger piece.
One of the most popular uses is to create a wall hanging. A single woven block, framed with a border and binding, makes a charming art piece for your home or studio.
Another option is to sew multiple blocks into a table runner or placemats. The woven pattern adds visual interest to any dining setting, blending beautifully with both rustic and contemporary interiors.
Quilters also love turning this block into pillow covers. The woven illusion looks elegant when displayed on couches or beds, and it offers a great way to experiment with color combinations.
If you’re more ambitious, you can use the pattern as part of a full-size quilt. Mixing woven blocks with solid filler blocks or alternating them with other patterns creates a quilt rich in texture and depth.
The design can even be adapted for scrap quilting, using leftover fabric strips from other projects. This approach not only reduces waste but also produces unique, colorful results.
1. Is the woven quilt block beginner-friendly?
Yes! The How to Make a Woven Quilt Block – Video Tutorial by Tulip Square is designed for all skill levels. Beginners can easily follow along, while advanced quilters can refine their precision techniques.
2. What fabrics work best for the woven quilt block?
High-quality cotton quilting fabrics are ideal. Solid colors or subtle prints help emphasize the woven illusion.
3. Can I hand-sew the woven quilt block instead of using a machine?
Absolutely. While machine sewing is faster, hand-sewing can produce beautiful results with careful attention to seam allowances.
4. How big is each finished block?
The size depends on your strip width. Most woven quilt blocks finish around 12 inches square, but you can easily adjust the measurements.
5. Can I use leftover scraps for this project?
Yes! Scrap-friendly designs like this are great for using up fabric remnants while still creating a cohesive woven pattern.
6. How do I press the seams properly?
Press seams in alternating directions between rows to help them nest neatly, as demonstrated in the Tulip Square tutorial.
7. What makes the Tulip Square video special?
The video provides clear visuals, helpful narration, and easy-to-follow instructions, making it a perfect learning tool for visual learners.
Learning How to Make a Woven Quilt Block – Video Tutorial by Tulip Square is both fun and rewarding. This pattern allows quilters to experiment with color, texture, and illusion while improving their piecing accuracy. Whether you create one block or an entire quilt, the woven design will add depth and sophistication to your work.
By following the Tulip Square tutorial, you gain not only technical skill but also artistic confidence. Every block you complete becomes a reflection of patience and creativity.
If this guide helped you understand the process better, please share your honest opinion and suggestions below. Your feedback inspires more creative content and helps other quilters discover the joy of crafting a beautiful woven quilt block.


