
How to make a mini tote bag with side pockets – step by step is an essential guide for anyone interested in DIY bag making. Whether you are a beginner or have some sewing experience, creating your own mini tote bag is both fun and rewarding.
With the right materials, instructions, and a bit of patience, you can craft a stylish and functional bag that suits your personal style. This guide will take you through the process in a detailed, step-by-step manner, ensuring you understand every part of the project.
Creating a mini tote bag with side pockets is more than just a sewing project; it is an opportunity to explore creativity, enhance your skills, and produce something practical for daily use.
Side pockets are especially useful for storing small items like your phone, keys, or lip balm, making your bag not only attractive but functional.
By following this guide, you will also learn important sewing techniques that can be applied to other projects, giving you a foundation for more advanced bag-making endeavors in the future.
Before starting, it’s essential to gather the correct materials and tools. A mini tote bag requires durable fabric, sturdy handles, matching thread, and tools such as scissors, pins, and a sewing machine. Choosing the right fabric is crucial because it affects the bag’s durability and appearance. From cotton to canvas, the choice depends on your preference and the intended use of the bag. Once you have everything prepared, the fun part begins—designing and sewing your very own mini tote bag with side pockets.
Choosing the Right Fabric and Materials
When learning how to make a mini tote bag with side pockets – step by step, selecting the right fabric is the first crucial step. Fabric determines not only the look but also the durability of your mini tote bag. Cotton and canvas are popular choices because they are strong yet easy to sew. Canvas is ideal if you want a bag that can carry heavier items, while cotton is perfect for a lighter, everyday bag.
In addition to fabric, the right thread is important for strong seams. Polyester thread is usually recommended because it offers both strength and flexibility. This ensures your mini tote bag can handle everyday wear and tear without the seams coming apart. Matching your thread color to your fabric also adds a professional touch to your finished bag.
The choice of handles is equally important. You can use pre-made straps or sew your own using the same fabric. For durability, make sure the handles are securely attached to the body of the bag. Reinforcing these areas with extra stitching will prevent the handles from tearing away from the bag, especially if you plan to carry heavier items in your mini tote bag with side pockets.
Another essential material is interfacing. Interfacing adds structure and stability to your mini tote bag, ensuring it holds its shape even when filled with items. Iron-on interfacing is the easiest to work with, allowing you to bond it directly to the fabric. With the right combination of fabric, thread, and interfacing, your mini tote bag will be both attractive and functional.
Cutting and Preparing the Pieces
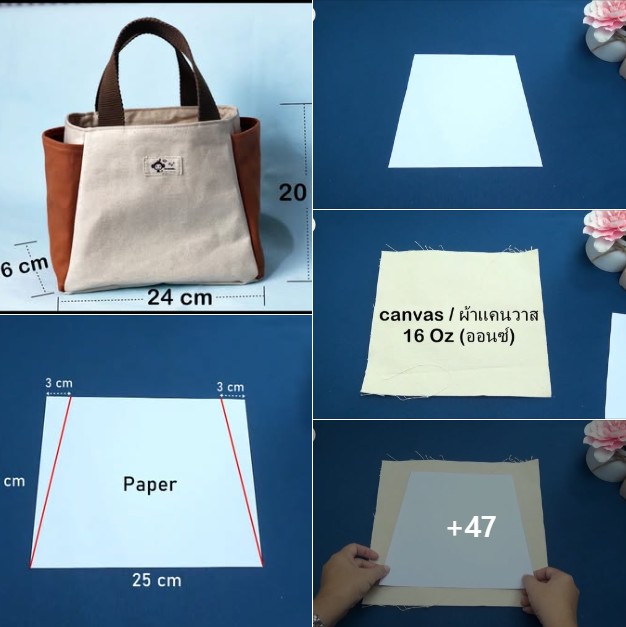
Once you have gathered all the materials, the next step in how to make a mini tote bag with side pockets – step by step is cutting your fabric pieces. Accurate cutting is essential for a professional-looking bag. Begin by measuring the dimensions for your bag, including the main body, bottom, and side pockets. Precision ensures that all pieces fit together perfectly during sewing.
Lay your fabric flat on a cutting mat and use a rotary cutter or sharp scissors to cut the pieces. Remember to add seam allowances, usually about half an inch, to ensure there is enough fabric for stitching. Don’t forget to cut two pieces for the side pockets—they are essential for the bag’s functionality.
Before sewing, it’s helpful to mark fold lines and pocket placements using fabric chalk or a disappearing ink pen. This guide will make assembling the bag easier and ensure that pockets are evenly aligned. Paying attention to these details now will save time and prevent mistakes during the sewing process.
If you are using interfacing, now is the time to attach it. Follow the manufacturer’s instructions for ironing it onto the fabric. Interfacing will give your mini tote bag a professional finish and prevent the bag from sagging over time. With your pieces accurately cut and prepared, you’re ready to start sewing your mini tote bag with side pockets.
Sewing the Side Pockets
The side pockets are one of the most practical features of your mini tote bag, providing easy access to essentials. To sew the pockets, fold the fabric pieces in half and press the edges to create a clean finish. Pin the pockets to the main body of the bag, ensuring they are aligned evenly on both sides.
Sew the pockets using a straight stitch, reinforcing the top corners for added durability. The reinforced corners prevent the pockets from tearing when items are inserted and removed frequently. Make sure the stitching is neat and secure to maintain the bag’s overall aesthetic.
After attaching the pockets, check the alignment by placing the bag on a flat surface. Adjust if necessary to ensure symmetry. A well-sewn pocket enhances both the look and functionality of your mini tote bag with side pockets.
To add extra strength, you can topstitch along the edges of the pockets. This not only secures the pocket further but also adds a decorative touch. A clean topstitch elevates the design and gives your DIY project a polished, professional appearance.
Finally, check the size and depth of the pockets. They should be spacious enough to hold small items securely without making the bag bulky. Properly constructed pockets are a defining feature of a high-quality mini tote bag.
Assembling the Bag
With the side pockets in place, you can begin assembling the main body of the mini tote bag. Start by sewing the side panels to the front and back pieces. Pin the pieces together carefully to ensure all seams are aligned. Precision is key for a clean, professional finish.
Next, sew the bottom panel to the assembled sides. This step shapes the bag and provides stability. Ensure that the corners are neatly aligned and the seams are reinforced. A strong bottom panel allows the mini tote bag to hold weight without sagging.
Once the main body is complete, attach the handles securely. Measure equal distances from each side to ensure symmetry. Reinforce the stitching at the base of the handles to provide extra support. Properly attached handles make carrying the bag comfortable and reliable.
Press the bag with an iron to remove any wrinkles and give it a crisp, finished look. A well-pressed mini tote bag with side pockets looks professional and inviting, ready for everyday use or gifting.
Finally, inspect all seams and pockets, making adjustments if necessary. Attention to detail ensures a high-quality result that will last for years. Your DIY mini tote bag is now complete and ready to be enjoyed.
Adding Final Touches and Personalization
Adding personal touches makes your mini tote bag with side pockets unique. You can decorate it with embroidery, patches, or fabric paint. These customizations reflect your personal style and creativity, making the bag one-of-a-kind.
Consider lining the bag with a contrasting fabric for a professional look. Lining adds durability and a neat finish to the interior, while also giving your bag a pop of color. This small detail can elevate your DIY project significantly.
You can also add small closures like buttons or magnetic snaps for added security. These functional elements enhance usability while maintaining style.
Adding labels or tags with your name or brand can personalize your bag further, making it perfect as a gift. These thoughtful additions showcase craftsmanship and attention to detail.
Finally, inspect the entire bag for any loose threads or uneven seams. Trim carefully and press again for a flawless finish. Your mini tote bag is now fully ready for use, combining style, function, and personalization.
FAQ About Making a Mini Tote Bag with Side Pockets
Q1: Can beginners make a mini tote bag with side pockets?
Yes, beginners can successfully make this bag. The step-by-step instructions are designed to guide even those with minimal sewing experience.
Q2: What type of fabric is best for a mini tote bag?
Canvas and cotton are the most recommended. Canvas provides durability, while cotton is lightweight and easier to sew.
Q3: How do I make the side pockets durable?
Reinforce the top corners with extra stitching and use strong thread like polyester to ensure the pockets last.
Q4: Can I customize my mini tote bag?
Absolutely! You can add embroidery, patches, lining, or closures to reflect your personal style.
Q5: What tools are essential for this project?
You will need scissors, pins, a sewing machine, fabric chalk, thread, and interfacing for a professional result.
Q6: How do I attach handles securely?
Measure equal distances from each side and reinforce the stitching at the base to prevent tearing.
Conclusion
In this guide on how to make a mini tote bag with side pockets – step by step, you learned how to choose materials, cut fabric, sew side pockets, assemble the bag, and add finishing touches. Creating a mini tote bag is not only a practical skill but also a creative process that allows for personalization and style. By following these detailed steps, you can produce a durable and stylish bag ready for everyday use.
VIDEO TUTORIAL
We would love to hear your thoughts! Share your experiences, ideas for improvement, or suggestions for future projects. Your feedback helps us continue providing clear, practical guides for all your DIY sewing adventures.