
Hunter's Star Quilt Block - Quick & Easy Tutorial

Learning how to make a little pouch bag with 3 compartments is a fantastic way to combine creativity with functionality.
This DIY project allows you to craft a small yet practical accessory that can be used for organizing coins, makeup, stationery, or other small essentials. With careful planning and attention to detail, your handmade bag will not only be useful but also stylish and unique.
A little pouch bag with 3 compartments is perfect for those who enjoy hands-on DIY projects. The multiple compartments provide an organized storage solution, making it easy to separate items and keep everything within reach.
Creating your own little pouch bag with 3 compartments also gives you the opportunity to experiment with colors, materials, and designs. You can use fabrics, felt, or even crochet techniques, depending on your preferences. Personalizing the bag makes it stand out and reflects your individual style.
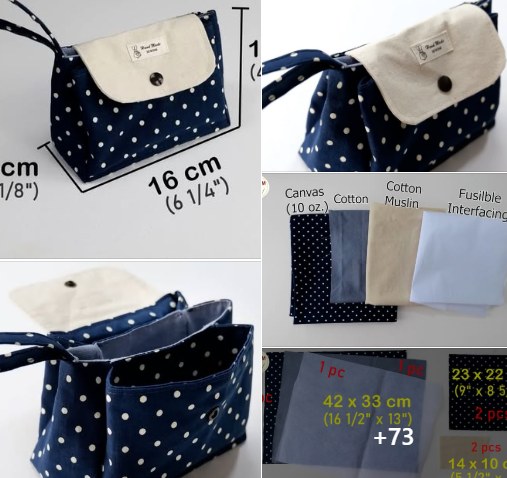
To start your project, gather all the necessary materials for the little pouch bag with 3 compartments. Being prepared ensures a smooth crafting process and prevents interruptions.
Essential materials include fabric or felt for the outer bag and lining, sewing thread, and a zipper or button closures for each compartment. Using contrasting colors can make the compartments visually distinct and easier to identify.
You will also need scissors, pins, a measuring tape, and a sewing machine or hand sewing needle. Proper tools allow you to achieve accurate cuts and neat stitching, which is crucial for a professional finish.
For added decoration, consider buttons, appliqués, embroidery, or charms. These elements can enhance the bag’s appearance and provide a unique, personalized touch.
If you prefer a structured bag, lightweight interfacing or padding can be used. This helps maintain the shape of the compartments and gives the bag a more polished look.
Finally, having a printed pattern or template can guide your cutting and assembly. A clear template ensures that each compartment is correctly sized and aligned, making the sewing process easier and more accurate.
Start by cutting all fabric pieces according to your template. Make sure to include pieces for the outer bag, lining, and any compartments. Accuracy is essential for neat assembly and balanced proportions.
Sew the compartments individually, attaching zippers or closures as needed. Ensuring that each zipper works smoothly will make the bag functional and user-friendly.
Next, assemble the main body of the bag. Sew the outer fabric pieces together first, followed by the lining. This step creates the bag’s structure and provides a neat interior finish.
Attach each compartment to the main body carefully, aligning edges and ensuring even spacing. Proper alignment is key to the bag’s overall look and functionality.
Add finishing touches, such as topstitching along edges or decorative embroidery. These details not only enhance aesthetics but also reinforce seams for added durability.
Finally, test the bag by opening and closing each compartment and checking the fit of items inside. Make any necessary adjustments to ensure that the bag is both practical and attractive.
One of the joys of making a little pouch bag with 3 compartments is customization. You can choose colors, patterns, and materials that reflect your personal style.
Experiment with fabrics such as cotton, canvas, or felt for different textures. Each material gives a unique look and feel to the bag, making it stand out.
Add embellishments like embroidery, patches, or appliqués to make your bag truly unique. These decorations allow for creativity and make the bag visually appealing.
Vary the size of the compartments based on your needs. For example, one compartment can hold coins, another makeup items, and the third keys or cards. Custom sizing improves functionality.
Consider adding a handle, strap, or keyring to increase versatility. A small strap allows the bag to be carried easily, while a keyring makes it practical for everyday use.
Finally, don’t hesitate to mix techniques. Combining sewing with crochet or adding lace or ribbon details can create a truly distinctive little pouch bag with 3 compartments.
Even experienced crafters can make mistakes when making a little pouch bag with 3 compartments. Awareness of common errors ensures better results.
One common mistake is misaligning compartments, leading to an uneven or unbalanced bag. Always measure and pin pieces carefully before sewing.
Using incompatible materials can cause issues, such as difficulty sewing thick fabrics or poor durability with thin fabrics. Choose materials that work well together.
Rushing through zipper installation may result in functional problems. Test each zipper before final assembly to ensure smooth operation.
Neglecting to reinforce seams can cause the bag to wear out quickly. Double-check stitching, especially at stress points, to increase longevity.
Failing to add a lining or interfacing when needed may make the bag floppy or unstable. Proper internal structure enhances usability and appearance.
Finally, skipping finishing touches like trimming threads or topstitching can leave the bag looking incomplete. Small details make a big difference in professional presentation.
Q1: Can beginners make this bag?
Yes, with patience and attention to detail, beginners can successfully create a little pouch bag with 3 compartments. Step-by-step instructions make it easy to follow.
Q2: What materials should I use?
You can use cotton, felt, or canvas for the outer bag, with a lighter fabric for the lining. Optional decorations include buttons, embroidery, and charms.
Q3: How long does it take to make one bag?
Completion time varies depending on skill level. Beginners may take 3–5 hours, while experienced crafters can finish in 2–3 hours.
Q4: Can I customize the compartments’ sizes?
Yes, the pattern is flexible. Adjust compartments according to your storage needs for coins, makeup, or other small items.
Q5: Is this bag durable?
With quality materials and reinforced seams, your little pouch bag with 3 compartments can be durable and suitable for daily use.
Q6: Can I give this bag as a gift?
Absolutely. Handmade bags are thoughtful gifts, and the multiple compartments add practicality, making it a unique and useful present.
Making a little pouch bag with 3 compartments is a rewarding project that combines functionality, creativity, and style. By following the step-by-step instructions and using quality materials, anyone can create a bag that is both practical and visually appealing. Customization options allow you to choose colors, fabrics, sizes, and embellishments to suit personal tastes or the recipient’s preferences.
Creating your own little pouch bag with 3 compartments encourages creativity, improves crafting skills, and results in a beautiful handmade item. Avoiding common mistakes and paying attention to details ensures that your bag is durable and professional-looking.
Another great tip for your little pouch bag with 3 compartments is to experiment with lining patterns. Using a contrasting or printed fabric for the interior adds a fun surprise when the bag is opened and elevates the overall aesthetic. Not only does a lined interior provide extra durability, but it also gives a more professional and polished finish.
We hope this guide inspires you to try making your own bag. Share your experiences, offer suggestions, and let us know how your project turned out. Your feedback and ideas help the crafting community grow and inspire others to create.


