
Hunter's Star Quilt Block - Quick & Easy Tutorial

Learning how to make a large craft storage tote bag with multiple pockets is one of the most rewarding sewing projects you can take on, especially if you love organizing your creative supplies.
A well-designed tote bag can hold yarn, brushes, glue guns, scissors, notebooks, and countless other materials that tend to clutter your craft area.
By building it yourself, you can choose every detail — from the fabric pattern and strap length to the number and shape of pockets — ensuring the bag fits your personal workflow. Besides being functional, a handmade tote also expresses your creativity and craftsmanship every time you use it.
Creating a large craft storage tote bag requires more than just sewing skills; it involves planning and precision. You’ll need to understand measurements, reinforcements, and fabric combinations to produce something durable and attractive.
While many store-bought craft bags can be expensive or lack the right features, designing your own lets you customize everything. The process also teaches you essential sewing techniques like adding zippers, stitching layered panels, and creating structured bases — skills that you can apply to other DIY projects later.
In addition to being practical, a craft storage tote bag with multiple pockets helps maintain order in your workspace. Imagine having dedicated compartments for every type of tool — small slots for pens, deep side pockets for rulers, zippered sections for beads, and interior dividers for fabric scraps. When everything has its place, you save time and feel less stressed during creative sessions. Whether you’re heading to a workshop, craft fair, or simply organizing at home, this project blends utility, style, and sustainability in a single, handmade solution.
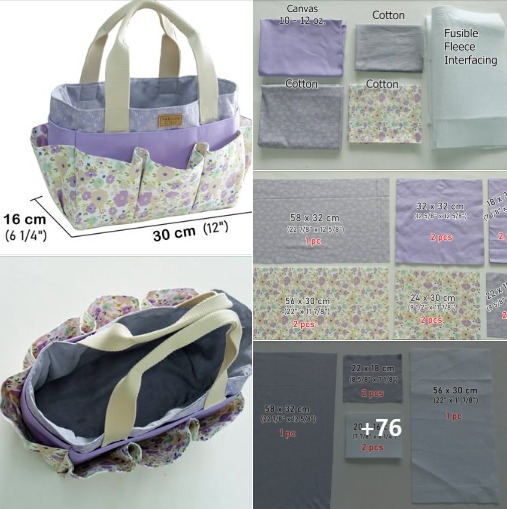
Selecting quality materials is the foundation of making a large craft storage tote bag with multiple pockets that lasts. You’ll need sturdy fabric for the exterior — canvas, denim, or heavy cotton work well because they resist tearing and provide structure. For the interior lining, choose a smooth fabric like quilting cotton or nylon that’s easy to clean. Reinforcing the bottom with interfacing or foam stabilizer prevents sagging and helps the tote keep its shape even when it’s full.
Before cutting, gather all the essential sewing tools. A rotary cutter ensures precise lines, while fabric clips keep thick layers aligned better than pins. You’ll also need a measuring tape, ruler, fabric marker, and an iron to press seams flat. Having a good pair of fabric scissors dedicated to sewing projects makes a big difference in how neatly your pieces come together.
Think about color coordination and design early in the process. Matching or contrasting patterns between the body and pockets can give your tote a professional appearance. Neutral tones like beige or gray pair beautifully with bright pocket linings, while bold prints can turn a simple storage bag into a fashion statement. Don’t hesitate to express your personality through your fabric choices.
Stability is key for any large tote. Consider using fusible interfacing or foam stabilizers on both the body and pocket pieces. This extra layer not only adds thickness but also ensures your pockets hold their shape after repeated use. Some crafters even insert a thin plastic sheet or cardboard at the base for extra firmness.
If you plan to carry heavy supplies, opt for reinforced handles made from webbing or doubled fabric strips. Secure them with box-shaped stitches or a crisscross pattern for extra strength. Adjustable straps or padded shoulder bands can make the bag more comfortable for longer trips.
Finally, don’t overlook the thread quality. Strong polyester thread is ideal for projects that need to endure weight and wear. Using a matching or slightly contrasting color gives a professional finish. Choosing high-quality materials from the start ensures your handmade craft tote is both beautiful and long-lasting.
Proper design and measurement are essential when learning how to make a large craft storage tote bag with multiple pockets. Start by deciding on the final dimensions based on what you plan to carry. A good average size for a craft tote is about 18 inches wide, 14 inches tall, and 6 inches deep — large enough to hold supplies without becoming cumbersome.
Sketch your design on paper before cutting fabric. This helps you visualize pocket placement and overall layout. Mark where you’ll add exterior side pockets, front pouches, and interior dividers. Each pocket should have a clear purpose — for example, narrow ones for pens, medium ones for scissors, and larger ones for notebooks or fabric rolls. A well-thought-out plan ensures you don’t forget crucial details once you start sewing.
Accurate measurements are the secret to a professional finish. Always add seam allowances, typically about ½ inch per side. When you measure the pocket panels, remember that folded hems and pleats consume extra fabric. Writing down every dimension and labeling each piece avoids confusion later on.
For the base and sides, you can choose between a rectangular or box-shaped structure. Rectangular totes are simpler, while box-shaped ones with gussets provide more interior space. If you prefer a softer look, add rounded corners or curved seams at the top. Small design decisions like these influence the final aesthetic and comfort of use.
Internal organization is where your creativity shines. Consider adding elasticized pockets, zip compartments, or Velcro closures. These features prevent items from falling out and keep everything within reach. Adjustable dividers inside the tote can transform it from a sewing kit carrier to a painting-supply organizer instantly.
Lastly, test your design using inexpensive muslin or scrap fabric. This prototype helps you spot measurement errors and gives you a feel for the final size. It’s a small step that can save you time, money, and frustration before committing to your final materials.
Now that you have your materials and measurements, it’s time to begin sewing the large craft storage tote bag with multiple pockets. Start with the pocket panels. Fold the top edge of each pocket piece twice and stitch to create a clean hem. If adding zippers, sew them before attaching the pocket to the main body. For pleated pockets, fold the center area outward and stitch along the sides to create depth.
Next, attach the finished pockets to the main body fabric. Pin or clip them carefully, aligning them based on your earlier design. Reinforce the top corners with double stitching since these areas endure the most stress. Add as many exterior and interior pockets as you want, balancing practicality with visual harmony.
Once all pockets are secured, sew the main body panels together. Place right sides facing each other and stitch along the sides and bottom edges. Turn it right-side out and press the seams flat with an iron for a crisp look. If your design includes a structured base, slide in the stabilizer before closing the lining.
To make the handles or straps, cut long strips of fabric (around 24 to 30 inches each). Fold them lengthwise, sew along the edges, then turn inside out and press. For added durability, insert a webbing core or interfacing. Secure the handles to the tote’s top edges using reinforced stitching in a square or X pattern.
The next step is adding the lining. Sew the lining pieces together just like the outer shell, leaving a small gap at the bottom. Insert the outer bag inside the lining (right sides facing), sew along the top edge, then turn everything right-side out through the gap. Close the gap with a neat invisible stitch.
Finally, topstitch around the upper edge of the tote to lock all layers together. This not only adds durability but also gives a polished finish. At this stage, you can embellish your tote with decorative stitching, buttons, or fabric labels that make it uniquely yours.
Personalization transforms your large craft storage tote bag with multiple pockets into something special. You can embellish it with embroidery, fabric paint, iron-on patches, or even monogram initials. Choose colors and motifs that reflect your creative personality — floral patterns for a soft touch or geometric prints for a modern vibe.
If you’re giving the tote as a gift, add a custom fabric tag or charm. Handmade items with personalized details always stand out, and recipients appreciate the extra thought behind them. You can also experiment with decorative topstitching in contrasting thread colors for visual interest.
Another way to customize your tote is by adding modular features. Detachable pouches, snap-on pockets, or key clips make the design more functional. Velcro dividers are excellent if you want to switch between different craft types — for example, moving from knitting supplies to scrapbooking tools.
Maintenance is equally important. Since tote bags tend to gather dust and lint, choose fabrics that are machine washable or easy to wipe clean. Always read fabric-care labels before washing. Spot-clean small stains with mild soap and a damp cloth to maintain the bag’s appearance and extend its life.
When not in use, store your tote properly. Avoid folding it in tight spaces that may crease or weaken the structure. Keeping it upright or lightly stuffed with tissue paper helps maintain its shape. If you’ve used stabilizers or foam, avoid direct heat or prolonged sunlight exposure to prevent warping.
By personalizing and caring for your tote, you ensure it remains not just a storage solution but also a reliable companion in your creative journey. Every detail — from color to care routine — adds personality and longevity to your handmade creation.
1. What is the best fabric for making a craft tote bag?
Canvas, denim, and heavy cotton are excellent choices because they’re durable, easy to sew, and maintain structure.
2. How can I make my tote bag more durable?
Use fusible interfacing or foam stabilizers, reinforce seams with double stitching, and choose strong polyester thread.
3. How many pockets should a craft tote have?
That depends on your needs, but 6 to 10 pockets of varying sizes provide a good balance of organization and accessibility.
4. Can I add zippers or magnetic closures?
Absolutely! Zippers, Velcro, or magnetic snaps add security and style. Just plan placement before sewing the panels together.
5. What’s the best way to clean the tote bag?
Spot-clean small stains or hand-wash the bag in cold water. Avoid harsh detergents or dryers that can distort the shape.
6. How long does it take to make one?
For beginners, the project can take about 5 to 7 hours spread over a couple of days. Experienced sewists may finish in half that time.
7. Can I sell tote bags I make using this guide?
Yes! Handmade craft totes are popular at markets and online shops. Just ensure your stitching and materials meet quality standards.
Learning how to make a large craft storage tote bag with multiple pockets is both a practical and creative adventure. You’ve explored material selection, design planning, detailed sewing steps, and ways to personalize and maintain your finished tote. Each stage builds valuable skills while resulting in a beautiful, functional bag that keeps your creative life organized.
By making your own craft tote, you not only save money but also produce something unique and eco-friendly. Every pocket, seam, and color choice reflects your personality and attention to detail.
We hope this guide inspires you to start sewing your own large craft storage tote bag today. Share your thoughts, experiences, and suggestions in the comments — your honest opinion helps others who want to try this rewarding project too.


