
Hunter's Star Quilt Block - Quick & Easy Tutorial

How to make a crossbody bag – pattern is a fantastic project for both beginners and experienced crafters who want to create a stylish and practical accessory.
Learning how to make a crossbody bag – pattern allows you to personalize your bag according to your taste, size preferences, and choice of fabric.
With a simple guide, you can craft a bag that is not only functional but also a statement piece that complements your everyday outfits. From selecting the right materials to finishing touches, this project will give you the confidence to design your own bag effortlessly.
Making a crossbody bag is not only about sewing; it is about understanding the components that make a bag durable and stylish. When you follow the how to make a crossbody bag – pattern steps, you will learn about the essential elements such as straps, pockets, lining, and closures.
Each detail contributes to the overall design and usability of your bag. Whether you plan to carry it for casual outings, work, or travel, knowing how to create a crossbody bag ensures that it meets your needs while reflecting your personality.
In addition to being a creative activity, learning how to make a crossbody bag – pattern can be rewarding and even cost-effective. Instead of purchasing expensive designer bags, you can craft one at home with materials that suit your budget. This process allows you to experiment with colors, textures, and styles without any limitations. By the end of this guide, you will be equipped with the knowledge to produce a beautiful, functional, and durable crossbody bag that you can proudly use or gift to someone special.
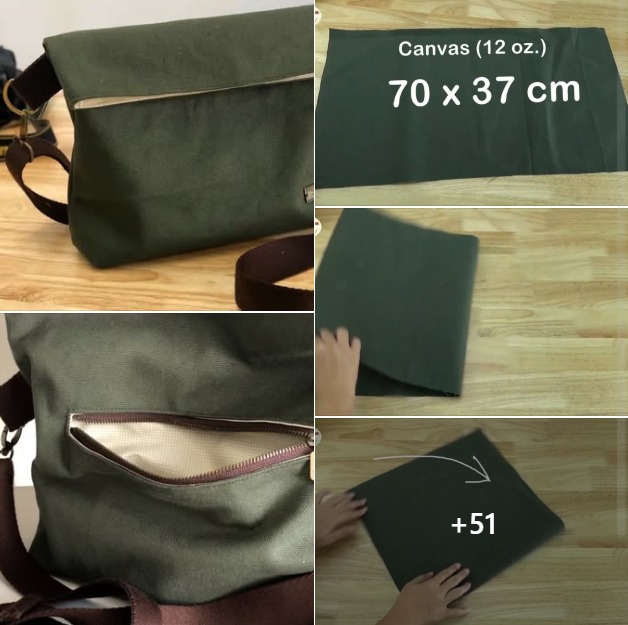
When starting your journey to learn how to make a crossbody bag – pattern, the first step is selecting the right materials. The quality of your bag depends heavily on the materials you use. Fabrics such as canvas, denim, or leather offer durability and style. Canvas is perfect for beginners because it is easy to work with and holds its shape well. Leather provides a premium finish but requires more advanced skills. Lining fabric, like cotton or polyester, adds strength and a polished look to the inside of your bag.
Hardware is another crucial element in your bag-making process. Buckles, zippers, and clasps should be sturdy enough to withstand daily use. Choosing the right size of hardware ensures that your bag functions smoothly without compromising style. How to make a crossbody bag – pattern requires careful measurement and coordination of hardware with fabric thickness to achieve a professional finish.
Thread selection should not be overlooked. Using strong polyester thread ensures that your seams hold up under stress. Matching the thread color with your fabric improves the overall aesthetic. Beginners sometimes underestimate the impact of thread choice, but it can make a big difference in the bag’s longevity and appearance.
Don’t forget about accessories such as decorative patches, buttons, or embroidery. Adding personal touches to your crossbody bag pattern makes it unique. These embellishments also allow you to express your creativity while practicing different sewing techniques.
Cutting tools are essential for precision. A rotary cutter or sharp scissors ensures clean fabric edges, which is crucial for aligning pattern pieces. Misaligned cuts can lead to uneven seams and a less polished final product.
Finally, having a well-lit and organized workspace helps maintain focus and efficiency. Organizing your materials before starting makes the bag-making process smoother and more enjoyable. Planning your workflow is a key tip for mastering how to make a crossbody bag – pattern efficiently.
The core of learning how to make a crossbody bag – pattern lies in understanding the pattern itself. Patterns provide a roadmap for cutting, sewing, and assembling the bag. Patterns vary depending on the bag style, but most include sections for the body, strap, flap, and pockets. Carefully reading the instructions before starting ensures you avoid mistakes that can waste time and materials.
Each pattern piece must be measured accurately. Cutting fabric according to the pattern dimensions is critical for a balanced and functional bag. Marking seam allowances and noting the right sides of the fabric prevent confusion during assembly.
Grain lines are another important consideration. Aligning the pattern with the fabric grain ensures that your bag maintains its shape and durability. Ignoring grain lines may result in a bag that twists or sags over time.
Patterns often indicate different stitch types for various sections. Following these stitch recommendations strengthens weak points and enhances the bag’s longevity. For instance, using a reinforced stitch on strap attachments prevents tearing.
Some patterns include optional design elements, such as extra pockets or decorative flaps. Beginners should focus on the basic pattern first, while more advanced crafters can experiment with these additions to create a personalized crossbody bag pattern.
Finally, always double-check your measurements before cutting fabric. This step ensures that your bag components fit together seamlessly, which is a fundamental principle in how to make a crossbody bag – pattern.
Mastering basic sewing techniques is essential when learning how to make a crossbody bag – pattern. Even simple stitches can make a significant difference in the final appearance and durability of your bag. Straight stitches are commonly used for seams, while backstitching strengthens critical areas like strap attachments.
Seam finishing is equally important. Techniques such as zigzag stitching or serging prevent fabric fraying, especially for bags made from woven materials. A clean seam finish contributes to the professional look of your finished bag.
Topstitching is a decorative and functional technique. It reinforces seams while adding an elegant touch. Practicing topstitching on scrap fabric before applying it to your bag ensures even spacing and neat results.
Pocket placement is another area where sewing precision matters. Accurate alignment ensures that the pockets are functional and aesthetically pleasing. Misaligned pockets can make your bag look uneven and reduce usability.
Attaching the strap securely is a crucial step. Reinforcing the strap area with multiple stitches or using interfacing ensures it can hold weight without tearing. This is a key aspect of how to make a crossbody bag – pattern that guarantees a durable product.
Finally, pressing seams during the sewing process improves fabric alignment and helps the bag maintain its shape. A well-pressed bag looks professional and increases longevity.
The final stage in how to make a crossbody bag – pattern is adding finishing touches. These details elevate the bag from a simple project to a stylish accessory. Hardware installation, such as attaching buckles or zippers, should be done carefully to avoid fabric damage.
Edge finishing adds both style and durability. Binding or folding edges creates a polished look and prevents fraying. Small details like decorative stitching or embroidery enhance visual appeal while showcasing your craftsmanship.
Lining installation is an important finishing touch. A well-fitted lining not only hides raw seams but also adds structure and strength to the bag. Choosing a lining with a contrasting color or pattern can create a striking visual effect.
Adding compartments or organizers inside the bag increases functionality. Consider including zippered pockets for valuables or open pockets for easy access. A well-designed interior improves usability and reflects thoughtful craftsmanship.
Finally, quality checks ensure your bag is both beautiful and functional. Test the strap strength, zipper operation, and overall sturdiness. Ensuring all components work properly completes the learning process in how to make a crossbody bag – pattern.
Small decorative elements, like tassels or charms, can be added as optional personal touches. These finishing touches not only improve aesthetics but also allow your bag to stand out as a unique creation.
Q1: What materials are best for beginners?
A1: Canvas or cotton fabrics are ideal for beginners because they are easy to handle and sew, providing durability without complex techniques.
Q2: How long does it take to make a crossbody bag?
A2: Depending on skill level, making a crossbody bag can take anywhere from 3 to 6 hours, including cutting, sewing, and finishing.
Q3: Can I use a commercial pattern?
A3: Yes, commercial patterns simplify the process by providing pre-measured pieces and instructions. They are helpful for beginners learning how to make a crossbody bag – pattern.
Q4: Do I need a sewing machine?
A4: While hand-sewing is possible, a sewing machine ensures stronger seams, faster production, and a cleaner finish.
Q5: How do I make the strap adjustable?
A5: Use a buckle or slider on the strap to allow length adjustment, ensuring comfort and versatility for daily use.
Q6: How can I add extra pockets?
A6: You can sew additional fabric pieces inside or outside the bag, aligning them carefully with the existing pattern to maintain symmetry.
In this guide, you learned how to make a crossbody bag – pattern, from selecting materials to adding finishing touches. We explored choosing the right fabric, understanding patterns, sewing techniques, and finishing details that make a bag functional and stylish. Crafting your own bag allows personalization, creativity, and cost savings while providing a sense of accomplishment.
Feel free to experiment with colors, fabrics, and designs, and don’t hesitate to add personal touches. We would love to hear your honest opinions, experiences, and suggestions on your bag-making journey. Sharing your results helps others and inspires new creative ideas in the world of DIY fashion.
Creating a crossbody bag is both functional and fashionable. With this How to Make a Crossbody Bag – Pattern, you can customize the size, colors, and materials to match your wardrobe.
Handmade bags are not only practical for carrying essentials but also allow you to express creativity. Choosing fabrics or yarns that reflect your personal style adds a special touch that store-bought bags often lack.


