
Hunter's Star Quilt Block - Quick & Easy Tutorial

How to make a beautiful apron with a pattern – free pattern is a wonderful project for anyone who loves crafting, sewing, and creating something useful and stylish.
Making your own DIY apron not only allows you to express your creativity, but it’s also a practical addition to your kitchen or craft room.
Whether you’re a beginner or a seasoned sewer, this sewing apron tutorial will help you design a personalized apron using a free apron pattern, ensuring a perfect fit and a professional look.
Creating your own apron is surprisingly simple when you follow a clear guide. With a few basic materials—fabric, thread, scissors, and a sewing machine—you can produce a stunning handmade apron that suits your style.
This project is ideal for people who enjoy crafting gifts or adding a personal touch to everyday items. You can also customize it by choosing fabrics that match your personality or your kitchen decor. The best part is that a free apron pattern makes the process accessible to everyone.
The art of how to make a beautiful apron isn’t just about sewing; it’s about creativity, patience, and self-expression. By learning this skill, you can make aprons for cooking, gardening, crafting, or even as thoughtful handmade gifts. Using a free apron pattern will give you a reliable base to start, while still allowing room for customization. This step-by-step sewing apron tutorial will guide you from choosing the right materials to adding finishing touches that make your apron stand out.
Before you start your DIY apron, selecting the right fabric is key to success. The fabric you choose determines how durable, comfortable, and attractive your final apron will be. Cotton and linen are classic choices because they are breathable, easy to wash, and come in countless prints and colors. For a sturdier apron—perfect for grilling or gardening—consider canvas or denim. These materials hold up well and protect clothing from spills and stains.
Next, make sure you have all the tools you’ll need for your sewing apron tutorial. Essential tools include scissors or a rotary cutter, measuring tape, pins or clips, and an iron. A sewing machine is recommended for neat and durable stitching, but you can also sew by hand if you’re patient. Don’t forget matching thread and a marking pen for tracing your apron pattern accurately. Having everything ready before you start will make the process smoother.
It’s important to pre-wash your fabric before cutting. This step prevents shrinkage and ensures your apron will maintain its shape after the first wash. Iron the fabric flat so you can trace your free apron pattern easily and cut precise shapes. Good preparation leads to a professional-looking result.
If you’re using a printed apron pattern, pin it to the fabric and trace around it carefully. Pay attention to grain lines and markings on the pattern; these details help your apron fit better and hang nicely when worn.
Once your pieces are cut, you can personalize them before sewing. Add pockets, decorative trims, or embroidery to make your apron unique. This is where creativity comes into play—mix colors, patterns, and textures that reflect your personality.
Lastly, keep your workspace organized. Arrange your tools within reach and keep the sewing area free from clutter. This helps you focus and reduces mistakes, especially when following a sewing apron tutorial for the first time.
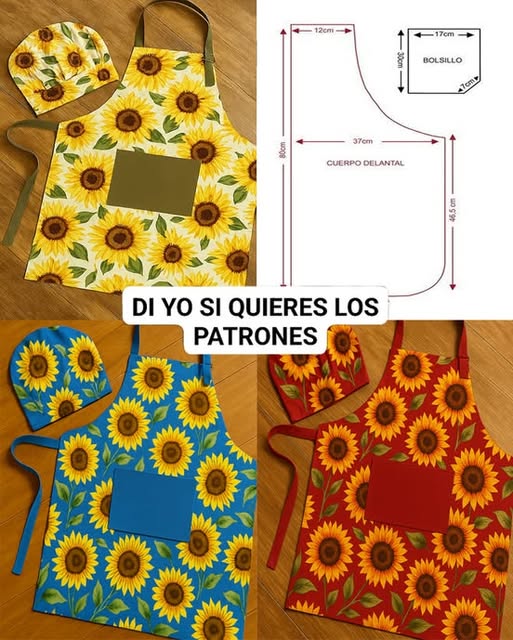
After preparing your materials, it’s time to cut the fabric according to your free apron pattern. Lay your fabric on a flat surface and ensure it’s smooth with no wrinkles. Carefully pin the paper pattern onto the fabric, aligning it with the grain for a balanced drape. Use sharp scissors or a rotary cutter for clean edges. Accurate cutting is crucial to ensure all pieces fit together perfectly.
When following a DIY apron pattern, you’ll typically have pieces for the main body, neck strap, and waist ties. Some patterns also include a front pocket, which adds both style and functionality. Take your time to label each piece so you can identify them easily during assembly.
Begin by hemming the edges of the apron body. Fold the fabric edges inward about 1/4 inch twice and press with an iron. Stitch along the fold to create clean, durable edges. This step gives your apron a polished finish and prevents fraying.
Next, attach the straps. If your apron pattern includes adjustable straps, consider adding D-rings or buttons for flexibility. For a classic style, simply sew the straps securely to the upper corners and sides of the apron. Reinforce these seams with backstitching for durability, especially if the apron will be used frequently.
Now it’s time to add pockets. Fold the pocket edges, iron them flat, and stitch the top edge for a clean look. Pin the pocket to your apron body and sew along the sides and bottom, leaving the top open. You can also divide the pocket with vertical stitches to create compartments for utensils or tools.
Finally, press the entire apron with a warm iron. This not only sets the stitches but also enhances the overall appearance. At this point, your DIY apron should be taking shape beautifully.
Adding decorative elements is where your how to make a beautiful apron project becomes truly personal. There are countless ways to make your apron stand out, even if you’re using a simple free apron pattern. Consider using patterned fabric for the straps, adding lace or ruffles along the edges, or stitching a contrasting pocket to create visual interest.
Embroidery is another great way to elevate your apron design. You can stitch your initials, a fun phrase, or a floral motif onto the pocket or bib area. This small touch adds charm and makes your DIY apron one-of-a-kind. If you’re new to embroidery, try using iron-on patches or fabric paint for similar effects.
For a modern touch, combine fabrics of different textures—like denim with cotton or canvas with linen. Mixing materials adds both strength and personality. Don’t be afraid to experiment with color blocking or bold prints; the key to learning how to make a beautiful apron is letting your creativity lead the way.
Trims and ribbons are also fantastic additions. Sew decorative ribbon along the edges or around the pocket. You can even make a bow from the same ribbon to tie around the waist. This transforms a simple sewing apron tutorial into a stylish fashion piece.
If you want your apron to double as a gift, think about presentation. Fold it neatly, tie it with a matching ribbon, and include a handwritten tag or care instructions. A handmade apron is a thoughtful and practical present for friends and family.
Above all, enjoy the process. Crafting a DIY apron is not only rewarding but also relaxing. Each stitch adds personality and meaning to the finished product.
Once your DIY apron is complete, proper care will keep it looking new for a long time. Wash your apron according to the fabric type—cotton and linen can usually be machine washed in cold or warm water, while canvas or denim may require a gentle cycle. Always check the care instructions of your chosen fabric before washing.
Iron your apron on the appropriate setting to maintain its crisp appearance. If you added trims or embroidery, use a pressing cloth to protect delicate details. Regular ironing helps your apron retain its shape and prevents wrinkles from setting in.
Store your apron neatly folded or hung on a hook in your kitchen. This prevents unnecessary creasing and keeps it easily accessible whenever you cook or craft. A well-kept apron also enhances your kitchen’s charm and encourages you to use it often.
Over time, if your apron shows signs of wear, consider repairing it instead of discarding it. Reinforce seams, replace worn straps, or add patches to refresh the look. This sustainable approach reduces waste and keeps your favorite DIY apron in use for years.
For those who love seasonal decorations, making multiple aprons with different free apron patterns can be fun. Try floral fabrics for spring, plaid for winter, or bright colors for summer. This keeps your creative spirit alive and your collection ever-changing.
Ultimately, caring for your handmade apron is part of the joy of owning something you created yourself. It’s a daily reminder of your skill, patience, and imagination.
1. What fabric is best for making an apron?
Cotton and linen are the most popular choices because they are lightweight, breathable, and easy to sew. For heavier use, canvas or denim works best.
2. Can I make an apron without a sewing machine?
Yes! While a sewing machine speeds up the process, you can hand-sew your apron using basic stitches. It just requires more time and patience.
3. Where can I find a free apron pattern?
There are many online resources offering printable free apron patterns, often suitable for beginners. Choose one that matches your desired style and size.
4. How can I personalize my apron?
Add pockets, embroidery, trims, or patterned straps. You can also mix fabrics or add ruffles for a more creative design.
5. Is an apron a good beginner sewing project?
Absolutely! Making an apron is simple, requires minimal fabric, and teaches essential sewing techniques such as hemming and attaching straps.
Learning how to make a beautiful apron with a pattern – free pattern is an enjoyable and rewarding experience. From choosing the right fabric to adding decorative touches, each step helps you develop new sewing skills and express your creativity. With a little patience and imagination, your DIY apron can become a stylish and functional piece you’ll be proud to wear or gift to someone special.
We hope this sewing apron tutorial has inspired you to start your own project. If you found this guide helpful, please share your thoughts, opinions, and suggestions below. Your feedback helps make every creative journey even better!


