
Hunter's Star Quilt Block - Quick & Easy Tutorial

How to make a beautiful apron with a pattern – free pattern is a delightful and rewarding sewing project that anyone can enjoy, from beginners to experienced crafters.
Creating your own apron gives you the freedom to choose fabrics, colors, and designs that express your personality while also providing a functional piece for your kitchen or workshop.
With a free apron pattern, you can easily bring your creative vision to life without needing to invest in expensive templates or kits.
Sewing a handmade apron is more than just a practical project—it’s an opportunity to explore your creativity and develop valuable sewing skills.
When you make an apron with a pattern, you learn how to cut fabric accurately, follow sewing instructions, and assemble pieces together neatly. Whether you’re preparing gifts, starting a small craft business, or simply enhancing your cooking routine, this project combines usefulness and charm in equal measure.
One of the best things about learning how to make a beautiful apron with a pattern is that it can be fully customized to suit your preferences. You can choose a vintage floral print for a retro kitchen look, opt for bold stripes for a modern vibe, or even use recycled fabrics for an eco-friendly approach. Plus, having access to a free pattern means anyone can join in, regardless of their budget. Let’s explore how you can create your own stunning apron step by step.
Selecting the perfect fabric is the first essential step in learning how to make a beautiful apron with a pattern – free pattern. The type of fabric you choose affects not only the appearance but also the durability and comfort of your apron. Cotton is the most common choice because it’s breathable, washable, and easy to sew. For a sturdier option, consider canvas, denim, or linen blends that can withstand heavy use in the kitchen or workshop.
Before you begin, gather the necessary tools. You’ll need scissors or a rotary cutter, pins or clips, an iron, a measuring tape, and a sewing machine or needle and thread if you prefer hand sewing. Having everything organized beforehand will make the process smoother and more enjoyable. Keeping your workspace clean and well-lit will also help prevent mistakes and improve accuracy when cutting or sewing your fabric pieces.
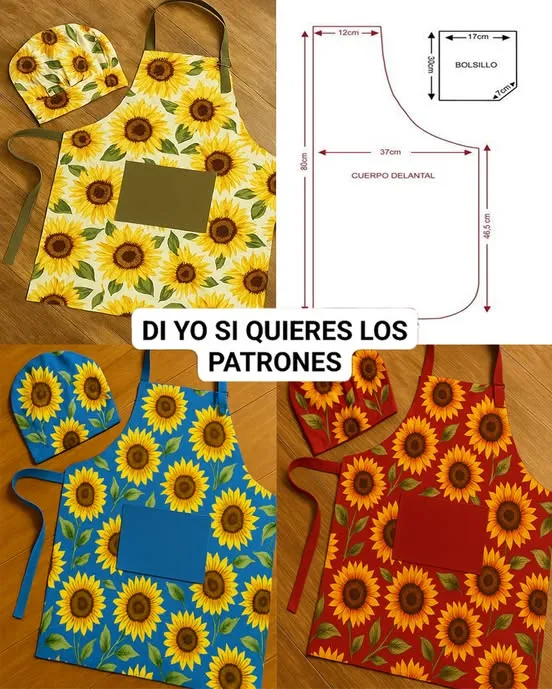
Next, print or trace your free apron pattern onto pattern paper or directly onto the fabric using chalk or a fabric marker. Patterns typically include several pieces, such as the main body, neck strap, and waist ties. Be sure to check the seam allowance on your pattern; this is the extra space added for stitching. Most patterns use a ½-inch or 1-centimeter allowance, but always confirm before cutting.
Once your fabric is ready, iron it to remove any wrinkles. This ensures that your apron pieces will align correctly and that your finished product will have a professional appearance. Wrinkled fabric can cause uneven seams or incorrect measurements, so taking a few extra minutes to press your fabric can make a big difference in the final result.
Before cutting, double-check that your pattern pieces are properly aligned with the fabric grain. The grain line determines how the fabric will stretch and behave once sewn. Aligning the pieces correctly helps the apron drape nicely on the body and last longer without warping or twisting after washing.
Lastly, take a moment to think about color combinations and accents. You can add a decorative pocket, trim, or ruffle to make your handmade apron unique. Mixing contrasting fabrics or adding embroidery can turn a simple project into something truly special.
Now that your materials are ready, it’s time to cut your fabric according to the free apron pattern. Carefully lay out each pattern piece and secure it with pins or fabric weights. Make sure you follow the grain line and cut smoothly to avoid jagged edges. Accuracy is crucial in this step; uneven cuts can lead to mismatched seams later.
If your pattern includes markings for darts, pleats, or pockets, transfer these to your fabric using a washable marker or tailor’s chalk. These markings act as guides to help you assemble your apron precisely. When you follow the instructions carefully, your apron pattern will come together seamlessly, giving your final product a polished look.
Once all pieces are cut, you may want to finish the raw edges with a zigzag stitch or use pinking shears to prevent fraying. This simple step can make your apron more durable and extend its lifespan. Even if you’re a beginner, practicing clean edge finishes will help you develop professional sewing habits.
Next, iron all your cut pieces one more time. Pressing them before sewing makes assembly easier and helps the seams lie flat. A well-pressed project not only looks better but also simplifies stitching because the fabric layers stay in place.
If you’re adding pockets, now is the time to prepare them. Fold the top edge of the pocket down twice, press it, and sew a straight line to create a clean hem. You can then position the pockets on the apron body according to your pattern layout and pin them securely before stitching.
Finally, organize your pieces in the order you’ll sew them. Keeping everything labeled and arranged makes the construction process much smoother, especially if this is your first time making an apron.
The fun part of learning how to make a beautiful apron with a pattern – free pattern is seeing your project come to life. Start by sewing the main body pieces together if your design has panels. Align the edges carefully, pin them, and stitch along the seam lines. Press each seam open after sewing to keep your apron flat and professional looking.
Next, attach the neck strap. You can either make an adjustable strap with D-rings or a fixed one sewn directly onto the apron. For a sturdy strap, fold the fabric strip in half lengthwise, press it, then fold the raw edges inside and stitch along both sides. This method creates a strong and neat strap that will hold up over time.
The waist ties follow the same process as the neck strap. Make sure they are long enough to tie comfortably around your waist with a bow. Attaching them securely to the apron sides ensures they won’t come loose during use. Reinforce the ends with a few backstitches for extra strength.
Once the straps are attached, hem the outer edges of the apron. Fold the raw edges under twice—first about ¼ inch and then another ¼ inch—and press before sewing. This double-fold hem hides the raw edges and gives your apron a tidy finish.
If your apron pattern includes decorative elements such as ruffles, lace, or contrasting trims, sew them on now. These embellishments add personality and can transform a basic apron into something truly eye-catching. Be sure to use matching or complementary thread colors for a cohesive appearance.
After assembling all parts, give your apron one final press with the iron. This step sets the seams, flattens any wrinkles, and helps the apron look crisp and new. Your handmade apron is now ready to wear or gift!
One of the joys of making your own apron with a pattern is the endless opportunity for customization. You can experiment with different fabric textures, prints, and colors to match your personality or kitchen decor. For instance, floral cotton gives a charming country feel, while denim offers a rustic, practical style that’s perfect for gardening or barbecues.
Consider adding embroidery or fabric paint designs to personalize your apron even further. Initials, small motifs, or quotes can make it unique. This is a great way to create handmade gifts for friends and family that carry sentimental value.
Another creative idea is to line your apron with a contrasting fabric. This not only adds durability but also gives your project a professional touch. Lined aprons feel more substantial and can be reversible if you choose coordinating prints.
You can also play with pocket designs. Try adding multiple pockets of various sizes for utensils, recipe cards, or a phone. Decorative stitching or buttons can enhance the look while maintaining functionality.
If you love eco-friendly projects, repurpose old shirts, tablecloths, or fabric scraps to make your apron. This sustainable approach reduces waste and gives new life to unused materials while adding character and charm to your final piece.
Lastly, don’t be afraid to experiment. Making a beautiful apron with a free pattern is all about expressing yourself through fabric and design. The more you practice, the more confident you’ll become in your sewing abilities.
1. What type of fabric is best for aprons?
Cotton and linen are the most popular because they are breathable, washable, and easy to sew. For heavier use, canvas or denim provides extra durability.
2. Can I sew an apron without a sewing machine?
Yes! You can sew an apron by hand using a strong backstitch. It will take longer, but the result can be just as beautiful and functional.
3. How much fabric do I need for one apron?
Typically, one yard (or about one meter) of fabric is enough for a standard adult apron, but always check your free pattern for exact measurements.
4. Can I adjust the pattern size?
Absolutely. Most apron patterns can be resized easily by adjusting the width or length. Just ensure that straps and ties are proportionate.
5. How do I care for a handmade apron?
Wash it in cold or warm water with mild detergent and air dry to preserve the fabric’s color and shape. Iron as needed.
6. Are free apron patterns good for beginners?
Yes! Free patterns are perfect for practice because they come with clear instructions and don’t require any investment.
Learning how to make a beautiful apron with a pattern – free pattern is a fulfilling and creative experience. It allows you to craft something practical, stylish, and completely personal. With the right fabric, tools, and a touch of imagination, anyone can design an apron that stands out while serving everyday needs. Whether you’re sewing for yourself, your family, or as gifts, the process teaches patience, precision, and the joy of handmade craftsmanship.
Now that you know every step, it’s your turn to create! Try making your own apron today and share your experience. What design did you choose? Leave your honest opinion and suggestions below—I’d love to hear how your project turned out!


