
Hunter's Star Quilt Block - Quick & Easy Tutorial

The Granny’s Star Block Pattern is a beloved quilt design that blends the warmth of traditional patchwork with the timeless charm of star motifs.
Whether you are crafting a family heirloom, a cozy throw, or a modern wall hanging, the Granny’s Star Block Pattern provides the perfect mix of structure and freedom to express your personal quilting style.
This pattern is particularly adored for its classic yet versatile layout. It allows quilters to use leftover fabric scraps, play with color combinations, and experiment with contrast and symmetry.
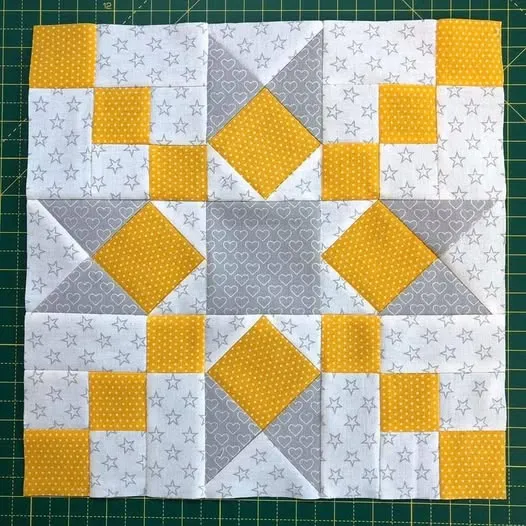
The block itself features a star centered within a grid, giving it a radiant look that shines in both vintage and contemporary fabric choices. From pastel tones to bold modern prints, the Granny’s Star Block Pattern adapts beautifully to any creative vision.
Another reason for its enduring popularity is the accessibility of the design. Even beginner quilters can master this pattern with patience and a basic understanding of piecing. It offers a rewarding balance—simple enough for newcomers, yet engaging enough to keep experienced quilters inspired. Whether you prefer hand-stitching or machine sewing, this block brings a sense of satisfaction and artistry that few designs can match.
The Granny’s Star Block Pattern holds a special place in quilting history. It draws inspiration from two beloved traditional designs: the “Granny Square,” popular in crochet, and the “Star Block,” a long-standing favorite in patchwork quilting. Combining these elements results in a fresh yet nostalgic block that evokes comfort, family, and creativity.
Historically, quilting has always been a means of storytelling and connection. Women from different generations shared patterns, fabrics, and techniques, creating quilts that symbolized love, warmth, and resilience. The Granny’s Star Block Pattern captures that intergenerational bond, paying homage to the artistry passed down through time.
What makes this pattern even more meaningful is its symbolism. The star represents guidance, hope, and light—a common motif in traditional crafts. When framed by the “granny” squares, it becomes a tribute to family, wisdom, and continuity. Every stitch tells a story, and every completed block becomes part of a larger narrative that connects quilters across eras.
Today, modern quilters embrace this design not just for its sentimental value but also for its adaptability. You can create an entire quilt from repeated Granny’s Star blocks or use a single block as the centerpiece for a pillow, table runner, or mini quilt. Its balanced geometry makes it easy to resize and customize to fit different projects.
Color choice also plays a big role. Traditional versions often feature soft calicos or reproduction prints, while modern quilters may use solids or bold patterns to give it a contemporary twist. No matter your preference, the Granny’s Star Block Pattern allows endless creativity without losing its cozy, familiar charm.
Making a Granny’s Star Block Pattern is both rewarding and straightforward. Here’s how to approach it with confidence and creativity:
1. Gather Your Materials
Start by selecting your fabrics. You’ll need at least four contrasting colors to make the star pop. Common fabric choices include cotton or quilting cotton, which are easy to cut and sew. Don’t forget coordinating thread, a rotary cutter, cutting mat, and ruler.
2. Cut the Fabric Pieces
Precision cutting is key in quilting. For a standard 12-inch block, you’ll typically cut small squares (for the star points), medium squares (for the surrounding blocks), and a larger square for the center. Each pattern variation may have slightly different measurements, so always double-check your template.
3. Arrange Your Layout
Before sewing, lay out all pieces on a flat surface. This helps visualize the color balance and symmetry of your design. The star should stand out clearly from the background, creating a bright focal point.
4. Sew in Rows
Begin piecing the small squares together row by row. Sew with a consistent ¼-inch seam allowance to ensure your block remains accurate in size. Press seams open or to one side after each row for a neat finish.
5. Join Rows into the Full Block
Once all rows are sewn, carefully align and stitch them together to form the full star block. Keep checking that points match correctly for a crisp, professional appearance.
6. Press and Trim
After sewing, press the entire block flat and trim any uneven edges. A perfectly squared block ensures easy assembly when joining multiple blocks into a larger quilt.
By following these simple steps, even a novice can produce a beautiful result. The Granny’s Star Block Pattern not only teaches essential quilting techniques but also helps build confidence for future, more complex projects.
The beauty of the Granny’s Star Block Pattern lies in its versatility. There’s no limit to how you can personalize it to reflect your taste and artistic flair.
Color Play: Experiment with gradients, monochromes, or complementary colors. A soft pastel palette gives a vintage look, while vivid colors create a striking modern feel.
Fabric Texture: Combine different textures, like linen, cotton, and flannel, to add depth and dimension. Mixing textures can make your quilt tactile and visually appealing.
Size Adjustments: You can enlarge or shrink the block depending on your project. Smaller versions work perfectly for cushions or tote bags, while larger ones form the foundation of full-sized quilts.
Borders and Sashing: Adding borders can frame each star beautifully. Sashing strips between blocks help the stars stand out and add an elegant separation.
Appliqué or Embroidery: Add hand-stitched details, embroidered names, or appliqué motifs to personalize your piece even more. This approach turns your quilt into a meaningful keepsake.
Seasonal Versions: Try making themed variations, such as Christmas colors, autumn tones, or floral spring shades. The Granny’s Star Block Pattern easily adapts to seasonal décor.
Each of these variations transforms the same basic pattern into something uniquely yours. That’s the true magic of quilting—it’s both structured and infinitely expressive.
To make the most of your quilting experience, here are some helpful tips every quilter should know:
Following these small but impactful techniques ensures that every Granny’s Star Block Pattern you create will look professional, polished, and full of life.
1. What size should a Granny’s Star Block be?
The standard size is 12 inches square, but you can easily resize it by adjusting the square measurements proportionally.
2. Can beginners make this pattern?
Yes! The Granny’s Star Block Pattern is perfect for beginners. It requires basic cutting and piecing skills but results in a beautiful, detailed design.
3. What fabrics work best?
Quilting cotton is ideal because it’s stable, easy to cut, and holds shape well. Avoid stretchy fabrics like jersey unless you’re experienced with stabilizers.
4. How much fabric do I need for a full quilt?
The amount depends on your desired quilt size. As a rule, plan for about one-third of your total fabric in background color and two-thirds in accent and star fabrics.
5. Can I make it using scraps?
Absolutely! This pattern is excellent for scrap busting. Small fabric remnants from previous projects work perfectly for the star points.
6. Is there a digital PDF version available?
Many modern quilters provide Granny’s Star Block Pattern – PDF downloads with printable templates and cutting guides, making it easy to start immediately.
7. How can I ensure sharp star points?
Maintain a consistent ¼-inch seam allowance, and double-check alignment before sewing final seams. Press seams carefully to keep edges crisp.
The Granny’s Star Block Pattern remains one of the most beloved and adaptable designs in the quilting world. It bridges the gap between tradition and modern creativity, allowing you to craft something that is both meaningful and visually stunning. From its historical roots to its endless variations, this pattern continues to inspire quilters of all ages.
If you’ve never tried it before, there’s no better time to start. Whether you create a single block or a full quilt, you’ll enjoy every stitch along the way. We hope this guide helps you appreciate the beauty and potential of the Granny’s Star Block Pattern—and encourages you to share your results proudly.


