
Hunter's Star Quilt Block - Quick & Easy Tutorial

If you are searching for a Free Folded Star Quilt Pattern for Beginners, you’ve come to the right place. This pattern combines creativity, geometry, and simplicity, making it an excellent project for new quilters who want to learn classic folding techniques.
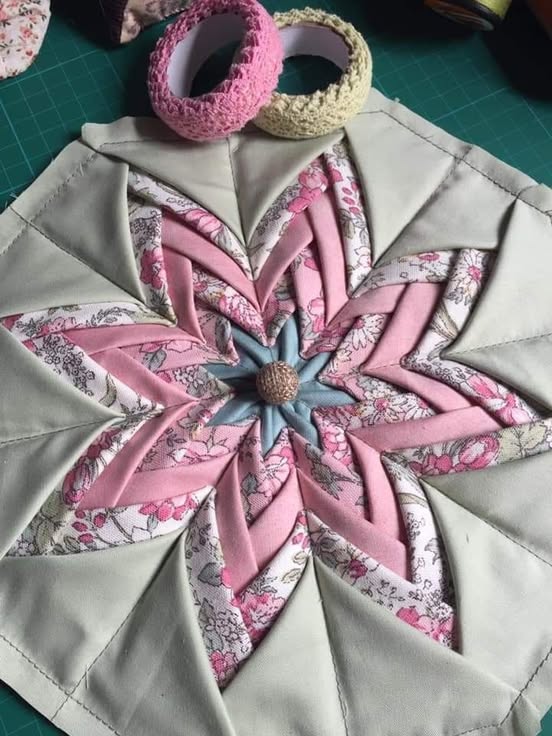
The folded star quilt design is known for its beautiful symmetry and layered texture, giving your finished piece a timeless look that stands out in any quilting collection.
Unlike traditional patchwork, the folded star quilt pattern involves folding fabric pieces rather than stitching small patches together.
This creates a unique dimensional effect that catches the eye and adds depth to your quilt. Beginners will find this technique both enjoyable and educational, as it teaches patience, precision, and the basics of fabric manipulation.
Whether you plan to make a wall hanging, table topper, or decorative pillow cover, the Free Folded Star Quilt Pattern for Beginners offers endless creative possibilities. With the right materials and a step-by-step approach, you can craft a stunning star pattern that looks intricate but is surprisingly easy to make once you understand the process.
Before starting your folded star quilt pattern, it’s important to gather all the necessary materials. Proper preparation ensures a smooth, stress-free quilting experience and helps you focus on the fun part — folding and assembling your star.
The essential materials include several pieces of cotton fabric in different colors or patterns. Quilting cotton is ideal because it holds folds well and provides crisp edges. You’ll also need a square base fabric, batting, and a backing fabric for structure and durability.
A rotary cutter, self-healing mat, and quilting ruler are essential for cutting fabric precisely. Accuracy is key in the folded star quilt pattern, as uneven cuts can affect the overall symmetry of the star design.
Pins or fabric clips help hold layers in place as you fold and position the pieces. A sewing machine isn’t strictly required for the folding process, but it can be used to secure layers once the design is complete.
You’ll also need an iron and ironing board. Pressing the folds firmly keeps the layers crisp and helps maintain shape throughout the project. Quilters often say the iron is your best friend for folded star designs!
Finally, choose matching or contrasting thread depending on your design preference. The right thread color can make your star pop or blend seamlessly with the background.
The Free Folded Star Quilt Pattern for Beginners follows a simple structure, even though the finished piece looks complex. By following each step carefully, you’ll achieve a beautifully layered star design that’s both precise and artistic.
First, cut your fabric squares into uniform sizes — typically 4×4 inches or smaller for compact designs. Each layer of the star will require four squares in the same color or pattern.
Fold each square diagonally in half to form a triangle, and then fold it again to create a smaller triangle. Press each fold with your iron to secure crisp lines. These folded triangles are the foundation of your folded star quilt pattern.
Next, place the first set of four triangles with their points meeting in the center of your base fabric square. Adjust them until they form a neat diamond or star shape. Pin them in place once you’re satisfied with the alignment.
Continue layering additional folded triangles around the first set, alternating colors or patterns as desired. Each new layer should slightly overlap the previous one, creating the signature folded star texture.
As you work outward, make sure each layer remains symmetrical. Take your time adjusting folds and pressing them flat. Consistency in folding and spacing is what makes the folded star quilt design so visually striking.
Once your star is complete, stitch around the outer edge to secure all layers. Then, attach batting and backing fabric to finish your mini quilt, wall hanging, or cushion top.
While the Free Folded Star Quilt Pattern for Beginners is beginner-friendly, a few tips can make your finished project look professional and polished.
Start with a simple color scheme. Using three or four coordinated fabrics ensures that your star design stands out clearly without becoming overwhelming.
Precision is everything. Use a rotary cutter and ruler for clean, exact edges — uneven cuts can throw off the alignment of your folds and distort the star shape.
Press each fold firmly with a hot iron. This step keeps the folds crisp and prevents the layers from shifting as you add new pieces.
Consider using fabric with small prints or solid colors. Large patterns can distract from the star’s geometric structure, while small prints emphasize the layered effect beautifully.
Take your time when aligning points in the center. This is the focal point of your design, and neat alignment makes the difference between a good quilt and a stunning one.
Finally, don’t be afraid to experiment! Once you’ve mastered the folded star quilt technique, you can adjust the number of layers, mix fabrics creatively, and even turn the pattern into coasters, placemats, or ornaments.
As with any quilting project, beginners may encounter a few common pitfalls when working on a folded star quilt pattern. Understanding these mistakes beforehand will save time and frustration.
One frequent mistake is using fabrics that are too thick or stiff. Choose lightweight cotton that folds easily and maintains shape without bulk.
Another issue is skipping the pressing step. Ironing every fold might seem tedious, but it’s crucial for clean, flat layers that stay in place.
Inaccurate cutting is another common problem. Even a small variation in square size can throw off the entire pattern’s symmetry. Always measure twice before cutting.
Avoid overcrowding your layers. Adding too many folded pieces too close together can make the quilt bulky and uneven. Leave consistent spacing between layers for balance.
Rushing through assembly can also lead to misalignment. Take your time with each layer, especially when centering your star and securing folds.
Lastly, don’t forget to secure the edges. Stitching around the finished star keeps everything in place and prevents fabric from fraying or shifting over time.
Q1: Is this project suitable for absolute beginners?
Yes! The Free Folded Star Quilt Pattern for Beginners was designed specifically for new quilters. The folding technique is easy to learn and doesn’t require advanced sewing skills.
Q2: Do I need a sewing machine?
Not necessarily. While a sewing machine helps with finishing the edges, the folding and layering can be done entirely by hand.
Q3: What fabric works best for this pattern?
100% cotton fabric is ideal because it holds folds well and presses flat. Avoid slippery materials like satin or polyester.
Q4: How large should the squares be?
For beginners, 4-inch squares are a good starting size. You can adjust dimensions depending on how large or small you want your finished star.
Q5: Can I make a full quilt using this design?
Absolutely. Once you master one star block, you can join multiple folded stars together to create a full-sized quilt.
Q6: How do I prevent the layers from shifting?
Use pins or clips generously and press each layer firmly. Stitch around the edges once the design is complete for added security.
The Free Folded Star Quilt Pattern for Beginners is more than just a craft project — it’s an introduction to the joy of quilting through simple, meditative folding techniques. With minimal materials and a bit of patience, anyone can create a visually stunning quilt design that looks far more advanced than it truly is.
By following the step-by-step instructions, preparing your materials carefully, and applying the provided tips, you’ll produce a folded star that’s both elegant and durable. Avoiding common mistakes and maintaining precision will ensure that your finished piece shines with professional quality.
We hope this guide inspires you to try the folded star quilt technique and experiment with your own creative variations.
Share your experiences, offer suggestions, and let us know how your project turned out — your feedback helps other quilting beginners find inspiration and confidence to start their own creations.


