
Hunter's Star Quilt Block - Quick & Easy Tutorial

The Escher Quilt Free Pattern is one of the most fascinating and visually captivating designs in the quilting world. Inspired by the mathematical genius of artist M.C. Escher, this quilt brings together geometry, illusion, and artistry in a unique way.
At first glance, the Escher Quilt seems to defy logic, creating the impression of interlocking shapes that appear to rise and fall across the surface of the fabric.
For quilting enthusiasts and beginners alike, exploring the Escher Quilt Free Pattern is not just a creative project but a rewarding journey into the harmony of symmetry and precision.
The beauty of the Escher Quilt Free Pattern lies in its balance between complexity and simplicity. While the design appears intricate, with its tessellating cubes and three-dimensional illusion, the actual process of making it can be surprisingly approachable once broken down step by step.
Whether you are a quilter looking for a fresh challenge or someone fascinated by optical illusions, this pattern offers a perfect opportunity to expand your skills while creating something truly spectacular. The use of contrasting colors, precise cutting, and accurate piecing allows each block to come alive with depth and movement.
For those searching for a project that combines creativity with structure, the Escher Quilt Free Pattern offers the ideal mix. It encourages attention to detail and patience but rewards you with a breathtaking visual result that few other designs can match. The magic happens when light and dark fabrics are carefully placed to form a continuous flow of cubes that seem to dance across the quilt. As you stitch each section together, the pattern begins to transform, and the illusion becomes clearer, giving you the joy of seeing a complex image take shape from simple fabric pieces.
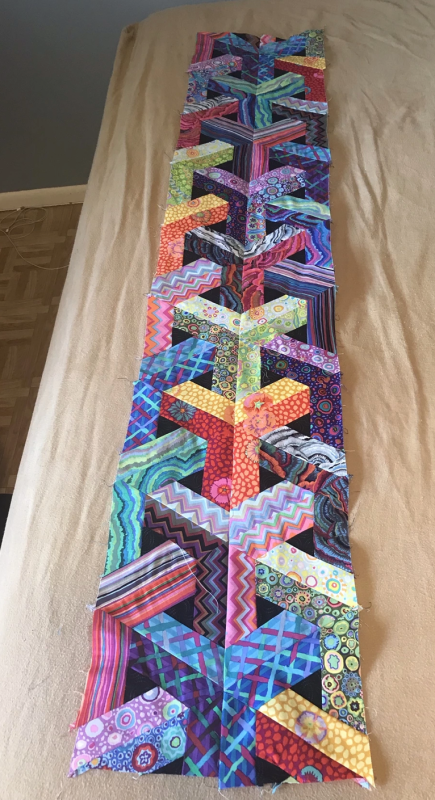
The Escher Quilt Free Pattern takes its name and inspiration from M.C. Escher, the Dutch artist known for his mathematically inspired artworks. His famous prints of interlocking shapes, impossible staircases, and repeating patterns translate beautifully into quilt design. The Escher-inspired quilt relies on the principle of tessellation — shapes that fit perfectly together without gaps or overlaps. In quilting, this is achieved through precise geometric cutting, usually involving hexagons, diamonds, or cubes.
One of the most common Escher-style designs in quilting is the “tumbling blocks” pattern. This pattern uses three diamonds of different shades to create the illusion of a 3D cube. When these cubes are repeated and aligned, they create an optical illusion of depth that seems to pop off the fabric. The result is a stunning quilt that looks both modern and timeless, depending on the fabrics and colors used.
Color selection plays a huge role in bringing the Escher Quilt Free Pattern to life. Traditionally, quilters use light, medium, and dark shades of the same color family to create depth. However, modern quilters often experiment with bold, contrasting colors for a dramatic effect. The key is consistency in value contrast — ensuring that each shade is distinct enough to define the edges of each “cube.”
Choosing the right fabric is equally important. Solid fabrics often work best because they clearly show the illusion, but subtle prints can add texture and interest. Some quilters even use metallic or gradient fabrics to give their Escher quilts an extra dimension of light and movement. The goal is always the same: to create an engaging, mesmerizing illusion that captures attention from every angle.
Finally, understanding the geometry behind the pattern helps quilters avoid mistakes and improve accuracy. Cutting with templates or a rotary cutter ensures that every piece fits perfectly. Precision is the foundation of the Escher effect — even a small misalignment can disrupt the illusion. With careful planning and patience, however, the design comes together beautifully, proving that mathematics and art truly go hand in hand.
Creating the Escher Quilt Free Pattern may seem intimidating at first, but breaking it down into smaller steps makes it completely manageable. The process begins with preparation, cutting, layout, piecing, and finishing. Each step requires focus, but the end result is well worth the effort.
The first step is choosing your pattern template. Many quilters use a standard “tumbling blocks” layout for the Escher effect. You can either draft your own using graph paper or find a printable free pattern online. Ensure that the template pieces fit together perfectly to avoid distortion later.
Next, select your color palette. Remember that the illusion depends heavily on contrast. Each cube consists of three diamonds: one light, one medium, and one dark. Lay out your fabric selections under good lighting to ensure that each shade stands out clearly. Some quilters even take black-and-white photos of their fabrics to test contrast levels.
Cutting the fabric accurately is the next crucial step. Use a rotary cutter and a ruler to cut precise diamond shapes, making sure all angles are consistent. You will need many identical pieces, so it’s helpful to cut in batches and keep them organized by shade. Labeling your fabric piles can prevent confusion during assembly.
Once all pieces are ready, begin laying them out on a flat surface or design wall. Start by creating small cube units, then combine these into larger blocks. Play around with arrangement until the illusion looks seamless. This stage can be creative — moving colors and shapes slightly can change the overall appearance of the quilt dramatically.
When satisfied with the layout, it’s time to sew. Join the diamonds carefully, aligning edges to maintain accuracy. Use a consistent seam allowance (usually ¼ inch) throughout. Press seams in alternating directions to reduce bulk and make assembly easier. Continue joining cubes row by row, watching as the illusion of depth grows stronger with each addition.
Finally, complete your quilt by adding borders, quilting stitches, and binding. Straight-line or geometric quilting designs often enhance the 3D effect of the Escher pattern. The finished quilt will not only be a piece of fabric art but a testament to your precision, creativity, and patience.
Even experienced quilters encounter challenges with the Escher Quilt Free Pattern, especially when aiming for perfect alignment and consistent color transitions. A few expert tips can make the process smoother and help you achieve a professional-looking result.
First, test small sections before cutting all your fabric. Create a few sample cubes to ensure that your color values and fabric choices produce the desired 3D effect. This small test can prevent disappointment later and help you adjust your palette or cutting method.
Second, pay close attention to fabric grain direction. When working with diamonds or angled pieces, fabric stretch can cause distortion. To prevent this, handle each piece gently and avoid over-pressing. Using spray starch can also help stabilize the fabric.
Third, press seams consistently. Seams should be pressed, not ironed, to prevent warping. Alternate the direction of seams between rows so that the blocks nest neatly together. This technique improves precision and reduces bulk.
Fourth, use a design wall to visualize the full quilt layout. Seeing the pattern vertically helps spot mistakes in shading or placement before sewing. It also allows you to experiment with different arrangements and color transitions.
Fifth, choose the right thread color for quilting. A neutral shade usually works best, but some quilters prefer to highlight the cube edges with slightly darker or lighter thread. This can subtly enhance the illusion of depth and dimension.
Finally, don’t rush the process. The Escher Quilt rewards patience. Take time to enjoy each step, from cutting to stitching, and remember that every block adds to a mesmerizing whole. The sense of accomplishment when the illusion appears clearly is unmatched.
While traditional Escher quilts rely on geometric precision and neutral color gradients, modern quilters have pushed the boundaries of the Escher Quilt Free Pattern in exciting ways. Today, you can find Escher-inspired designs featuring bold colors, abstract shapes, and digital prints that challenge the eye even more dramatically.
One popular variation involves using rainbow color schemes instead of monochrome tones. By arranging gradients across the quilt, you create a mesmerizing flow of hues that enhance the 3D illusion in unexpected ways. This approach adds vibrancy and a modern twist to a classic pattern.
Another creative adaptation is combining different geometric patterns with Escher cubes. For instance, some quilters merge tumbling blocks with hexagons or triangles to produce a quilt that plays with multiple illusions simultaneously. This creates a more dynamic and layered visual experience.
Digital printing has also opened new possibilities. Some artists design their Escher quilts using printed fabrics that already contain illusionary designs. By aligning these prints strategically, they enhance depth without additional piecing complexity.
Minimalist versions of the Escher Quilt Free Pattern have also gained popularity. Using only black, white, and gray fabrics produces a sleek, contemporary look suitable for modern interiors. These quilts demonstrate that simplicity can be just as striking as complexity.
Finally, quilters are exploring mixed media techniques by incorporating metallic threads, fabric paint, or even 3D embellishments. These additions play with light and shadow, amplifying the Escher illusion and turning each quilt into a true piece of optical art.
1. Is the Escher Quilt Free Pattern suitable for beginners?
Yes, but beginners should start with a small version or sample block first. Understanding color contrast and precise cutting are key skills that improve with practice.
2. What shapes are used in the Escher Quilt design?
Most Escher quilts are made using diamond shapes arranged into cubes. Each cube consists of three diamonds of different shades to create a 3D illusion.
3. Can I use patterned fabrics for this quilt?
Absolutely! While solid fabrics show the illusion most clearly, subtle prints can add texture and depth. Just ensure the color values contrast enough to maintain the 3D effect.
4. How big should an Escher Quilt be?
The size depends on your project goal. You can make anything from a wall hanging to a full bed quilt. Adjust the size of each cube block to control the final dimensions.
5. How do I prevent distortion when sewing angled pieces?
Use spray starch and press gently rather than ironing. Handle pieces carefully to avoid stretching the fabric along the bias edges.
6. What type of quilting design works best?
Straight-line quilting or echo quilting around the cubes enhances the 3D illusion. Avoid overly complex quilting that might distract from the geometric design.
7. Where can I find templates or patterns?
Many free printable templates are available from quilting communities and pattern-sharing platforms online. Just ensure the pattern is accurate before cutting fabric.
The Escher Quilt Free Pattern is more than a sewing project—it’s a captivating exploration of art, geometry, and craftsmanship. From selecting the perfect fabrics to assembling each cube with care, every step brings you closer to a masterpiece that plays with perception and depth. Whether you choose a traditional color palette or experiment with modern variations, this quilt guarantees admiration and creative satisfaction.
Now that you’ve learned how to understand, create, and personalize the Escher Quilt, it’s your turn to bring this illusion to life. Take your time, enjoy the process, and let your imagination guide your color and pattern choices. When your quilt is finished, it will not only be a testament to your skill but also a piece of optical art.
If you’ve tried the Escher Quilt Free Pattern, share your honest opinion and suggestions below — your feedback inspires others to start their own creative journey!


