
Hunter's Star Quilt Block - Quick & Easy Tutorial

Creating a unique and functional home decoration can be both fun and rewarding. The Embroidery Hoop Clock – Step by Step guide allows you to transform a simple embroidery hoop into a stylish clock that reflects your personal taste.
This project combines creativity, functionality, and DIY craftsmanship, making it ideal for crafters of all skill levels. Whether you are looking for a custom gift or a statement piece for your living space, this project will guide you through every stage of the process.
Using an embroidery hoop as the base for a clock is a brilliant way to repurpose materials while creating a decorative yet practical item.
The Embroidery Hoop Clock – Step by Step approach encourages experimentation with colors, textures, and designs. You can use fabrics, felt, or even crochet pieces as the clock background, allowing you to personalize your project fully. The result is a one-of-a-kind piece that not only tells time but also enhances your home décor.
The appeal of an Embroidery Hoop Clock – Step by Step goes beyond aesthetics. DIY clocks like these improve hand-eye coordination, boost creativity, and give you the satisfaction of making something functional from scratch. This project also supports sustainability by encouraging the reuse of materials, such as leftover embroidery hoops, fabric scraps, and old clock mechanisms. With a little patience and creativity, you can craft a beautiful, fully functional clock that’s perfect for any room.
Before starting your Embroidery Hoop Clock – Step by Step, gather all necessary materials to ensure a smooth crafting process. You will need an embroidery hoop, fabric for the clock face, a clock mechanism with hands, scissors, glue, and optional decorative items like beads or ribbons. Having all materials ready prevents interruptions and makes the process enjoyable.
Choosing the right fabric is crucial for a professional-looking Embroidery Hoop Clock – Step by Step. Consider using fabrics with patterns or textures that complement your room décor. Plain fabrics provide a minimalist look, while patterned fabrics add a playful or elegant touch. Cotton, linen, or felt are ideal choices because they are easy to handle and maintain.
The clock mechanism should match the size of your hoop. Most small to medium embroidery hoops work well with standard clock kits, which are available at craft stores or online. Ensure the hands of the clock are proportional to your hoop size for a balanced and functional appearance.
Additional tools like fabric markers, rulers, and hot glue can help with precision and stability. If you plan to add embellishments, having these ready ensures a smooth assembly. Preparing all components ahead of time sets the foundation for a successful Embroidery Hoop Clock – Step by Step project.
The first step in your Embroidery Hoop Clock – Step by Step is preparing the hoop and fabric. Begin by loosening the screw at the top of the embroidery hoop and separating the inner and outer rings. Place the fabric over the inner hoop and press the outer hoop on top, tightening the screw just enough to hold the fabric securely without stretching it excessively.
Make sure the fabric is centered and smooth. Wrinkles or folds can affect the appearance of your clock face. Using a small amount of glue or fabric tape on the edges can help secure the fabric and prevent slipping during assembly. A neatly prepared fabric base is essential for a polished and professional Embroidery Hoop Clock – Step by Step.
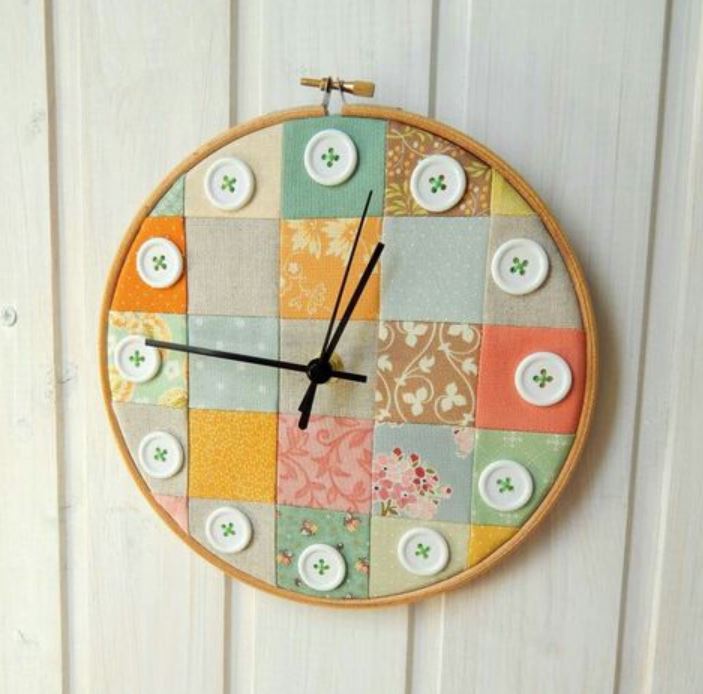
Once the fabric is secured, decide on the clock numbers or markers. You can draw them directly onto the fabric using fabric markers, attach pre-made numbers, or use decorative elements like buttons or beads. Proper alignment ensures that the clock is not only stylish but also functional.
Next, prepare the center hole for the clock mechanism. Measure and mark the exact center of the fabric, then carefully cut a small hole just large enough for the clock shaft to pass through. Accuracy in this step is critical for the clock to function properly and look symmetrical.
Finally, double-check all adjustments and ensure the fabric is taut. A smooth, even surface is key to completing the Embroidery Hoop Clock – Step by Step successfully and achieving a clock that is visually appealing and durable.
With the fabric prepared, it’s time to assemble your Embroidery Hoop Clock – Step by Step. Insert the clock mechanism through the hole at the center of the fabric. Secure it according to the manufacturer’s instructions, typically using a washer and nut to hold it in place. Make sure the mechanism is firmly attached to prevent wobbling or shifting over time.
Attach the clock hands carefully. Align the hour hand first, followed by the minute hand, and then the second hand if included. Test the movement to ensure the hands rotate freely without obstruction. Proper alignment is essential for a functional and accurate clock.
Once the mechanism is secure, add decorative embellishments if desired. You can sew or glue ribbons, beads, or appliqués around the clock face to personalize your Embroidery Hoop Clock – Step by Step. Balance aesthetics with functionality to avoid overcrowding the clock face, which could interfere with reading the time.
Finally, tighten the embroidery hoop screw and make any final adjustments. Ensure the fabric is smooth, the numbers or markers are legible, and the clock hands move without interference. Your Embroidery Hoop Clock – Step by Step is now complete and ready to display.
Customization is the most exciting part of creating your Embroidery Hoop Clock – Step by Step. You can experiment with colors, fabrics, and decorative elements to match any style or theme. For example, using pastel tones can create a soft, modern look, while bold patterns add a vibrant, eclectic touch.
Consider adding personalized designs such as embroidery, painted motifs, or small sewn elements to make your clock truly unique. You can also create seasonal or themed clocks for holidays, birthdays, or special occasions. These personalized touches elevate the Embroidery Hoop Clock – Step by Step from a simple project to a meaningful, custom piece.
Clock hands and numbers can also be customized. Swap the standard hands for colorful or uniquely shaped alternatives to enhance visual interest. Decorative number markers or stickers can add charm and make your clock stand out as a creative home accessory.
Size adjustments are possible by choosing different hoop diameters or layering multiple hoops for a dimensional effect. Layering allows for creative depth and design variety, making your clock a focal point in any room.
Finally, consider gifting your finished Embroidery Hoop Clock – Step by Step. Handmade clocks are thoughtful gifts that combine practicality with creativity, perfect for housewarmings, weddings, or personal milestones. Customization ensures that each clock is unique and memorable.
Q1: What size embroidery hoop is best for this project?
Medium hoops (8–12 inches) work best for most standard clock mechanisms and provide enough space for decoration.
Q2: Can I use any fabric for the clock face?
Yes, but cotton, linen, or felt works best because they are easy to handle and maintain.
Q3: How do I ensure the clock mechanism is secure?
Use a washer and nut to hold the mechanism firmly in place, and double-check that the hands move freely.
Q4: Can I customize the numbers or markers?
Absolutely! You can draw, glue, or sew numbers or decorative markers to match your style.
Q5: How do I hang the embroidery hoop clock?
Most hoops can be hung using the top screw or by attaching a ribbon or hook to the back for stability.
Q6: Is this project suitable for beginners?
Yes! Following the Embroidery Hoop Clock – Step by Step instructions allows even beginners to create a professional-looking clock.
Creating an Embroidery Hoop Clock – Step by Step is a fun, creative, and functional DIY project. From selecting materials to assembling the mechanism and adding decorative elements, each step allows you to craft a unique and personalized timepiece. Whether for your home or as a gift, this project combines style, creativity, and practicality.
We hope this guide inspires you to create your own Embroidery Hoop Clock – Step by Step and explore your DIY creativity. Don’t forget to leave a sincere opinion and suggestions in the comments—your feedback helps others and motivates more handmade projects.
With patience and imagination, you can transform a simple embroidery hoop into a beautiful, functional clock that enhances any space.


