
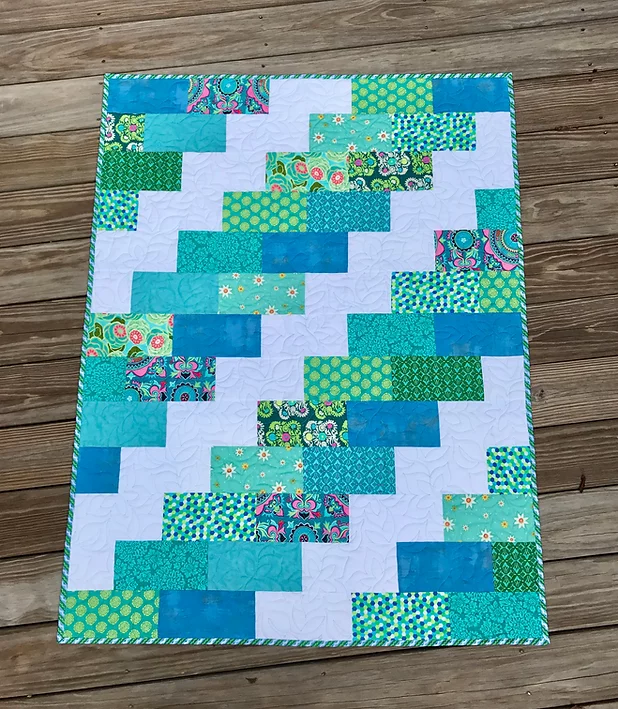
Creating a beautiful quilt may seem like a daunting task, but the Easy Brick Quilt Tutorial makes it accessible for both beginners and experienced quilters alike.
This method focuses on a simple brick pattern, which produces a stunning visual effect without requiring complex techniques.
Whether you are crafting a quilt for personal use or as a thoughtful gift, following this tutorial ensures a professional-looking finish with minimal frustration. From choosing the right fabrics to mastering the assembly, this guide will take you through every essential step.
Quilting is not only a functional craft but also an art form that allows you to express creativity through fabric, texture, and color.
The Easy Brick Quilt Tutorial emphasizes simplicity while encouraging experimentation with patterns and fabric combinations. By breaking down the process into manageable steps, you can confidently create a quilt that looks intricate yet remains easy to construct. This approach is perfect for those who are new to quilting or for anyone looking for a relaxing, rewarding project.
One of the key advantages of this Easy Brick Quilt Tutorial is its flexibility. You can adjust the size, color scheme, and complexity of the quilt according to your personal preferences. Additionally, the brick pattern works well with both traditional and modern fabrics, allowing you to create a quilt that fits any décor style. With patience and attention to detail, this tutorial ensures that your quilt will be both beautiful and durable, making it a cherished piece for years to come.
Choosing the Right Fabrics for Your Brick Quilt
Selecting fabrics is one of the most important steps in creating a quilt that is visually appealing and long-lasting. In the Easy Brick Quilt Tutorial, the recommended fabrics are cotton blends due to their durability and ease of handling. Cotton fabric holds its shape well, making it ideal for cutting precise brick shapes. Additionally, you can mix prints, solids, and textures to achieve a dynamic look that reflects your personality.
When choosing colors for your quilt, consider complementary and contrasting shades to make the brick pattern stand out. For example, using a mix of light and dark fabrics can create depth, while sticking to a single color palette results in a more subtle, elegant design. Remember that the choice of fabric affects not only the appearance but also the overall feel of the quilt, so prioritize both aesthetics and comfort.
Prewashing your fabrics is highly recommended. It removes excess dye and prevents future shrinking or color bleeding, which can distort the brick pattern. The Easy Brick Quilt Tutorial emphasizes fabric preparation because well-prepared materials make assembly easier and improve the finished product’s quality. Ironing the fabric after washing also ensures smooth cuts and accurate seams.
Mixing patterns can enhance the visual appeal of your quilt. Consider pairing florals with solids or stripes with polka dots to create an engaging brick layout. The Easy Brick Quilt Tutorial encourages creativity while maintaining the structure of the brick pattern. By thoughtfully combining fabrics, your quilt will look professional and eye-catching.
Another tip is to consider the texture of the fabrics. Quilts that mix smooth and slightly textured fabrics can create a tactile experience that makes the quilt enjoyable to touch as well as visually appealing. The tutorial explains how to balance textures without compromising the brick design’s clarity.
Finally, ensure that you have enough fabric for the entire quilt, including extra for borders and backing. The Easy Brick Quilt Tutorial provides guidelines for calculating the amount of fabric required based on your desired quilt size. Proper planning at this stage prevents unnecessary interruptions during the assembly process.
Cutting and Arranging Your Brick Pieces
Cutting precise pieces is crucial for achieving the clean, structured look characteristic of brick quilts. The Easy Brick Quilt Tutorial recommends using a rotary cutter, ruler, and cutting mat to ensure accuracy. Each brick piece should be uniform in size, which allows them to align neatly during assembly.
Start by cutting all your fabric into rectangular pieces that match the dimensions specified in the tutorial. Accurate measurements help maintain consistency across rows, preventing misalignment. The tutorial also suggests labeling your pieces to avoid confusion, especially when working with multiple colors or patterns.
Arranging the bricks before sewing is an essential step. Lay out your fabric pieces in the desired brick pattern on a flat surface to visualize the final design. This step allows you to experiment with color placement, creating contrast and rhythm in the quilt. The Easy Brick Quilt Tutorial emphasizes the importance of planning your layout for a polished result.
Once you are satisfied with the arrangement, take a photo or make a diagram to reference during sewing. This helps ensure that you replicate your layout precisely and avoid mistakes. The tutorial also provides tips for balancing colors across rows and columns for a harmonious effect.
For beginners, it may be helpful to sew a small sample row first. This allows you to test seam allowances and verify that your bricks align correctly. The Easy Brick Quilt Tutorial includes strategies for adjusting seam allowances if necessary to maintain the correct dimensions throughout the quilt.
Finally, check that all pieces are facing the correct direction. Some fabrics have directional prints, and misalignment can disrupt the visual flow of the quilt. Following these steps ensures that your brick quilt will look professional and aesthetically pleasing.
Sewing Your Brick Quilt Together
Sewing the bricks together is the heart of the Easy Brick Quilt Tutorial. Begin by stitching each row of bricks, maintaining a consistent seam allowance, typically 1/4 inch. Accuracy is key to ensuring that the bricks align perfectly and that the quilt maintains a structured appearance.
Pressing the seams after each row is highly recommended. The tutorial suggests pressing seams in alternating directions for adjoining rows to reduce bulk and create a flatter finish. Proper pressing also enhances the quilt’s overall durability and visual appeal.
As you join rows, take care to match seams where bricks meet. Pinning the edges before sewing can prevent shifting and misalignment. The Easy Brick Quilt Tutorial emphasizes patience during this stage, as precise alignment contributes significantly to the finished quilt’s professional look.
When all rows are sewn together, the quilt top is complete. Inspect the quilt for any uneven seams or loose threads and make adjustments as needed. This final check ensures that your quilt is ready for layering with batting and backing.
Adding borders can enhance the quilt’s visual impact. The tutorial suggests simple borders that complement the brick pattern without overpowering it. Borders frame the quilt, providing a polished finish and additional stability.
Finally, consider topstitching around each brick or row for extra reinforcement and decorative appeal. The Easy Brick Quilt Tutorial provides guidance on stitching techniques that enhance both function and aesthetics.
Quilting and Finishing Your Project
The final steps of the Easy Brick Quilt Tutorial involve quilting and finishing. Start by layering the quilt top with batting and backing, smoothing out any wrinkles. Basting the layers together using pins or spray adhesive keeps them in place during quilting.
Quilting can be done by hand or machine. The tutorial recommends simple straight-line quilting along the brick seams for beginners, which enhances the pattern and adds stability. More advanced quilters can experiment with free-motion quilting to add texture and dimension.
Once quilting is complete, trim any excess fabric and batting from the edges. The Easy Brick Quilt Tutorial explains how to square the quilt and prepare it for binding. Clean edges contribute to a professional-looking finish and prevent fraying over time.
Binding the quilt is the final touch. Cut strips of fabric, fold them, and sew around the quilt’s edges. The tutorial provides step-by-step instructions for attaching binding neatly, ensuring that the quilt is both durable and visually appealing.
After binding, give the quilt a final press to smooth out seams and enhance its overall appearance. The Easy Brick Quilt Tutorial emphasizes the importance of attention to detail in this stage, as small adjustments can greatly improve the finished quilt’s quality.
Finally, admire your work! Completing the quilt is a rewarding experience, showcasing your creativity and skill. This Easy Brick Quilt Tutorial provides a roadmap from fabric selection to finishing touches, ensuring that every step contributes to a beautiful, functional quilt.
FAQ – Easy Brick Quilt Tutorial
Q1: What fabrics work best for a brick quilt?
A1: Cotton fabrics are ideal due to their durability, ease of handling, and ability to maintain shape. You can mix solids and patterns for visual interest.
Q2: Can beginners follow this tutorial?
A2: Absolutely. The Easy Brick Quilt Tutorial is designed to be beginner-friendly, with clear steps and simple techniques.
Q3: How do I prevent bricks from misaligning?
A3: Use accurate cutting tools, pin pieces before sewing, and press seams carefully to maintain alignment throughout the quilt.
Q4: What is the best way to quilt the layers together?
A4: Beginners can use straight-line quilting along the seams, while advanced quilters can explore free-motion quilting for added texture.
Q5: Can I adjust the size of the quilt?
A5: Yes, the tutorial allows flexibility in size. Adjust the number of bricks per row and rows per quilt to meet your desired dimensions.
Q6: How do I care for my finished quilt?
A6: Wash in cold water with mild detergent and tumble dry low or air dry. Prewashing fabrics prevents color bleeding.
Conclusion
The Easy Brick Quilt Tutorial provides a comprehensive guide for creating a stunning quilt with minimal complexity. From selecting fabrics to cutting, sewing, and finishing, each step ensures that your quilt is both beautiful and functional. By following this tutorial, you can confidently produce a quilt that reflects your creativity while mastering fundamental quilting techniques.
We encourage readers to leave their honest opinions and suggestions, sharing their experiences and inspiring others to explore the rewarding world of quilting.