
Hunter's Star Quilt Block - Quick & Easy Tutorial

DIY Cute Backpack – Free Pattern is an exciting and practical project for anyone who loves crafting. Whether you are a beginner or an experienced sewist, creating your own cute backpack allows you to express your personality while making a functional accessory.
With a free pattern, you can easily follow step-by-step instructions to bring your design to life without needing expensive tutorials or complex templates. This project is perfect for personal use, gifts, or even small business opportunities.
One of the main advantages of a DIY cute backpack is the ability to customize it fully. You can choose your favorite fabrics, mix textures, and add unique touches like embroidery, patches, or charms.
Unlike store-bought backpacks, handmade designs reflect your own style and creativity. Whether you prefer a minimalist aesthetic, a playful design with bright colors, or a chic neutral look, a handmade backpack can match your personal taste perfectly.
Creating a DIY backpack is not only fun but also a rewarding learning experience. Following a free pattern teaches you valuable sewing techniques, from cutting fabric accurately to assembling straps and adding pockets. The project helps improve your skills, whether you sew by hand or with a machine. Plus, completing a backpack gives a sense of accomplishment as you carry an item you made entirely yourself.
The first step for your DIY Cute Backpack – Free Pattern project is selecting materials. The fabric choice determines both the bag’s durability and its overall look. Durable options like cotton canvas, denim, or faux leather are ideal for the main body, while softer fabrics like linen or quilted cotton work well for lining.
Lining fabric is crucial for finishing the interior neatly. Lightweight cotton or polyester lining adds structure while protecting your belongings. It also prevents seams from fraying, ensuring a professional-looking finish.
Interfacing is essential to give your backpack strength, especially in the body, base, and straps. Fusible interfacing is convenient because it bonds to the fabric when ironed, providing stability without adding bulk.
High-quality hardware like zippers, buckles, and D-rings is important for functionality. Choose colors and finishes that match your design. Sturdy metal hardware ensures the backpack can withstand daily use without damage.
Thread selection is also key. Polyester or nylon thread is strong and long-lasting. Matching thread colors can create a seamless look, while contrasting colors can add playful accents to your backpack design.
Finally, make sure you have all the basic sewing tools ready, including scissors, pins, measuring tape, a seam ripper, and a sewing machine. Having all materials organized before starting ensures a smooth sewing process for your DIY project.
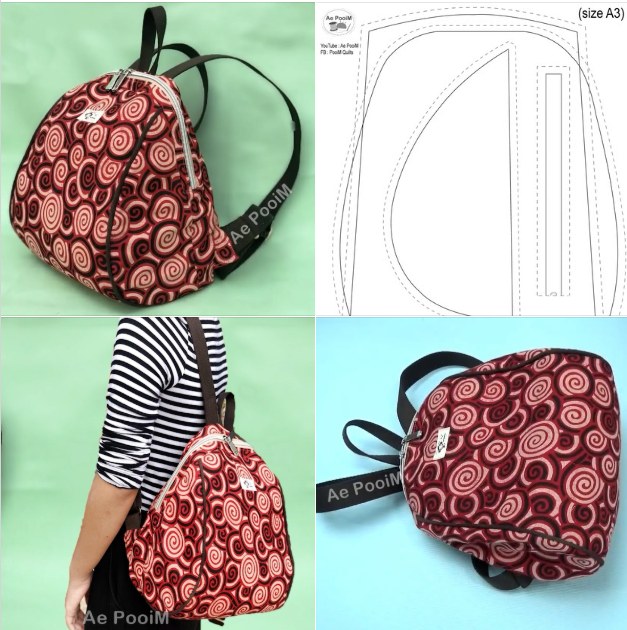
To begin your DIY Cute Backpack – Free Pattern, start by cutting all fabric pieces according to your template. Most free patterns include printable templates for the main body, flap, pockets, and straps. Carefully cut each piece and mark any sewing lines or notches.
Next, prepare the pockets. Fold and sew the pocket edges neatly, then attach them to the front or sides of the backpack body. Pockets not only add functionality but also enhance the bag’s aesthetic appeal.
Once the pockets are in place, it’s time to assemble the main body. Sew the side and bottom seams together, ensuring the seams are straight and reinforced. Use a sewing machine if available for stronger, neater stitches.
After the main body is complete, attach the straps. Adjustable straps can be made with fabric, webbing, or a combination of both. Sew the straps securely to the top and bottom of the bag to support weight comfortably.
Add the lining by sewing it into the interior of the backpack. The lining should fit snugly and cover all inner seams, giving your backpack a polished and professional look.
Finally, sew the flap and closures. Zippers, snaps, or buckles can be used depending on your design. Adding these finishing touches ensures your backpack is functional, secure, and visually appealing.
Customizing your DIY Cute Backpack – Free Pattern allows your creativity to shine. Start by choosing colors and patterns that match your style. Mixing prints, textures, and bold colors can make your backpack stand out.
Consider adding embellishments like patches, embroidery, buttons, or appliqués. These details can turn a simple bag into a unique statement piece.
Experiment with different strap styles. Adjustable straps with buckles or padded straps can enhance both comfort and design. Straps can also be decorated with ribbon or trim for extra flair.
Incorporating pockets and compartments adds both functionality and visual interest. Interior pockets can keep belongings organized, while exterior pockets provide easy access to small items.
Try using different fabrics for the lining or flap. Contrasting or complementary fabrics create a playful look, giving your DIY backpack a professional and creative finish.
Lastly, make sure to measure the backpack carefully and adjust patterns if needed. A properly sized bag ensures comfort, practicality, and the perfect fit for daily use or travel.
Q1: Can beginners make this DIY cute backpack?
Yes! The free pattern and step-by-step instructions make it accessible even for beginners. Start with simple fabrics and basic designs before moving to more advanced projects.
Q2: What fabric works best for a backpack?
Cotton canvas, denim, or faux leather are durable options. Soft fabrics like quilted cotton or linen work well for lining.
Q3: How long does it take to make a backpack?
Time depends on complexity and experience. Simple designs may take 3–5 hours, while detailed or multi-pocket backpacks can take longer.
Q4: Can I wash my DIY backpack?
Yes, but check fabric care instructions. Canvas and cotton backpacks can usually be machine washed on a gentle cycle, while leather or delicate trims may require spot cleaning.
Q5: Can I sell backpacks made from this pattern?
Yes! Handmade backpacks are popular for small businesses, craft fairs, and online shops. Make sure to respect copyright if using other people’s pattern designs.
Q6: How can I make my backpack more durable?
Use strong fabrics, reinforce seams, choose quality hardware, and double-stitch critical areas like straps and pockets.
Creating a DIY Cute Backpack – Free Pattern project is both fun and rewarding. From selecting materials to adding personal touches, every step allows you to showcase your creativity and sewing skills. Handmade backpacks are functional, stylish, and make wonderful gifts or personal accessories.
With proper planning, careful sewing, and thoughtful customization, anyone can create a beautiful, high-quality backpack. Share your completed projects, favorite patterns, or tips in the comments. Your feedback inspires others and builds a supportive crafting community.
From choosing fabrics to adding finishing touches, each step allows for creativity and self-expression. This backpack is practical for everyday use—whether for school, work, travel, or casual outings—and doubles as a thoughtful handmade gift.
By following the step-by-step instructions, gathering the right materials, and adding your personal flair, you’ll end up with a backpack that is unique, durable, and stylish. More importantly, you will enjoy the process of creating something by hand, knowing it carries your own effort and imagination.
Whether you are an experienced sewer or a beginner looking for a meaningful project, this tutorial will help you achieve a result that is both beautiful and useful.


