
Hunter's Star Quilt Block - Quick & Easy Tutorial

The Autumn Stillness – Quilt Pattern is an invitation to slow down, embrace the beauty of the changing seasons, and express your creativity through fabric and thread.
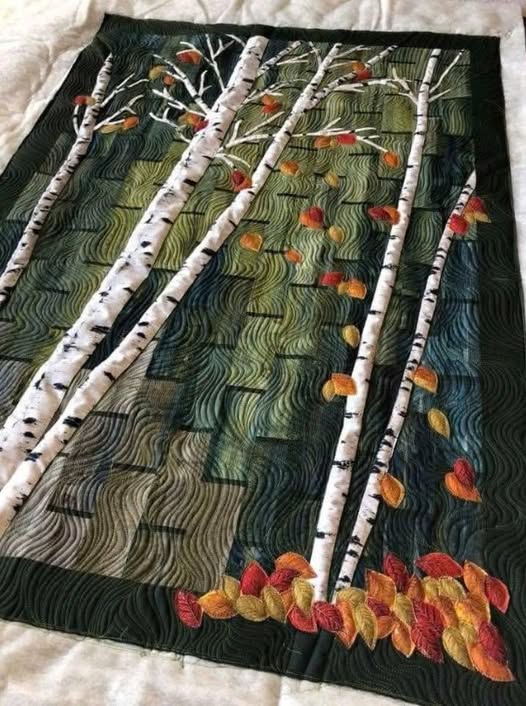
This DIY quilt captures the peaceful atmosphere of fall—the golden leaves, crisp air, and cozy evenings at home. Whether you’re a seasoned quilter or just starting your quilting journey, this project offers both relaxation and artistic fulfillment.
Creating an Autumn Stillness quilt allows you to bring nature’s palette indoors. Rich earth tones, warm oranges, muted greens, and deep browns work together to form a design that reflects the serenity of autumn.
By following a FREE quilt pattern, you can easily achieve a professional result while adding your own personal touch. This project combines structure and creativity, giving you freedom to experiment with fabric combinations and layout designs.
A handmade quilt is more than just fabric stitched together—it’s a story of patience, artistry, and comfort. The Autumn Stillness – Quilt Pattern is ideal for those who enjoy seasonal crafts or wish to create meaningful, handmade gifts. As you follow this quilting tutorial, each piece you sew becomes part of a larger picture—one that embodies warmth, tranquility, and timeless craftsmanship.
The foundation of every successful quilt begins with thoughtful fabric selection. For your Autumn Stillness quilt, focus on fabrics that mirror the natural hues of fall. Cotton quilting fabric is the most popular choice because it’s soft, easy to handle, and available in a wide range of patterns. Look for prints that feature leaves, plaids, or subtle textures to enhance the autumnal theme of your quilt pattern.
Before cutting, pre-wash all your fabrics to prevent shrinkage or color bleeding. Iron them flat to ensure accuracy when cutting shapes. Good preparation sets the stage for a smooth quilting process and professional-looking results.
You’ll also need basic quilting tools—rotary cutter, cutting mat, quilting ruler, pins, and a sewing machine. Having the right equipment helps you follow this quilting tutorial precisely. Additionally, keep thread in complementary colors to ensure neat, invisible seams.
For batting, consider using cotton or wool blends. These materials provide warmth and maintain the soft drape that’s characteristic of a cozy DIY quilt. The backing fabric can either coordinate with the front or feature a contrasting print for added flair.
When planning your FREE quilt pattern, sketch your layout first. Decide on the size, number of blocks, and overall color balance. This step helps you visualize the final design and avoid mismatched tones or repetitive sections.
Lastly, set up your workspace in a comfortable, well-lit area. Organize tools and fabrics before you begin. A tidy sewing space contributes to accuracy, efficiency, and enjoyment as you bring your Autumn Stillness quilt to life.
After preparing your materials, it’s time to cut and piece the fabrics. Using your FREE quilt pattern, carefully trace and cut each shape with a rotary cutter for clean, precise edges. Accuracy in cutting ensures that all pieces fit together seamlessly when assembled.
Start by arranging your fabric pieces into blocks according to the quilt pattern. Lay them out on a flat surface or design wall to experiment with color placement. This is where creativity truly shines—you can adjust the arrangement until you achieve a visually balanced composition that reflects the calm essence of autumn.
Begin sewing your blocks together using a ¼-inch seam allowance, pressing seams as you go. Pressing toward the darker fabric side prevents show-through on lighter fabrics. This step, though simple, makes a big difference in achieving a polished, professional finish for your DIY quilt.
Once all blocks are complete, arrange them into rows. Sew each row together carefully, matching seams for a precise fit. This process transforms individual blocks into a cohesive quilt top—a rewarding milestone in this quilting tutorial.
If desired, add borders around the quilt top to frame the design. Borders can enhance visual harmony and increase the quilt’s size for greater warmth and coverage. Choose coordinating or contrasting fabrics based on your preferred look.
Finish by pressing the completed quilt top one final time. Smooth out wrinkles and check for loose threads. Your Autumn Stillness quilt top is now ready for the next stage: layering and quilting.
Now that your quilt top is ready, it’s time to assemble the layers—top, batting, and backing. Lay the backing fabric right side down, place the batting on top, and then position your quilt top right side up. Smooth out wrinkles and secure the layers together with safety pins or basting spray. This step ensures your quilt pattern remains aligned during stitching.
Decide on your quilting style. Straight-line quilting offers a clean, modern look, while free-motion quilting allows for creative swirls, leaves, or other nature-inspired designs. Both methods work beautifully with the Autumn Stillness quilt, depending on your desired texture and skill level.
When machine quilting, start at the center and work outward to prevent bunching. Take your time—quilting is as much about patience as precision. Each line of stitching strengthens your quilt and adds character to your DIY quilt project.
After quilting, trim the edges evenly to prepare for binding. The binding frames your quilt and secures all layers together. Choose a fabric that complements the overall design—either a subtle tone that blends in or a bold color that highlights the border.
Attach the binding by sewing it to the quilt’s front, then folding it over to the back and hand-stitching for a neat finish. This step adds a professional touch and completes your quilting tutorial beautifully.
Finally, inspect the finished quilt for loose threads or uneven seams. Press it lightly, and admire your work. Your Autumn Stillness quilt is now complete—a perfect expression of craftsmanship and seasonal tranquility.
One of the most enjoyable parts of this project is personalization. Adding custom touches to your Autumn Stillness – Quilt Pattern makes it truly one of a kind. You can embroider initials, a favorite quote, or a small date label to commemorate when the quilt was made. These subtle details make your DIY quilt more meaningful.
For a rustic feel, include appliqué leaves or acorns. You can hand-stitch these motifs onto the quilt’s border or corners, creating depth and character. These elements complement the autumn theme and make your FREE quilt pattern stand out.
Mixing fabric textures can also add visual interest. Try combining smooth cotton with flannel or linen accents. The tactile contrast adds warmth and personality to your Autumn Stillness quilt.
Consider using decorative stitching. Zigzag, leaf, or vine motifs stitched along the seams add artistry without overwhelming the design. These small details elevate your quilt pattern to an heirloom-worthy piece.
If the quilt is a gift, include a handwritten tag or sewn-in fabric label with your name and date. Personal touches like this add sentimental value, turning a handmade project into a lifelong keepsake.
Above all, enjoy the process. Quilting is not just about the final product—it’s about mindfulness, creativity, and joy. The Autumn Stillness quilt is a celebration of craftsmanship and the peaceful rhythm of the fall season.
1. What fabric works best for an autumn quilt?
High-quality cotton quilting fabric is best due to its softness and ease of sewing. Look for prints in warm, earthy tones for an authentic fall look.
2. Can beginners make the Autumn Stillness quilt?
Yes! This FREE quilt pattern is beginner-friendly and includes simple piecing techniques suitable for all skill levels.
3. How do I quilt without puckering?
Ensure layers are properly basted and use a walking foot for even stitching. Work from the center outward to prevent fabric shifting.
4. How can I personalize my quilt?
Add embroidery, appliqué, or custom fabric labels. You can also experiment with decorative stitches or mix different fabric textures.
5. How should I wash and care for my quilt?
Wash gently in cold water with mild detergent and air dry or tumble dry on low. Proper care helps preserve your DIY quilt for years to come.
The Autumn Stillness – Quilt Pattern combines creativity, warmth, and seasonal beauty into one rewarding project. By following this quilting tutorial, you can create a timeless DIY quilt that captures the serene essence of fall. From fabric selection to the final stitch, each step invites relaxation and artistry.
We hope this guide inspires you to begin your own quilting journey. Share your experiences, opinions, and suggestions below—we’d love to hear how your Autumn Stillness quilt turned out!


