
Hunter's Star Quilt Block - Quick & Easy Tutorial

Creating an Animal Bed – Quilt Pattern is an exciting project that brings warmth, creativity, and comfort together in one beautiful handmade piece.
Whether you are crafting a cozy spot for your pet or designing a playful quilt inspired by your favorite animals, this quilt pattern project allows for endless possibilities.
With simple techniques and an artistic approach, you can produce a DIY quilt that looks professional and feels personal. This project is perfect for beginners eager to improve their sewing skills and for experienced quilters looking for a fun, quick project.
The beauty of an animal bed quilt lies in its combination of function and charm — it is practical yet visually delightful, and every stitch tells a story of love and craftsmanship.
When you make your own animal bed quilt, you are creating something special that reflects your creativity and care. Instead of purchasing a generic store-bought bed, crafting one yourself means you can choose the exact colors, fabrics, and designs that match your home and your pet’s personality. You can personalize it with patchwork animal shapes, paw prints, or colorful patterns. Whether you are sewing for a dog, cat, or even a small rabbit, the free quilt pattern provided here can be adapted to any size and shape. Each square of fabric becomes part of a bigger story, blending textures and colors to create comfort and style.
A handmade animal bed is more than a place to sleep; it’s an expression of affection. Your pet feels the softness and warmth of your work, and every carefully sewn detail contributes to a durable, cozy resting place. Plus, the project doesn’t require advanced quilting techniques — just a few materials, a little patience, and creativity. By following this quilt pattern, you’ll enjoy a relaxing sewing experience that produces something truly meaningful and practical.
To begin crafting your animal bed – quilt pattern, gather all the essential materials before starting. The main fabric should be soft but durable. Cotton and flannel are excellent choices because they’re gentle on your pet’s skin and easy to clean. For the outer layer, you might want to select fabric with fun animal prints or bright patchwork colors that make your DIY quilt visually appealing. If your pet sheds frequently, consider darker fabrics or patterns that camouflage hair and dirt.
You’ll also need batting — a soft inner layer that adds warmth and cushioning to your handmade quilt. Polyester or cotton batting both work well, but polyester tends to retain its shape longer, especially for heavier animals. For backing, choose a tough fabric such as canvas or denim to protect against scratches or wear. A strong backing layer ensures that the animal bed remains durable through frequent use and washing.
Other essential materials include thread in matching or contrasting colors, fabric scissors, quilting pins, and a sewing machine. A rotary cutter and mat are useful for precise cutting, especially when working with geometric patchwork designs. Don’t forget to have a tape measure to ensure accurate sizing — pets come in all shapes and sizes, so adjust your free quilt pattern accordingly. Preparing all materials in advance will make your sewing process smooth and efficient, letting you focus on creativity instead of logistics.
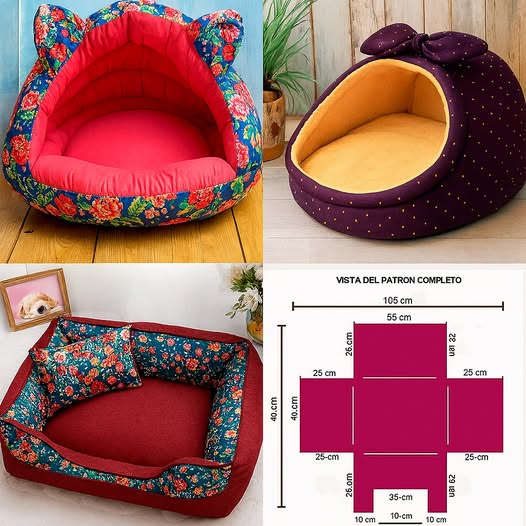
The first step in making your animal bed quilt is to measure your pet. Knowing the correct dimensions ensures that your quilt is neither too small nor too large. For small pets like cats or rabbits, a 24×24 inch square might be ideal, while larger dogs might need a 36×48 inch bed. Once you’ve determined the right size, cut your fabrics accordingly — top fabric, batting, and backing. Aligning your layers properly is crucial to creating a balanced, comfortable bed.
Next, begin sewing your quilt pattern. If you are creating a patchwork design, stitch your small fabric squares together first. Experiment with color coordination, mixing prints, solids, and textures to give your DIY quilt a fun, animal-themed aesthetic. Once your quilt top is ready, layer it with batting in the middle and backing fabric on the bottom. Use pins or quilting clips to hold all three layers securely in place.
Start quilting by sewing along the seams or creating diagonal lines that run across your pattern. You can quilt by hand or machine, depending on your preference. Make sure your stitches are tight and even, providing structure while keeping the layers together. Once quilting is complete, trim any excess fabric or batting, and sew around the edges to finish. You can also add a decorative binding to give your handmade quilt a professional look. The result will be a soft, cushioned animal bed that is both functional and stylish.
Customization is what makes your animal bed – quilt pattern stand out. Start by choosing a theme — such as forest animals, marine life, or simple geometric designs. Mixing different fabric prints adds personality and charm to your DIY quilt. You can also incorporate appliqués of animals, paw prints, or even your pet’s name for an extra personal touch. These little details make your project unique and meaningful.
Consider adding texture through different fabrics like fleece, corduroy, or minky for added softness. Some crafters even include removable covers to make washing easier. For outdoor pets or high-traffic areas, use water-resistant fabrics for the bottom layer to protect your animal bed from moisture or dirt. Adjusting the pattern to your needs ensures that the bed stays practical while looking beautiful.
Another creative idea is to use fabric scraps from previous projects to make a colorful patchwork quilt. This approach is eco-friendly and gives your project a charming, homemade vibe. If you’re making multiple animal bed quilts, try experimenting with shapes — round, rectangular, or oval — to suit different pet sizes and spaces. Don’t be afraid to mix vibrant colors or soft pastels; your imagination is the only limit when it comes to customizing your free quilt pattern.
One of the most common mistakes when making an animal bed quilt is inaccurate measurements. Taking precise measurements before cutting fabric prevents wasted material and ensures a perfect fit for your pet. Always double-check dimensions before sewing. Another common error is using thin or low-quality batting, which can lead to a lumpy or uneven bed. Choose a durable, high-loft batting for better comfort and longevity.
Improper layering is another issue many beginners face. Ensure that your top fabric, batting, and backing are perfectly aligned before quilting. If they shift during sewing, the quilt may end up uneven or wrinkled. Using plenty of pins or basting spray helps keep the layers stable. Also, pay attention to stitch tension — too tight, and your DIY quilt may pucker; too loose, and it might fall apart over time.
Rushing through the project can also lead to mistakes. Take your time to press seams, trim edges neatly, and follow your quilt pattern carefully. When adding decorative details, always secure your stitches firmly, especially if your pet tends to scratch or bite their bedding. Avoid using embellishments like buttons or beads, as they can pose a choking hazard. With patience and attention to detail, you can avoid these pitfalls and create a professional-quality handmade quilt that lasts for years.
Q1: Is this project beginner-friendly?
Yes, the animal bed quilt pattern is suitable for beginners. It involves basic sewing techniques and can be completed in a few hours.
Q2: What kind of fabric works best?
Cotton, flannel, or canvas fabrics are ideal for creating a DIY quilt that is soft, durable, and easy to wash.
Q3: Can I use leftover fabric scraps?
Absolutely! Using scraps is a great way to create a unique patchwork quilt and reduce waste.
Q4: How do I clean the finished animal bed?
Most handmade quilts can be machine washed on a gentle cycle with mild detergent. Avoid bleach or harsh chemicals.
Q5: Can I make the quilt reversible?
Yes! Simply choose two beautiful fabrics for the top and bottom layers to create a reversible animal bed quilt.
Q6: What size should I make for my pet?
Measure your pet while lying down and add a few inches for comfort. Adjust your free quilt pattern accordingly.
Creating your own Animal Bed – Quilt Pattern is not just a sewing project — it’s a labor of love. It combines functionality, creativity, and care into one heartwarming design. Whether you’re crafting a DIY quilt for your dog, cat, or rabbit, each piece you make reflects your style and affection. Following this free quilt pattern helps you create a comfortable, durable, and attractive bed that your pet will adore.
We hope this guide inspires you to design your own animal bed quilt. Take your time, enjoy the process, and express your creativity through every stitch.
Share your thoughts, leave a sincere opinion, and tell us how your project turned out — your feedback helps inspire other quilting enthusiasts who share the same passion for handmade creations!


