
Hunter's Star Quilt Block - Quick & Easy Tutorial

If you love sewing practical accessories, learning how to make an 11-Pocket Fabric Wallet – Free Pattern is a must-try project. This wallet combines organization, creativity, and function in one sleek design.
With eleven pockets for cards, bills, coins, and receipts, it’s ideal for everyday use or thoughtful handmade gifts. Whether you’re a beginner or an experienced sewist, this pattern helps you craft a stylish wallet that’s as durable as it is beautiful.
Sewing your own wallet means full control over colors, textures, and finishes. The 11-Pocket Fabric Wallet – Free Pattern lets you mix cotton prints, denim, canvas, or even recycled fabric to create something unique. It’s an eco-friendly, budget-friendly alternative to store-bought wallets—plus, it’s surprisingly simple once you break it into clear steps.
Unlike bulky leather wallets, a fabric version is lightweight yet sturdy when properly interfaced. You can adjust the pattern for different sizes or add closures such as snaps, Velcro, or zippers.
Once you complete your first 11-Pocket Fabric Wallet – Free Pattern, you’ll likely want to make more in different fabrics and colors for every season or as personalized gifts.
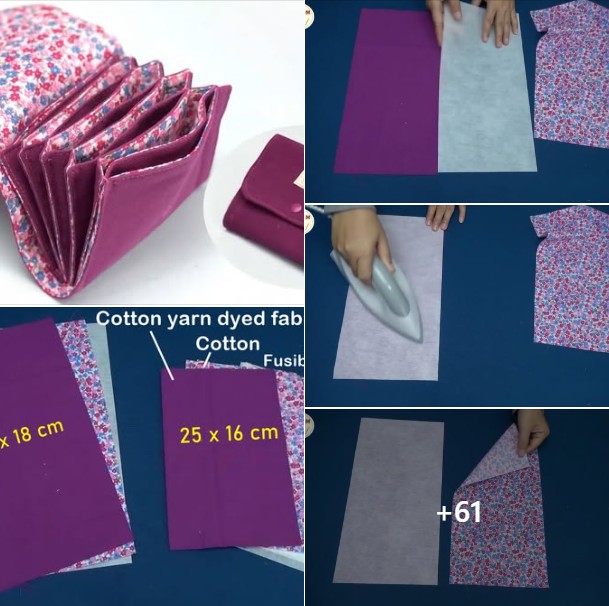
Before cutting into your material, gather everything needed for your 11-Pocket Fabric Wallet – Free Pattern. Fabric choice is crucial for structure and longevity. Medium-weight cotton or quilting fabric is perfect because it’s easy to sew and comes in endless designs. For extra durability, pair your main fabric with fusible interfacing to reinforce layers and keep pockets crisp.
You’ll also need matching thread, scissors or a rotary cutter, pins or clips, an iron, and a sewing machine. Small accessories like zippers, buttons, or magnetic snaps can add both function and personality. If you’re new to interfacing, lightweight fusible types are easy to apply—simply iron them to the wrong side of your fabric following the manufacturer’s instructions.
Consider using a contrasting lining to make interior pockets pop visually. Many makers choose solids for the exterior and patterned fabrics for the inside, giving a professional look when the wallet opens. If you’re making gifts, coordinating fabrics by theme—florals, geometric prints, or minimalist neutrals—adds a thoughtful touch.
The 11-Pocket Fabric Wallet – Free Pattern requires precision cutting. Label each piece as you cut to avoid confusion later. Organizing components in small stacks for outer pieces, linings, and pockets speeds assembly and minimizes mistakes.
Finally, pre-wash all fabrics before cutting. This prevents shrinking later and keeps your finished wallet neat after washing or ironing. Proper preparation ensures a polished, long-lasting result.
After selecting materials, the next step in your 11-Pocket Fabric Wallet – Free Pattern is accurate cutting and preparation. Start by measuring and marking your fabric carefully using a ruler or cutting mat. Straight, even cuts are vital for pocket alignment.
Cut one piece for the wallet exterior, one for the lining, several smaller rectangles for card slots, and one long strip for the bill compartment. Depending on the pattern variation, you may also cut a small square for a coin pocket flap. Remember to include seam allowances—usually ¼ inch is sufficient for most sewing projects.
Fuse interfacing to the wrong side of each piece. This simple step adds stiffness and prevents the wallet from sagging once loaded with cards and cash. If you prefer a softer finish, apply interfacing only to the exterior and large pocket pieces.
Next, mark fold lines where the pockets will overlap. Pressing each fold with an iron helps maintain crisp edges, which is key for professional-looking results. You can use tailor’s chalk or erasable fabric pens for these markings; they’ll disappear after pressing.
Pin or clip your layered pockets together according to the 11-Pocket Fabric Wallet – Free Pattern diagram. This stage is where your wallet begins to take shape. Double-check pocket alignment so that cards fit snugly but slide out easily.
Before sewing the main body, practice a few stitches on fabric scraps. Adjust your tension, stitch length, and needle type. A universal size 80/12 needle works for most medium-weight fabrics, while heavier textiles like canvas may need a size 90/14.
Now comes the exciting part—assembling your 11-Pocket Fabric Wallet – Free Pattern. Begin with the card pockets. Stitch along the folded edges of each pocket to secure them, then stack them in layers on the wallet lining. Sew the sides carefully, ensuring each pocket layer remains even and doesn’t shift.
Once all card pockets are attached, sew the bill pocket along the bottom edge. For extra strength, backstitch at the start and end of each seam. This prevents fraying with frequent use. If adding a zipper coin pouch, install the zipper before joining the main wallet layers. Zippered compartments add security for coins or small items.
Place the exterior and lining right sides together. Sew around the edges, leaving a small opening for turning. Clip the corners to reduce bulk, turn the wallet right side out, and press flat with an iron. Then, topstitch all around to close the turning gap and reinforce the seams.
For closures, you can choose magnetic snaps, buttons, or Velcro. Mark their placement before final topstitching to ensure accurate alignment. Snaps give a sleek, modern finish, while buttons can add handmade charm.
The 11-Pocket Fabric Wallet – Free Pattern is now nearly complete! Give the wallet a final press, making sure all edges are neat and flat. Test each pocket to ensure smooth access to cards and bills. If everything fits well, admire your craftsmanship—you’ve created a custom, organized wallet with professional quality.
Finally, consider adding decorative stitching or fabric labels for a personalized touch. Simple straight stitches in contrasting thread can highlight edges beautifully.
One of the best things about the 11-Pocket Fabric Wallet – Free Pattern is its flexibility. You can adapt it to different styles, materials, and functions. For instance, use denim or canvas for a rugged look, or choose metallic cotton prints for something elegant and modern.
If you often travel, enlarge the pattern slightly to accommodate passports or boarding passes. You can even add a hidden pocket for important documents. Quilters may enjoy piecing fabric scraps together for a patchwork exterior, making each wallet a mini art piece.
Personal touches like embroidered initials, appliqué designs, or fabric paint can make your wallet one-of-a-kind. Decorative topstitching not only looks great but also reinforces seams. Mixing textures—such as pairing cork fabric with cotton—adds sophistication and durability.
Eco-friendly crafters can upcycle old clothes or fabric remnants. Turning unused textiles into practical accessories reduces waste while giving sentimental value to the finished wallet. A wallet made from a beloved shirt or skirt fabric becomes both functional and nostalgic.
The 11-Pocket Fabric Wallet – Free Pattern is also a wonderful handmade gift. Wrap it with a ribbon or present it inside a small drawstring bag. Friends and family appreciate the thought and effort behind a custom, handcrafted piece.
Finally, don’t hesitate to experiment. Once you understand the basic structure, the pattern can evolve into countless variations—from minimalist cardholders to multi-pocket organizers. Creativity is limitless when fabric, color, and imagination meet.
Q1: Do I need advanced sewing skills?
No. This pattern is beginner-friendly. As long as you can sew straight seams and follow measurements, you’ll succeed.
Q2: What fabric works best?
Medium-weight cotton is easiest to handle, but canvas or denim adds extra strength. Always use interfacing for structure.
Q3: How can I keep the wallet sturdy?
Use fusible interfacing on main pieces and reinforce pocket seams with backstitching at stress points.
Q4: Can I wash my wallet?
Yes—most cotton or canvas wallets are washable. Hand wash in cool water, then air dry to preserve shape.
Q5: What’s the best closure type?
Magnetic snaps are sleek and easy, but buttons or Velcro also work depending on your preference.
Q6: How long does it take to make?
Around two to three hours for beginners; experienced sewists can finish in under two hours.
Creating your own 11-Pocket Fabric Wallet – Free Pattern is both fun and functional. You’ve learned how to select fabrics, cut pieces accurately, assemble multiple pockets, and personalize every detail. The end result is a professional-looking wallet that keeps everything neatly organized while reflecting your individual style.
This project proves that practical sewing doesn’t have to be complicated—just creative and well planned. With a few simple materials and patience, you can turn plain fabric into a durable accessory you’ll use every day.
We hope this tutorial inspires you to grab your fabric stash and start sewing your own 11-Pocket Fabric Wallet – Free Pattern today. Don’t forget to leave your sincere opinion and suggestions in the comments. Your feedback helps other makers and encourages even more creativity in the sewing community. Happy stitching!


