
Crocheted house-shaped cookie for Christmas tree

If you’re looking for a fun and colorful summer project, Watermelon Coasters – Crochet Pattern is the perfect choice to brighten your home and impress your guests.
Crochet coasters are practical, easy to make, and allow you to express your creativity with colors and textures. The watermelon design adds a refreshing and playful touch to your décor, making every gathering feel more cheerful and inviting.
The beauty of the Watermelon Coasters – Crochet Pattern lies in its simplicity. Even if you’re new to crochet, you’ll be able to follow this pattern and achieve impressive results.
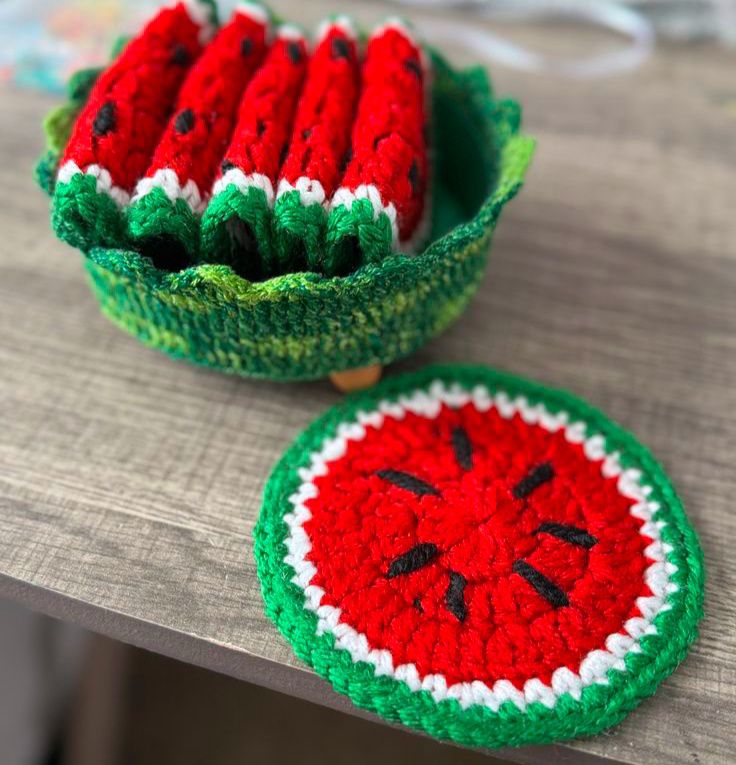
Each coaster mimics a juicy slice of watermelon, complete with green rind, white border, pink flesh, and tiny black “seeds.” This project is not only a wonderful way to practice basic crochet stitches but also a great handmade gift idea for summer parties, picnics, or housewarmings.
Crocheting these vibrant coasters also promotes sustainability. Instead of buying mass-produced items, you can repurpose leftover yarn to create something beautiful and functional. Learning Watermelon Coasters – Crochet Pattern allows you to combine creativity with eco-conscious crafting. Let’s dive into the step-by-step guide and discover how to make your own colorful watermelon coasters.
The first step in making Watermelon Coasters – Crochet Pattern is choosing the right materials. The yarn you select will influence both the appearance and durability of your coasters. Cotton yarn is ideal because it absorbs moisture well, keeps its shape, and is easy to wash—perfect for items that will come into contact with drinks.
When it comes to color, you’ll need three main shades: pink or red for the fruit’s interior, white for the border, and green for the rind. Black yarn can be used for the tiny seeds, or you can embroider them later with a tapestry needle. These colors come together to give your coasters a realistic and cheerful watermelon look.
Choose a crochet hook size recommended for your yarn weight, typically between 3.5 mm and 4 mm for medium cotton yarn. Using the correct hook ensures your stitches are consistent and your coasters lay flat. A smaller hook can create a tighter fabric, while a larger one will give a softer, more flexible finish.
You’ll also need basic crochet tools: scissors, a yarn needle for weaving ends, and possibly a stitch marker if you prefer to track rounds easily. Having your materials prepared in advance makes the crocheting process smooth and enjoyable.
Lastly, make sure your yarn colors complement each other. You can even experiment with different shades of green or pink to give each coaster a unique personality. That’s one of the joys of working with the Watermelon Coasters – Crochet Pattern—you can personalize each piece while maintaining the fun summer vibe.
Now that you have your materials ready, it’s time to start the Watermelon Coasters – Crochet Pattern. Begin with the center of the watermelon using your pink or red yarn. Create a magic ring and crochet six single crochets into it. Pull tight to close the ring. This forms the heart of your watermelon slice.
In the next round, increase each stitch by two to create a perfect circle. Continue crocheting in rounds, adding increases evenly in each new row. This helps the coaster stay flat and prevents curling. As the circle expands, you’ll notice the watermelon’s “flesh” taking shape.
After reaching your desired diameter—usually about four to five inches—switch to white yarn. This white border represents the inner rind of the watermelon. Crochet one or two rounds of single stitches in white. Be sure to keep your tension even to maintain a smooth edge.
Next, change to green yarn to create the outer rind. Crochet another round or two, depending on how thick you want the rind to appear. You can even mix light and dark greens to add more dimension and realism to your Watermelon Coasters – Crochet Pattern.
Once your coaster is complete, fasten off and weave in all yarn ends securely. At this point, you’ll already have a bright and cheerful watermelon coaster. But to make it truly stand out, you’ll want to add the finishing touches—tiny black seeds that give it that realistic charm.
The details are what bring your Watermelon Coasters – Crochet Pattern to life. To create the seeds, use black yarn or embroidery thread. With a yarn needle, stitch small teardrop or oval shapes onto the pink area of the coaster. Space them evenly, usually about six to eight seeds per coaster.
If you prefer, you can crochet small black knots directly onto the surface using a tapestry needle. This adds a bit of texture while keeping the design simple. Alternatively, you can sew on small black beads for a three-dimensional effect—just ensure they’re securely attached if the coasters will be used around children.
After adding the seeds, gently block your coasters to ensure they lay flat. To do this, dampen them lightly, pin them to a flat surface, and let them dry completely. Blocking enhances the final shape and gives your coasters a polished look.
Another creative idea is to add a hanging loop using green yarn. This makes it easy to hang your Watermelon Coasters – Crochet Pattern in the kitchen or gift them in sets tied with ribbon. Presentation adds charm to your handmade creations, especially if they’re intended as gifts.
Finally, check all edges for loose threads and weave them in neatly. Quality finishing makes your coasters more durable and professional-looking. Once complete, your watermelon coasters are ready to bring summer joy to any table setting.
One of the best parts about working with the Watermelon Coasters – Crochet Pattern is how easily you can customize it. By changing yarn colors, you can create “different fruit” coasters—such as kiwi, lemon, or orange slices—using the same pattern structure. It’s a simple way to expand your collection while keeping the same circular crochet technique.
For a modern twist, try using variegated yarn that naturally blends shades of red or pink to mimic the gradient of real watermelon flesh. This creates a soft, blended look that’s visually appealing. You can also experiment with textured stitches like half double crochets or puff stitches to add more depth.
If you want larger coasters or trivets for serving bowls, simply continue adding rounds in the pattern until you reach your desired size. The versatility of this Watermelon Coasters – Crochet Pattern allows you to adapt it for various purposes—from drink coasters to decorative kitchen mats.
Adding a protective layer to the bottom, such as a thin cork or felt circle, can prevent slipping and add durability. Simply glue it in place using fabric adhesive. This practical touch makes your handmade coasters even more functional.
Lastly, personalize your coasters with embroidery or initials if they’re gifts. Handmade items become extra special when they include personal touches. Whether for home use or gifting, the Watermelon Coasters – Crochet Pattern lets you combine practicality with artistry.
Q1: Can beginners make these watermelon coasters?
Yes! This pattern uses basic stitches like single crochet and increases, making it ideal for beginners looking for a fun project.
Q2: What type of yarn works best?
Cotton yarn is the best choice because it’s durable, washable, and absorbs moisture well—perfect for coasters.
Q3: How many coasters can I make with one skein of yarn?
Depending on the yarn weight, one skein can make 6–8 coasters in standard size.
Q4: Can I use different colors?
Of course! Experiment with color combinations to create your own fruit-inspired coasters like kiwi or orange slices.
Q5: How do I make sure my coasters stay flat?
Maintain even tension and increase stitches evenly in each round. Blocking your finished coasters also helps them stay flat.
Q6: Are these coasters machine washable?
Yes, cotton yarn coasters can usually be machine washed on a gentle cycle. Lay flat to dry for best results.
Making Watermelon Coasters – Crochet Pattern is a delightful and creative way to add handmade charm to your home. From selecting vibrant yarns to adding tiny black seeds, every step allows you to enjoy the process and produce something functional and beautiful. These coasters not only protect your table but also bring a burst of summer freshness to your décor.
We hope this guide helps you feel confident in creating your own Watermelon Coasters – Crochet Pattern. If you’ve tried this project, please leave a sincere opinion and suggestions in the comments below.
Your feedback inspires others and helps improve future crochet tutorials. Get your yarn ready, embrace your creativity, and let your imagination slice into summer fun!


