
Crocheted house-shaped cookie for Christmas tree

VALENTINE’S DAY RUG step by step is a delightful, hands-on project that transforms simple materials into a warm, heartfelt piece for your home.
This Valentine’s Day Rug pattern works beautifully as a seasonal accent, a cozy gift, or a statement piece placed at an entryway or beside a bed.
In this guide I’ll walk you through a clear step by step tutorial that blends practical instruction with creative ideas so you can finish a rug that looks polished and professional.
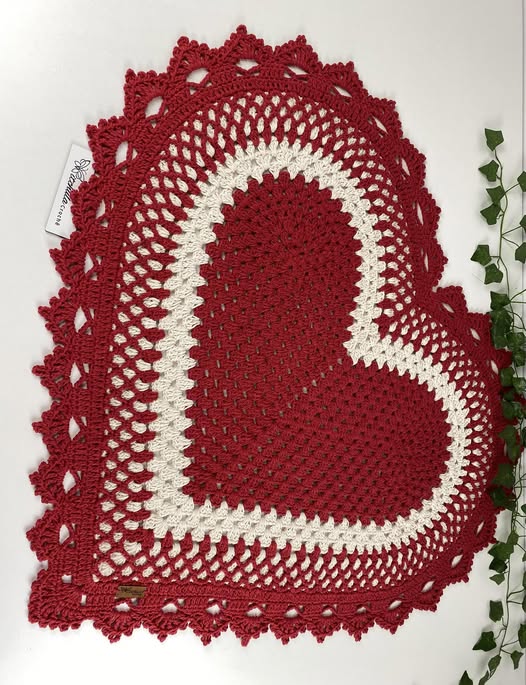
Whether you choose tufting, crochet, or hooked rug techniques, the goal is the same: to produce a charming Heart rug that holds up to everyday use and spreads holiday cheer.
Making a VALENTINE’S DAY RUG step by step is ideal for crafters who love tactile projects. You’ll learn how to plan the layout, select yarn or fabric scraps, prepare your backing, and apply finishing touches that make a difference. This article highlights several approaches—DIY rug pattern ideas for beginners and intermediate makers—so you can pick the method that fits your tools and time. Throughout the piece I’ll explain key terms like tufted rug, crochet rug, and DIY rug pattern to help you choose materials and techniques with confidence.
Above all, this step by step tutorial emphasizes durability and aesthetics. I’ll include smart tips for color contrast, scale, and safety (non-slip backing, washable choices) so your rug is both beautiful and practical. Expect guidance on measured planning, pattern scaling, and finishing methods that extend your rug’s life. By the end you’ll have everything you need to make a personalized Valentine’s Day Rug that feels handmade, intentional, and ready to be loved.
Start your VALENTINE’S DAY RUG step by step project by gathering the right materials. For a tufted or hooked Heart rug, you’ll want a sturdy backing like monk’s cloth, burlap, or rug canvas to accept loops and tufts. For a crochet rug approach, opt for heavy-weight yarns or t-shirt yarn and the appropriate large hook size. Choosing a good backing is one of the most important decisions for longevity.
Yarn and fibers define texture and color. If you’re creating a plush tufted rug, use wool or acrylic yarns rated for rugged use; for a flatter crochet rug, bulky or super-bulky yarn gives faster results. Consider a palette dominated by reds, pinks, ivory, and accent neutrals for a classic Valentine’s Day Rug, then add a pop color or two for visual interest. Mixing textures—soft wool with boucle or chenille—creates depth.
Tools vary by method: tufting guns or hand-tufting tools for tufted rugs, latch hook or rug hook for hooked rugs, and large crochet hooks or knitting needles for crocheted variations. You’ll also need scissors, a non-slip rug pad, fabric glue or rug binding tape for edges, and a frame or hoop if you want to keep the backing taut as you work. A measuring tape and fabric marker complete the kit.
For safety and finish, include a slip-resistant backing or rug pad sized to your finished rug, and an upholstery adhesive or zig-zag stitching method to secure edges. If you want a washable rug, test your materials’ washability first. Selecting the right supplies up front makes the VALENTINE’S DAY RUG step by step process smoother and ensures professional-looking results.
Before you begin the hands-on work for your VALENTINE’S DAY RUG step by step, sketch the Heart rug design at the intended final size. Use scaled graph paper or a digital canvas to mark heart proportions, border width, and any motifs like initials or scalloped edges. Solid planning saves time and prevents surprises mid-project.
Transfer the pattern onto your backing carefully. For tufted or hooked methods, trace a bold outline that is easy to follow with a pen or tailor’s chalk; for a crochet rug, create a stitch chart or written row guide that matches your gauge. Test a small swatch to verify gauge if you’re working in crochet so that the final dimensions align with your sketch. Adjust hook size or yarn weight as needed.
Set up a comfortable workspace with good lighting and a flat, stable surface. If using a frame or hoop for tufting or hooking, assemble it and secure the backing tautly so loops are consistent. Keep all tools within reach to maintain a steady rhythm and reduce strain—tufting and hooking can be repetitive, so ergonomic setup matters for longer sessions.
Organize yarn by color and label skeins to avoid confusion during color transitions in your VALENTINE’S DAY RUG step by step. Consider pre-cutting lengths for applique pieces or fringe accents to speed assembly. Having a clean, dedicated area also helps when working with adhesives or spray backing to avoid messes.
Finally, protect your floor and surfaces while you work—tufting and hooking can shed fibers. Lay down a drop cloth and have a lint roller or handheld vacuum available. Preparing thoughtfully makes the creative steps more enjoyable and helps your Valentine’s Day Rug look neat and intentional when finished.
Begin the VALENTINE’S DAY RUG step by step by outlining the heart shape clearly on the backing. With tufting or hooking, follow the traced line closely so your shape remains crisp. For a crochet rug, start at the center of the heart and work outward with increases to keep curves smooth. Accuracy at this early stage sets the tone for the entire project.
If tufting, use a punch or tufting gun to insert loops into the backing, maintaining consistent loop height for an even pile. Work in small sections—top to bottom or left to right—to avoid tangling yarn and to keep tension uniform. Change color blocks where your pattern dictates, tying off securely between color changes and burying ends neatly on the back.
For hooked rugs, pull yarn or strips through the backing using the hook, creating uniform loops. Trim loops later for a cut-pile look if desired. Hooking allows for bold, graphic shapes—perfect for a stylized Heart rug—and is forgiving for beginners as you can easily adjust density as you go.
If crocheting, form rows or rounds following your chart; use stitches like single crochet, half double, or trebles depending on the texture and thickness you want. Incorporate color changes by joining new yarn at the beginning of a stitch and weaving in ends securely on the inside or back. For a sturdier edge, finish with a border of slip stitch or a neat single crochet rim.
Constantly check measurements as you progress to ensure the heart remains proportionate and the rug’s width matches your original plan. Pause to step back and assess color balance and scale—sometimes a small change in color placement can elevate the whole design. When sections are complete, reinforce joins with extra stitching or adhesive as needed to prevent gaps.
After completing the pile or crochet body in your VALENTINE’S DAY RUG step by step, trim loops evenly if you prefer a cut pile and brush the surface to reveal texture. Clean up stray fibers with scissors or a lint shaver, being careful not to damage the backing. A neat finish instantly upgrades the overall look of your Heart rug.
Secure edges with binding tape, whip stitch, or a sewn fabric border to prevent unraveling. For tufted or hooked rugs, apply a strong latex or canvas-backed adhesive to the reverse side and press a protective backing in place; allow to cure fully before trimming or moving. A finished edge not only looks professional but increases the rug’s lifespan.
Add embellishments like tassels, pompoms, or a crocheted scalloped border for extra charm. If you included appliqué initials or motifs, ensure they are double-stitched and anchored. Small finishing details make your VALENTINE’S DAY RUG feel bespoke and gift-ready.
Care instructions matter: vacuum gently, spot clean with mild detergent, and avoid machine washing unless your materials are labeled washable. Use a non-slip rug pad beneath the finished piece to protect floors and keep the rug in place. For seasonal storage, roll the rug (don’t fold) and store in a breathable fabric bag to prevent mildew.
Display ideas: place your Heart rug at an entryway for a romantic surprise, use it as a centerpiece under a small table, or drape it over a bench for a decorative touch. The warmth of handmade texture paired with the thoughtful step by step process will draw compliments and become a conversation starter in any room.
FAQ
Q: What is the best technique for beginners doing a VALENTINE’S DAY RUG step by step?
A: For beginners, a simple hooked rug or a chunky crochet rug using bulky yarn and a large hook is often the most accessible. These methods require basic tools and allow forgiving corrections. Start with a small heart to build confidence before attempting larger sizes.
Q: Can I make a VALENTINE’S DAY RUG step by step without special equipment like a tufting gun?
A: Absolutely. Hand-tufting tools, rug hooks, or crochet hooks work well and are more affordable. Tufting guns speed production but are not essential—many beautiful Heart rugs are made entirely by hand.
Q: Which yarn or material is most durable for a high-traffic rug?
A: Use sturdy, tightly spun wool or synthetic yarns (acrylic blends) rated for floor use. For tufted rugs, denser pile and a robust backing are key. Avoid loosely spun novelty yarns in high-traffic areas as they may pill or wear faster.
Q: How do I make sure the heart shape remains even and symmetrical during the VALENTINE’S DAY RUG step by step?
A: Use a printed or drawn template, fold your backing to mark symmetry, or grid your pattern on graph paper. Check measurements frequently and work slowly around curves to keep the heart balanced.
Q: Is it safe to wash a handmade Valentine’s rug?
A: It depends on materials. Many handmade rugs should be spot-cleaned or professionally cleaned. If you use washable yarns and secure the backing properly, you may be able to gently hand wash or machine wash on a delicate cycle—always test a swatch first.
Q: How can I add non-slip properties to my finished rug?
A: Attach a non-slip rug pad underneath or apply a non-slip silicone coating to the back. For tufted or hooked rugs, a full backing plus a rug pad provides the best stability and protects flooring.
Following this VALENTINE’S DAY RUG step by step guide gives you the tools and confidence to create a heartfelt, handmade accent that fits your home and skill level. From choosing the right DIY rug pattern and materials to completing tidy edges and care routines, each stage of the process contributes to a durable, beautiful Heart rug. Whether you choose tufting, hooking, or a crochet rug approach, the planning and finishing tips here will help your rug look intentional and last for seasons.
I’d love to hear how your project turned out—please leave an honest opinion and any suggestions or variations you discovered while making your Valentine’s Day Rug. Your feedback helps refine these step by step tutorials and inspires others to try their own creative versions.


