
Crocheted house-shaped cookie for Christmas tree

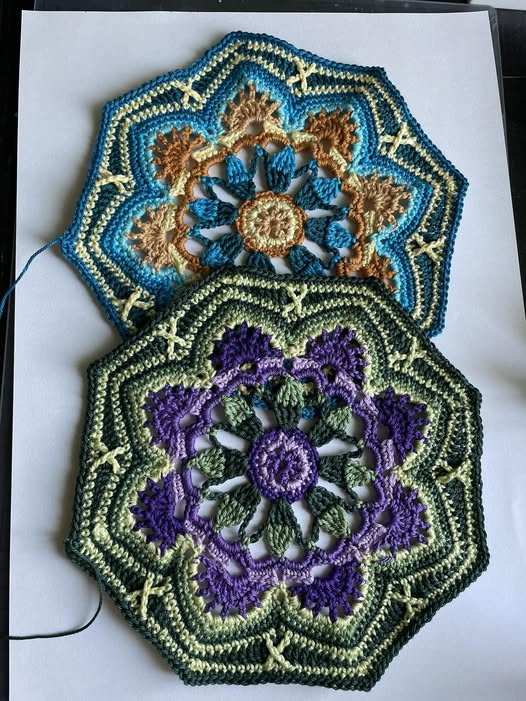
Square Persa – Step-by-step is a unique and creative craft technique that has been gaining popularity among crochet enthusiasts and DIY lovers worldwide.
Learning how to create a Square Persa can be both relaxing and rewarding, offering endless possibilities for blankets, pillows, and even stylish fashion accessories.
Whether you are a beginner or an experienced crafter, understanding the step-by-step process of making a Square Persa ensures that you can produce a beautiful, consistent result every time.
Many people are drawn to the Square Persa because of its intricate design and the satisfaction that comes from completing each square perfectly.
Unlike simple crochet patterns, this style emphasizes detail, symmetry, and vibrant color combinations. By mastering the Square Persa – Step-by-step, you can enhance your creativity while developing new skills that are transferable to other types of crochet and knitting projects.
Additionally, learning the Square Persa technique can be a therapeutic and mindful activity. Spending time crafting each square encourages patience, focus, and a sense of accomplishment. Moreover, the versatility of Square Persa makes it an ideal project for personal use or as a thoughtful handmade gift. With this guide, you will discover every step needed to create stunning Square Persa pieces with confidence.
Before diving into the Square Persa – Step-by-step process, it is important to understand the basic elements involved. A Square Persa is typically composed of geometric patterns that interlock seamlessly, creating an elegant and uniform design. The foundational skills required include basic crochet stitches, color changes, and tension control.
Starting with a clear understanding of the materials is essential. You will need yarn in your preferred colors, a compatible crochet hook, and scissors. Choosing high-quality yarn enhances the durability and appearance of your Square Persa. Beginners should start with medium-weight yarn for easier handling.
Another crucial aspect of mastering Square Persa is learning how to read crochet patterns accurately. Familiarity with pattern symbols and stitch abbreviations will make following the step-by-step instructions much easier. Practicing small swatches can help you gain confidence before committing to a larger project.
To create a perfect Square Persa, you also need to maintain consistent tension. Uneven tension can distort the shape of the square, affecting the overall design. By paying attention to these basic principles, you set yourself up for success in the Square Persa – Step-by-step process.
Additionally, understanding color theory can elevate your Square Persa design. Combining contrasting or complementary colors adds depth and visual appeal to the final piece. Experimenting with color placement ensures that each square is unique and aesthetically pleasing.
Finally, patience and practice are key. While the Square Persa – Step-by-step method may seem intricate at first, repetition will improve your skills. Taking the time to master each step ensures that your finished squares are neat, vibrant, and professional-looking.
When starting the Square Persa – Step-by-step, selecting the right tools and materials is crucial for achieving excellent results. The first essential item is yarn. Opt for soft, durable yarn that will hold its shape. Cotton or acrylic yarns are popular choices for Square Persa projects due to their texture and versatility.
A suitable crochet hook is also necessary. The size of the hook depends on the thickness of your yarn, but generally, a medium-sized hook is ideal for beginners. Using the right hook ensures even stitches and prevents strain on your hands during prolonged crafting sessions.
Scissors and stitch markers are additional tools that make the Square Persa process smoother. Stitch markers help keep track of pattern repeats and important points in your work. Keeping scissors nearby allows for easy trimming of yarn ends without interrupting your workflow.
Having a measuring tape or ruler is beneficial for maintaining consistent square sizes. Measuring your work as you progress ensures that all squares will fit together seamlessly when assembled into larger projects. Consistency is key for achieving the clean, professional look characteristic of Square Persa.
A yarn needle or tapestry needle is essential for weaving in ends and finishing your squares. Properly hiding yarn ends enhances the overall appearance of your Square Persa, making your work look polished and refined.
Finally, a comfortable workspace contributes to a pleasant crafting experience. Good lighting, ergonomic seating, and a clutter-free area allow you to focus entirely on your Square Persa – Step-by-step project without distractions.
Creating a Square Persa – Step-by-step involves several stages that require careful attention to detail. Begin by making a foundation chain, which sets the base for your square. The number of chains depends on the size of the square you want to achieve.
Once your foundation chain is complete, start working your first row with basic crochet stitches such as single or double crochet. This initial row establishes the pattern and prepares you for more complex stitch sequences in subsequent rows.
Incorporating color changes is a defining feature of Square Persa. Plan your colors ahead and introduce them gradually to create vibrant patterns. Be mindful of tension when switching colors to maintain an even surface.
As you progress, follow the pattern to build geometric shapes or motifs within the square. Attention to detail is crucial, as small mistakes can affect the symmetry of the final design. Take breaks if needed to ensure accuracy and prevent frustration.
After completing the main body of the square, finish with a neat border. Borders not only provide structure but also enhance the aesthetic appeal of the Square Persa. Choose a color that complements your design to achieve a professional look.
Finally, weave in all loose ends and gently block your square if necessary. Blocking ensures that your square maintains its shape and lays flat, making assembly easier when joining multiple Square Persa pieces into larger projects.
Achieving a flawless Square Persa – Step-by-step requires practice and a few insider tips. One important tip is to maintain consistent stitch tension. Uneven tension can distort the square and affect overall symmetry.
Another helpful trick is to use stitch markers to track pattern repeats. This simple step prevents mistakes and makes it easier to follow intricate designs. Beginners often underestimate the usefulness of stitch markers, but they are invaluable for Square Persa projects.
Experimenting with different yarn textures and colors can produce unique results. Combining smooth and textured yarns or contrasting shades can elevate the visual interest of your Square Persa.
Taking breaks during long crafting sessions is essential. Fatigue can lead to mistakes, so pacing yourself ensures that your squares remain neat and uniform. A rested mind and hands improve precision in the Square Persa – Step-by-step process.
Joining multiple squares can be challenging for beginners. Practice different joining methods, such as whip stitch or slip stitch, to find the technique that works best for your project. Properly joining squares ensures a seamless final piece.
Finally, don’t be afraid to make mistakes. Each error is an opportunity to learn and improve. With patience and dedication, you can master the Square Persa – Step-by-step technique and create stunning, professional-quality designs.
Q1: Is Square Persa suitable for beginners?
Yes, beginners can start with simple patterns and gradually progress to more complex designs. Understanding basic crochet stitches is essential before attempting advanced motifs.
Q2: What types of yarn are best for Square Persa?
Medium-weight cotton or acrylic yarns are ideal. They are easy to handle, durable, and provide good stitch definition for intricate designs.
Q3: How do I maintain consistent tension in my Square Persa?
Practice is key. Make small swatches, pay attention to hand positioning, and avoid pulling the yarn too tight or too loose.
Q4: Can I change colors in the middle of a square?
Absolutely. Color changes add vibrancy and complexity to your design. Always switch colors at the beginning of a new row or stitch sequence.
Q5: How do I join multiple Square Persa pieces?
You can use whip stitch, slip stitch, or other joining techniques. Ensure squares are blocked and edges are aligned for a seamless finish.
Q6: How do I prevent my squares from curling?
Blocking your squares and maintaining even tension throughout the project helps prevent curling. A consistent stitch pattern also contributes to a flat, uniform shape.
In conclusion, mastering the Square Persa – Step-by-step technique opens up a world of creative possibilities for crochet enthusiasts. From understanding the basics to choosing the right materials, following a detailed step-by-step process, and applying helpful tips, this guide covers everything you need to create beautiful, professional-quality squares.
By practicing patience, experimenting with colors and textures, and paying attention to detail, anyone can create stunning Square Persa pieces. Whether for personal use, gifts, or larger projects like blankets and throws, these squares are versatile and rewarding to make.
We hope this guide has inspired you to start your Square Persa journey. Please leave a sincere opinion and share any suggestions for future tutorials. Your feedback is invaluable and helps us improve our content for fellow craft lovers.


