
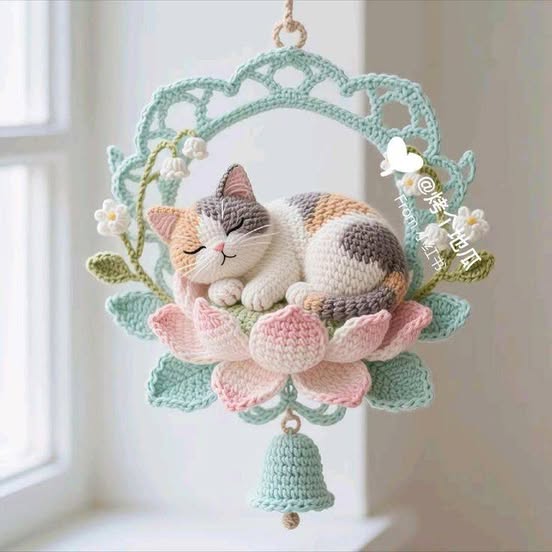
If you are a fan of cute and cozy crafts, the Sleeping Cat Amigurumi Tutorial is the perfect project for you. This pattern allows you to create a small, adorable crochet cat that appears peacefully sleeping, making it a charming addition to your home décor or a delightful handmade gift.
The Sleeping Cat Amigurumi combines soft textures, intricate crochet techniques, and careful attention to detail to bring your cat to life in yarn form.
Creating a Sleeping Cat Amigurumi is both relaxing and rewarding. This project provides a wonderful opportunity to practice crochet skills while producing something functional and decorative.
Whether you are a beginner or an experienced crafter, following this tutorial step-by-step ensures a successful and satisfying crafting experience.
Not only is the Sleeping Cat Amigurumi visually appealing, but it also serves as a soft toy, paperweight, or cozy decoration. Its small size and cuddly appearance make it versatile, and you can customize colors, yarn types, and features to match your preferences or gift recipients’ tastes.
Materials Needed for the Sleeping Cat Amigurumi
Before beginning the Sleeping Cat Amigurumi Tutorial, gather all the necessary materials. Being prepared ensures a smooth crafting process and reduces interruptions.
You will need medium-weight yarn in your chosen colors, a crochet hook suitable for your yarn, a yarn needle, and stuffing for shaping the cat. Soft yarns create a plush, cuddly texture, while firmer yarns give structure and stability.
Scissors, stitch markers, and a measuring tape are essential tools to maintain consistent stitch counts and accurate sizing throughout the project. Precision ensures a neat and professional-looking amigurumi.
Optional embellishments like safety eyes, embroidery thread, or felt can enhance your cat’s facial features. These small details bring personality and charm to your finished Sleeping Cat Amigurumi.
For beginners, choosing yarn that is easy to handle and a hook size recommended for your yarn weight makes the process more enjoyable. Following the pattern exactly helps prevent frustration and mistakes.
Finally, having a printed or digital copy of the pattern ensures you can track your progress and check each step carefully. Templates for shaping the head, body, and limbs are especially helpful for maintaining symmetry and proportion.
Step-by-Step Instructions for Making the Sleeping Cat
Start your Sleeping Cat Amigurumi by creating the body. Work in rounds, increasing and decreasing stitches as instructed to form a rounded, cozy shape. This serves as the foundation for the rest of your cat.
Next, crochet the head, following the pattern for a smooth and symmetrical shape. Attention to stitch placement ensures the head fits proportionally with the body.
Create the limbs, ears, and tail according to the pattern. Each part is carefully shaped with increases, decreases, and strategic stitching to achieve a lifelike appearance. Attach these parts to the body using a yarn needle and secure stitching for durability.
Add facial details using embroidery thread or felt. Eyes, nose, and mouth are optional, but even small touches can dramatically enhance the character of your Sleeping Cat Amigurumi.
Stuff the amigurumi evenly with soft filling to maintain its shape. Overstuffing can distort the cat, while under-stuffing may make it floppy. Proper stuffing ensures a balanced and cuddly final product.
Finally, check all seams and attachments. Reinforce any weak points to ensure longevity. A well-finished Sleeping Cat Amigurumi will retain its form and look professionally crafted for years to come.
Tips for Customizing Your Sleeping Cat
One of the most enjoyable aspects of the Sleeping Cat Amigurumi Tutorial is customization. You can experiment with yarn colors to create different breeds or playful fantasy cats.
Varying the size of your cat is another option. Small cats make cute keychains or ornaments, while larger versions serve as soft toys or decorative accents.
Mixing yarn textures can add depth and realism. Combining soft and fuzzy yarns with smooth cotton creates contrast, making your amigurumi visually interesting.
Adding accessories such as a tiny scarf, bow, or embroidered collar gives your cat personality and charm. These details make the Sleeping Cat Amigurumi unique and personalized.
Adjusting facial expressions with embroidery allows you to make your cat look sleepy, content, or playful. Small changes in stitch placement can dramatically alter the expression and mood.
Finally, using different crochet techniques, like bobble stitches or surface crochet, can add texture to fur or other features. Experimenting with techniques elevates your amigurumi from simple to stunning.
Common Mistakes to Avoid
Even experienced crafters can encounter challenges when making a Sleeping Cat Amigurumi. Awareness of common mistakes ensures better results.
One common mistake is uneven stuffing. Overstuffing can stretch the stitches, while under-stuffing may result in a floppy cat. Maintain even pressure throughout.
Miscounting stitches is another frequent error. Always double-check your stitch count at the end of each round to prevent shape distortions.
Improper attachment of limbs, ears, or tail can cause the cat to look asymmetrical. Pinning parts in place before sewing helps maintain proper alignment.
Neglecting facial details can reduce the cat’s personality. Even simple embroidered eyes and nose can dramatically enhance appearance.
Using yarn that is too thin or too thick can affect the structure. Follow the pattern’s recommended yarn weight for best results.
Finally, rushing through finishing touches often leads to sloppy seams or weak attachments. Take your time to ensure a polished, professional-looking Sleeping Cat Amigurumi.
FAQ about Sleeping Cat Amigurumi
Q1: Is this tutorial suitable for beginners?
Yes, the Sleeping Cat Amigurumi Tutorial provides step-by-step instructions suitable for beginners, while also offering creative options for advanced crafters.
Q2: What yarn is recommended?
Medium-weight yarn is ideal. Soft yarns make cuddly cats, while firmer yarns provide structure. Safety eyes or embroidery thread are optional.
Q3: How long does it take to make one cat?
Time varies depending on experience. Beginners may need 3–5 hours, while experienced crafters can finish in 2–3 hours.
Q4: Can I change the size of the cat?
Yes, adjusting yarn thickness and hook size allows you to create smaller or larger cats, suitable for keychains or decorative pieces.
Q5: Is the cat safe for children?
Yes, but avoid small detachable parts like buttons for very young children. Embroidered features are safer for little ones.
Q6: Can I make multiple cats for gifts?
Absolutely. The Sleeping Cat Amigurumi is a perfect handmade gift, and customizing colors and features adds a personal touch.
Conclusion
The Sleeping Cat Amigurumi Tutorial is a delightful project that combines creativity, patience, and attention to detail. By following this guide, you can create a charming, functional, and personalized crochet cat that is perfect as a gift or home decoration. Customization options allow crafters to experiment with colors, sizes, textures, and accessories, making each cat a unique creation.
Making a Sleeping Cat Amigurumi is both fun and rewarding. By avoiding common mistakes, using quality materials, and taking time with details, you can produce a polished, professional-looking amigurumi that will bring joy to anyone who sees or receives it.
Another creative idea for your Sleeping Cat Amigurumi is to make themed cats for special occasions. For example, you can use pastel colors for spring or festive shades for holidays like Christmas and Halloween.
VIDEO TUTORIAL
We hope this tutorial inspires you to craft your own sleeping cat. Share your results, give feedback, and offer suggestions to continue improving your projects and inspiring the crafting community.