
Crocheted house-shaped cookie for Christmas tree

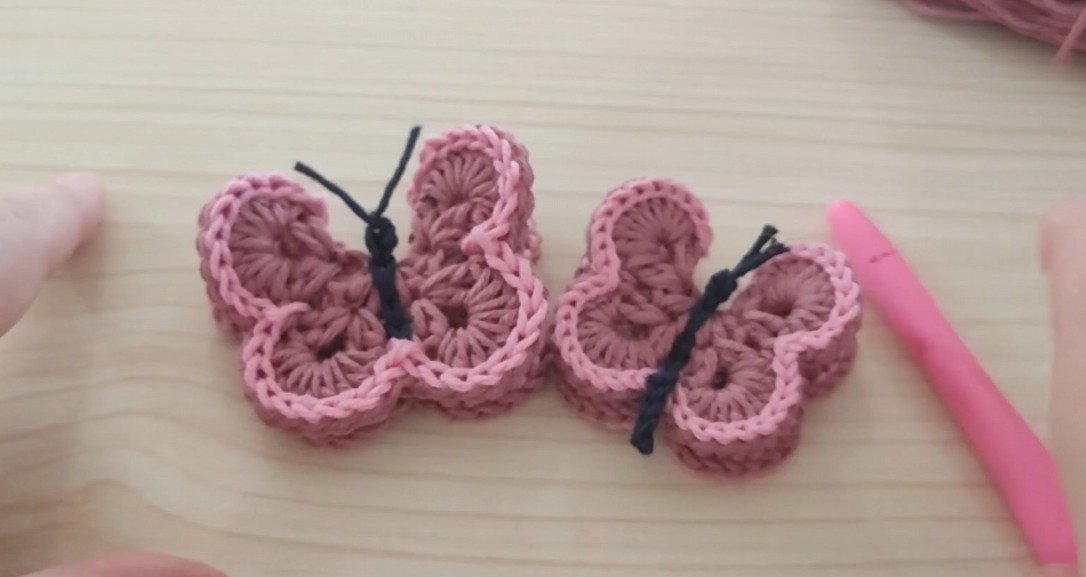
The Simple Relief Butterfly – Crochet Pattern is a delightful and versatile project for crochet enthusiasts of all levels. Whether you are a beginner or an experienced crocheter, creating this beautiful butterfly design can bring a touch of elegance to your home decor, clothing, or accessories.
With its simple yet intricate relief stitches, this pattern allows crafters to explore creative textures while producing a charming final product. Simple Relief Butterfly – Crochet Pattern projects are perfect for adding a personalized touch to gifts, wall hangings, or even as standalone decorative pieces.
Crochet has been a beloved craft for centuries, and patterns like the Simple Relief Butterfly – Crochet Pattern showcase how traditional techniques can be transformed into modern, stylish designs.
The use of relief stitches in this pattern adds depth and dimension, giving the butterfly a realistic and eye-catching look. By following this pattern, crafters can not only improve their crochet skills but also enjoy the therapeutic and relaxing benefits that come with working on a creative project.
Moreover, the Simple Relief Butterfly – Crochet Pattern is highly adaptable. You can adjust the size, yarn color, and type of hook to match your creative vision. From delicate pastel butterflies for baby blankets to bold, colorful designs for home decor, this pattern offers endless possibilities. The combination of simplicity and elegance makes it a must-have for anyone looking to expand their crochet repertoire and produce stunning results with a manageable level of effort.
Relief stitches are essential in making the Simple Relief Butterfly – Crochet Pattern stand out. These stitches create raised textures that give your butterfly a three-dimensional appearance. Unlike flat crochet stitches, relief stitches like front post and back post double crochets allow you to build layers of texture, making the butterfly more visually dynamic and tactile.
When working with relief stitches, it’s important to maintain consistent tension. This ensures that your butterfly’s wings have a smooth and even surface, without any unwanted gaps or uneven areas. Practicing these stitches before starting the actual pattern can significantly improve your final result. By mastering relief stitches, you will also gain skills applicable to a wide variety of other crochet patterns that rely on textured designs.
The Simple Relief Butterfly – Crochet Pattern often utilizes a combination of basic stitches like single crochet, double crochet, and slip stitches along with relief techniques. Understanding the interaction between these stitches helps in creating the delicate wing shapes and the overall butterfly structure. Relief stitches not only enhance the aesthetic appeal but also make the butterfly sturdy and more durable.
In addition, relief stitches can be used to emphasize certain areas of your crochet project. For instance, in the Simple Relief Butterfly – Crochet Pattern, the central body of the butterfly often features more pronounced relief stitches, which helps it stand out against the delicate wings. This contrast between textures is what makes the pattern visually appealing and satisfying to complete.
Finally, experimenting with relief stitches in the Simple Relief Butterfly – Crochet Pattern can encourage creativity. You can play with different stitch combinations, creating unique variations that reflect your personal style. These techniques provide endless possibilities for customizing your butterfly designs.
Selecting the appropriate yarn and hook is crucial for a successful Simple Relief Butterfly – Crochet Pattern. Yarn weight, fiber type, and color can dramatically affect the outcome of your project. For beginners, medium-weight yarns like worsted or DK are recommended because they are easier to handle and show relief stitches clearly.
Cotton yarn is an excellent choice for this pattern due to its smooth texture and ability to hold the shape of relief stitches. Acrylic yarn can also be used for a softer, more flexible finish, while blends of cotton and acrylic offer a balance of structure and drape. The choice of yarn color can enhance the visual impact of your butterfly; contrasting colors can make the relief stitches pop, while gradients or variegated yarns add a natural, blended effect.
The crochet hook size should match your yarn choice. A slightly larger hook can give your butterfly a looser, more delicate appearance, while a smaller hook produces a tighter, more detailed texture. Using the right hook ensures that your relief stitches maintain their intended shape without causing your work to become too rigid or too floppy.
Experimenting with different yarn and hook combinations in a small swatch before starting the full Simple Relief Butterfly – Crochet Pattern can save time and prevent mistakes. Swatching allows you to visualize the final effect, make adjustments, and ensure your chosen materials are comfortable to work with.
Additionally, the yarn and hook choice can influence the versatility of your finished butterfly. Sturdier yarns are ideal if you plan to attach the butterfly to clothing or accessories, while softer yarns work well for decorative home items. Selecting materials with these factors in mind will help you achieve a professional and satisfying result.
Finally, paying attention to yarn texture and sheen can elevate your Simple Relief Butterfly – Crochet Pattern. Smooth, shiny yarns can make the relief stitches more pronounced, while matte yarns provide a subtle, sophisticated look. By carefully choosing your materials, you ensure that your butterfly stands out as a beautiful and high-quality piece.
Creating the Simple Relief Butterfly – Crochet Pattern involves a series of straightforward steps that are easy to follow with a little patience. Begin by crocheting the body of the butterfly, which usually starts with a foundation chain followed by several rows of relief stitches. These stitches form the central structure that will support the wings.
Once the body is complete, move on to the wings. Start with the top wings, using a combination of double crochet and relief stitches to achieve the desired shape and texture. Pay attention to symmetry, as even and balanced wings are key to making your butterfly look realistic and polished.
After finishing the top wings, proceed to the bottom wings. These are typically smaller and may involve fewer stitches but require the same careful attention to relief techniques. Combining the wings with the central body creates a cohesive and visually appealing butterfly structure.
Once the wings are attached, it’s time to add finishing touches. You can use slip stitches or single crochet to smooth edges, add antennae, or create additional texture. These small details enhance the overall design and give the butterfly a professional and refined look.
Blocking your finished Simple Relief Butterfly – Crochet Pattern is an optional but highly recommended step. Gently wet the butterfly and pin it to a flat surface in the desired shape. Allow it to dry completely, which will help set the stitches and maintain the three-dimensional relief texture.
Finally, enjoy your completed butterfly! Whether displayed as part of a crochet mobile, sewn onto a pillow, or attached to clothing, the Simple Relief Butterfly – Crochet Pattern offers endless possibilities for creative use and personal expression.
One of the most enjoyable aspects of the Simple Relief Butterfly – Crochet Pattern is the ability to customize it according to your preferences. You can experiment with different colors for the wings and body to create unique variations that match your decor or style. Bold color combinations create striking butterflies, while pastel shades give a soft, delicate appearance.
Another customization option is to adjust the size. By increasing or decreasing the number of foundation chains and rows, you can create small butterflies suitable for embellishments or larger ones for wall art and blankets. This flexibility makes the pattern adaptable to various projects and needs.
Adding embellishments like beads, sequins, or embroidery can further enhance your butterfly. Placing small beads along the edges of the wings or at the center can create a sparkling effect, while embroidery adds intricate patterns that highlight the relief stitches.
You can also experiment with different yarn textures. Combining smooth and fluffy yarns within the same butterfly can create interesting contrasts and tactile appeal. Similarly, using variegated yarns adds a natural gradient effect that enhances the visual depth of the relief stitches.
Consider combining multiple butterflies to form a decorative cluster. Arranging them in patterns on a blanket, wall hanging, or clothing item can create a visually stunning effect that highlights your crochet skills and creativity.
Finally, documenting your customizations and variations can inspire future projects. Keeping notes on color combinations, stitch adjustments, and embellishments ensures that you can replicate or improve upon your favorite designs in future Simple Relief Butterfly – Crochet Pattern projects.
Q1: What skill level is required for this pattern?
A1: The Simple Relief Butterfly – Crochet Pattern is suitable for beginners who are comfortable with basic crochet stitches, as well as intermediate and advanced crocheters who want to practice relief stitches.
Q2: How long does it take to complete one butterfly?
A2: Depending on your experience and the size of the butterfly, it typically takes 2–5 hours to complete one Simple Relief Butterfly – Crochet Pattern.
Q3: Can I use any type of yarn?
A3: Yes, but medium-weight yarns such as cotton or acrylic are recommended for best results. The yarn should be smooth enough to showcase the relief stitches.
Q4: How do I make my butterfly more durable?
A4: Using slightly tighter stitches, sturdy yarn, and optionally a small amount of fabric stiffener can help your butterfly maintain its shape and longevity.
Q5: Can I attach the butterfly to clothing?
A5: Absolutely! The Simple Relief Butterfly – Crochet Pattern can be sewn or glued onto garments, hats, scarves, or bags for a decorative touch.
Q6: How can I prevent my butterfly from losing shape?
A6: Blocking your finished butterfly by gently wetting it and pinning it into shape helps maintain the three-dimensional relief texture and ensures long-lasting results.
The Simple Relief Butterfly – Crochet Pattern is a versatile and rewarding crochet project that allows crafters to explore relief stitches, practice their skills, and create stunning decorative pieces. From understanding the importance of stitch techniques to selecting the right yarn and hook, every step of this pattern contributes to a beautiful, three-dimensional butterfly. With customization options such as color, size, texture, and embellishments, this pattern is perfect for personal projects or thoughtful gifts.
By following the steps and tips provided, anyone can create a charming butterfly that reflects their creativity and craftsmanship. Take the time to experiment, enjoy the process, and celebrate your finished piece.
We encourage you to leave a sincere opinion about this pattern and share suggestions for future projects. Your feedback helps the crafting community grow and inspires new ideas for beautiful crochet creations.


