
Crocheted house-shaped cookie for Christmas tree

The Simple Crochet Balaclava – Free Pattern is a versatile and cozy project that combines practicality and style, perfect for keeping warm during the cold seasons. This handmade accessory has recently gained popularity not only for its functionality but also for its trendy appearance in modern fashion.
Whether you’re going skiing, taking a walk in the chilly air, or simply want to make a fashionable statement, a crochet balaclava is an excellent choice. It’s simple to make, beginner-friendly, and offers endless possibilities for customization.
Working on the Simple Crochet Balaclava – Free Pattern allows you to create a piece that fits your exact style and comfort needs. You can choose your favorite yarn color, texture, and thickness to design something unique. It’s a wonderful project to use leftover yarn, making it sustainable as well as creative.
Plus, crocheting your own balaclava gives you the satisfaction of crafting something both beautiful and functional, ideal for personal use or thoughtful gifts.
Crochet balaclavas have a timeless charm. They’ve evolved from purely practical winter gear to stylish accessories that fit perfectly into today’s handmade fashion trends. The Simple Crochet Balaclava – Free Pattern is designed to be quick to make, with easy stitches and a snug fit that keeps your head, neck, and ears warm. You’ll love how it combines simplicity, warmth, and handmade charm—all in one creative project.
H2 – 1. Materials and Tools for the Simple Crochet Balaclava
Before starting your Simple Crochet Balaclava – Free Pattern, it’s important to gather all the necessary materials. You’ll need medium-weight yarn, which provides warmth without being too bulky. Acrylic or wool-blend yarns are perfect because they are soft, durable, and available in a variety of colors. Choose a neutral tone for a classic look or go bold with bright shades for a modern twist.
You’ll also need a crochet hook that matches your yarn weight, usually 4.5 mm or 5 mm. Having a yarn needle, stitch markers, and scissors will help you keep your project organized and clean. A measuring tape is also useful to ensure the balaclava fits perfectly around your face and neck.
Make sure your yarn has some stretch but maintains its shape after washing. The right yarn choice can make your Simple Crochet Balaclava – Free Pattern more comfortable and long-lasting. Consider using a soft lining yarn if you have sensitive skin or plan to wear it for extended periods.
Before starting, check your gauge with a small swatch. You don’t want your balaclava to turn out too tight or too loose. Adjust your hook size if necessary to achieve the right fit. Proper gauge ensures your finished piece has the perfect balance of coziness and flexibility.
If you want a softer texture, try combining two strands of thinner yarns together. This can create a plush, thicker feel without adding too much bulk. It’s also a creative way to mix colors for a gradient or ombre effect, adding personality to your Simple Crochet Balaclava – Free Pattern.
Finally, prepare your workspace. A comfortable chair, good lighting, and a quiet atmosphere make crocheting an enjoyable and relaxing experience. Once everything is ready, you can dive into the creative process of crafting your balaclava.
H2 – 2. Step-by-Step Guide to Making the Crochet Balaclava
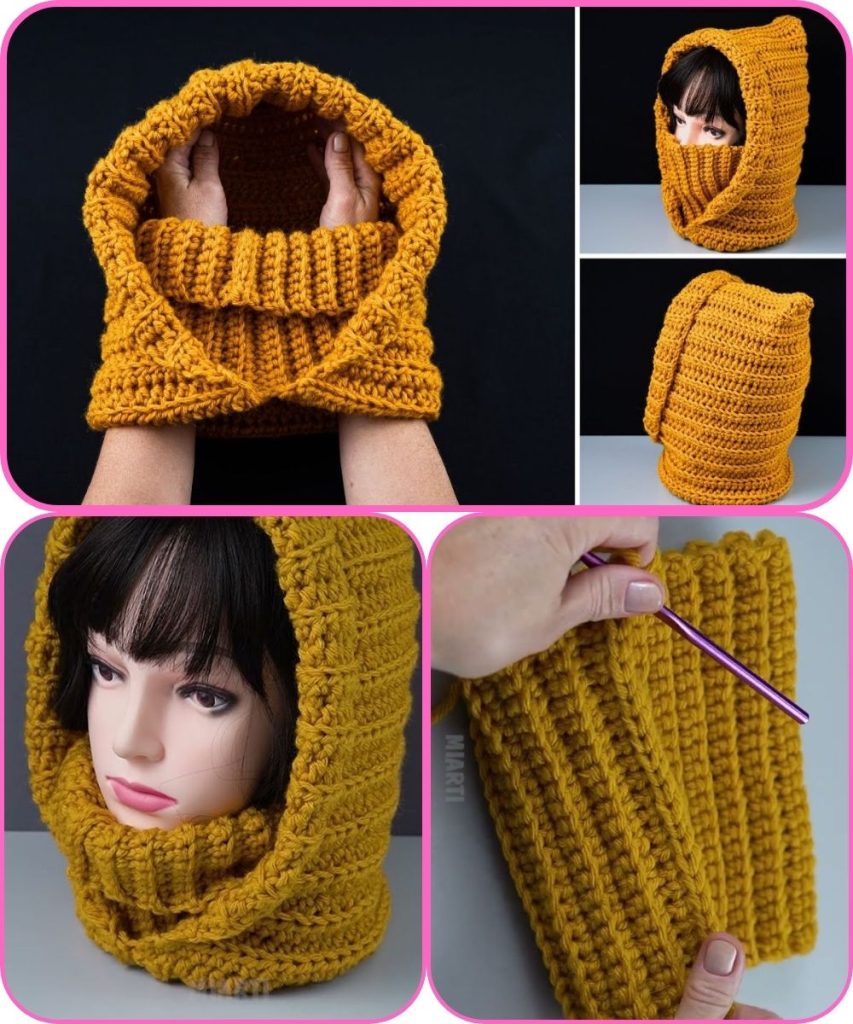
To begin your Simple Crochet Balaclava – Free Pattern, start by creating the base chain that will form the width of your piece. The length will depend on the size of the head you’re making it for. Once your foundation chain is ready, work in half double crochet (hdc) or single crochet (sc) rows to build the main section.
Continue crocheting until the piece reaches the desired height to cover from the top of your head to below your chin. Fold the piece in half lengthwise, leaving an opening for the face. This simple construction makes it beginner-friendly while keeping it stylish and functional.
Next, crochet around the face opening to create a clean edge. You can use single crochet stitches for a neat, snug border. If you prefer a looser fit, try a round of double crochet instead. This edging gives the balaclava a finished look and helps it hold its shape.
Once the face section is complete, it’s time to shape the neck area. You can add a few extra rounds around the bottom to make a turtleneck-like extension. This part ensures your Simple Crochet Balaclava – Free Pattern stays in place and provides extra warmth during cold weather.
For added texture or design, consider changing colors midway or adding stripes. It’s an easy way to personalize your balaclava and make it stand out. Crocheting color blocks or subtle patterns can make your project look professionally made without much extra effort.
After finishing all the crochet sections, weave in all loose ends using a yarn needle. Try on your balaclava and adjust the fit if necessary by adding or removing a few stitches around the face or neck. The flexibility of crochet allows you to customize easily until it fits perfectly.
H2 – 3. Tips and Customization Ideas
The Simple Crochet Balaclava – Free Pattern offers endless opportunities for creativity. You can customize it in many ways to match your personality and needs. For example, you can add a drawstring around the face opening for an adjustable fit. This detail not only makes it practical but also gives it a trendy look.
If you want a more feminine style, consider adding a small decorative flower or pom-pom to the top. These details make your project cute and playful, perfect for younger crocheters or gifts for friends. You can even match your balaclava to other crochet accessories like mittens or scarves for a coordinated winter set.
Another great idea is to use variegated yarn, which automatically creates color transitions as you crochet. This eliminates the need to change yarn colors manually while giving your Simple Crochet Balaclava – Free Pattern a stylish and unique gradient effect.
You can also experiment with different stitches. Try incorporating ribbed textures or bobble stitches to add visual interest and dimension. Mixing stitches is an excellent way to elevate your balaclava from simple to stunning while still keeping the pattern easy to follow.
If you prefer a looser style, increase the number of stitches in the neck section for a more relaxed drape. Alternatively, for a tighter, more fitted look, use smaller hooks and tighter tension. These small adjustments make a big difference in the overall fit and comfort.
Lastly, don’t forget to block your finished piece. Blocking helps smooth out stitches and enhances the balaclava’s shape. It gives your crochet work a professional finish, making your handmade creation look store-bought while still being uniquely yours.
H2 – 4. Benefits of Making Your Own Crochet Balaclava
Creating your own Simple Crochet Balaclava – Free Pattern has many benefits beyond just staying warm. First, it’s a sustainable and affordable way to make winter accessories without buying new ones. You can use leftover yarn from previous projects, reducing waste and saving money.
Handmade crochet items are also more meaningful than store-bought products. When you create something with your hands, it carries personal value and emotional warmth. Every stitch represents time, care, and creativity, turning your balaclava into more than just an accessory—it becomes a piece of art.
Crocheting your own balaclava allows you to adjust the design for comfort and function. Whether you want it snug for outdoor sports or loose for casual wear, you have complete control over the final result. This flexibility ensures that your finished piece suits your exact lifestyle and preferences.
Another advantage is the stress relief that comes from crocheting. The rhythmic motions and focus involved in making the Simple Crochet Balaclava – Free Pattern can be calming and therapeutic. Many crafters find crochet to be a great way to relax after a busy day.
Additionally, handmade balaclavas make wonderful gifts. They show effort, thought, and care—qualities that make them extra special for birthdays, holidays, or simply as acts of kindness. A handmade item always feels more personal than something bought in a store.
Lastly, creating your own balaclava gives you the satisfaction of accomplishment. Wearing something you’ve made yourself provides a sense of pride and joy that’s hard to match. It’s a rewarding experience that combines creativity, skill, and practicality.
FAQ – Simple Crochet Balaclava – Free Pattern
1. Is the Simple Crochet Balaclava – Free Pattern suitable for beginners?
Yes, this pattern is perfect for beginners. It uses basic stitches like single crochet and half double crochet, making it easy to follow even if you’re new to crocheting.
2. What kind of yarn is best for making a crochet balaclava?
Acrylic, wool, or wool-blend yarns are great choices because they’re warm, soft, and stretchy. Choose yarn that feels comfortable against your skin.
3. How long does it take to make a crochet balaclava?
Depending on your skill level, you can complete it in one to two evenings. It’s a quick and satisfying project, ideal for weekend crafting.
4. Can I make the balaclava fit any size?
Absolutely! You can easily adjust the number of chains or rows to fit children, teens, or adults. Customizing the size is one of the perks of crochet.
5. Can I wash my crochet balaclava?
Yes, most yarns are machine washable. However, it’s best to follow the care instructions on your yarn label to maintain softness and shape.
6. Can I add a lining inside the balaclava?
Yes, you can sew in a soft fabric lining for extra warmth and comfort, especially if you plan to wear it in very cold weather.
Conclusion
The Simple Crochet Balaclava – Free Pattern is a perfect blend of style, warmth, and creativity. With just a few materials and basic stitches, you can craft a cozy accessory that’s both functional and fashionable. Whether you’re making it for yourself or as a handmade gift, this project brings joy from start to finish. The customization options make it a timeless pattern you’ll want to revisit again and again.
Try making your own balaclava today and experience the comfort of wearing something crafted by hand. Don’t forget to leave your honest opinion and suggestions below—your feedback helps inspire others to start their own crochet journey too!


