
Crocheted house-shaped cookie for Christmas tree

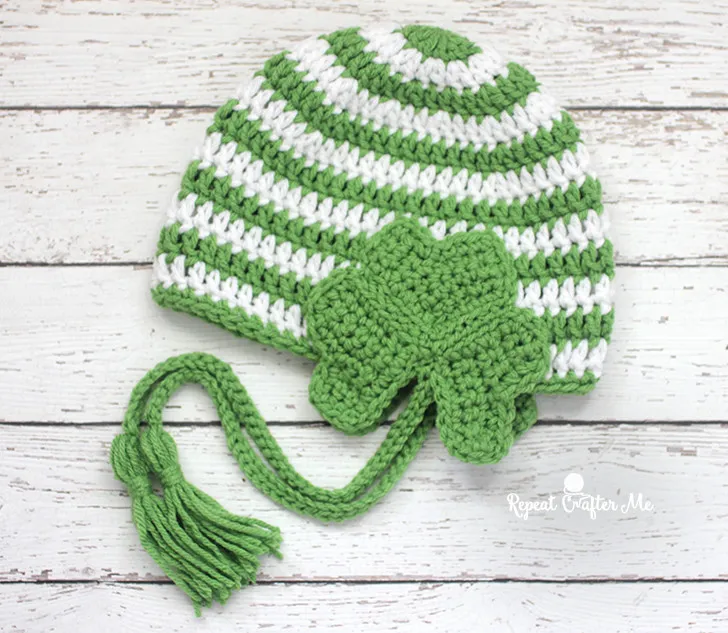
The Shamrocks in a Row Crochet Hat is a charming and festive accessory perfect for celebrating St. Patrick’s Day or adding a touch of luck to your winter wardrobe.
This crochet pattern is loved by both beginners and experienced crafters because it combines simplicity with beautiful texture. With the Shamrocks in a Row Crochet Hat, you can create a wearable piece of art that showcases delicate shamrock motifs arranged in a stylish row.
One of the most appealing aspects of this pattern is that it is easily customizable. You can adjust the size, choose your favorite yarn colors, and even modify the length to create a beanie, slouchy hat, or even a cozy ear warmer.
The Shamrocks in a Row Crochet Hat PDF pattern gives clear, step-by-step instructions, complete with stitch diagrams and helpful tips for achieving consistent results.
Whether you’re making this hat as a gift, for personal use, or to sell in your craft shop, the Shamrocks in a Row Crochet Hat is a fun and rewarding project. Its repetitive shamrock pattern is visually striking, and the overall design is both playful and sophisticated. This article will explore everything you need to know about making this beautiful hat, from materials to techniques, styling tips, and troubleshooting common challenges.
Creating the Shamrocks in a Row Crochet Hat begins with gathering the right materials. Having the correct tools ensures that your crochet project goes smoothly and your finished hat has a professional look.
First, you’ll need yarn suitable for hats. Worsted weight yarn is a popular choice because it provides warmth and structure while being easy to work with. You can choose solid colors or mix shades for a more dynamic effect, especially if you want your shamrocks to stand out.
Next, selecting the appropriate crochet hook size is crucial. Most patterns recommend a hook that matches your yarn weight, often ranging between 4.0mm and 5.5mm for worsted weight. This ensures your stitches are neither too tight nor too loose, giving the hat the correct fit and texture.
Other essential tools include stitch markers, a yarn needle for weaving in ends, and scissors. Having these tools on hand before you start will save time and reduce frustration. The Shamrocks in a Row Crochet Hat pattern PDF often includes a full materials list, which makes preparation easier.
Many crafters also like to have a measuring tape to check the size of the hat as they crochet. This ensures a comfortable fit, especially if the hat is intended for someone else. A well-prepared workspace with good lighting can also make a significant difference in your crafting experience.
Finally, patience and attention to detail are intangible but crucial tools. Crocheting a patterned hat like this one requires focus, especially when creating consistent shamrock shapes in a row. Taking your time results in a polished, professional-looking hat.
The Shamrocks in a Row Crochet Hat is designed to be accessible while still offering an interesting pattern. Following the instructions carefully ensures your project turns out beautifully.
Start by making a foundation chain that matches the circumference of the intended head size. Be sure to check your gauge, as this will affect the final fit of the hat.
Next, begin crocheting the hat body, often starting with simple stitches like single or double crochet. This base layer provides structure and helps the shamrock pattern stand out. Most PDF patterns include detailed diagrams showing where each shamrock motif should be placed.
The shamrocks themselves are created using a combination of basic stitches, typically including chains, slip stitches, and clusters. Working slowly and consistently is key to forming well-defined shamrocks. Some crafters find it helpful to mark each shamrock with a stitch marker to maintain even spacing.
As you continue, alternate rows of basic stitches and shamrock motifs. This alternating technique ensures that the shamrocks are evenly distributed in a row across the hat, creating a visually appealing design.
Finally, finish the hat with a neat edge. You can use single crochet or a ribbed pattern to give the bottom a snug fit. Weave in all ends securely, and if desired, block the hat gently to help it keep its shape.
One of the best things about the Shamrocks in a Row Crochet Hat is its versatility. You can make it your own by experimenting with yarn colors, hook sizes, and even hat shapes.
For a more festive look, choose a bright green yarn for the shamrocks and a contrasting neutral color for the background. This will make the motifs pop and give your hat a classic St. Patrick’s Day feel.
If you want a more subtle design, use two similar shades of the same color. This creates a textured effect that’s visible up close but softens the overall look, making the hat wearable year-round.
Adjusting the hat size is easy by adding or subtracting foundation chain stitches and rows. Many PDF patterns include size charts for children, teens, and adults, so you can ensure the perfect fit.
You can also add embellishments, like a pom-pom on top, buttons along the edge, or metallic yarn for a bit of sparkle. These small details give your Shamrocks in a Row Crochet Hat a unique, personalized touch.
Finally, combining different stitch patterns in the base layers can make your hat even more interesting. For example, alternating half-double crochet with double crochet adds texture and dimension without interfering with the shamrocks.
Even experienced crafters may encounter challenges when making the Shamrocks in a Row Crochet Hat, but most problems are easily solvable.
One common issue is uneven shamrock motifs, which usually happens if the tension changes between stitches. Maintaining a consistent stitch tension and using stitch markers can prevent this problem.
Another challenge is incorrect hat sizing. Always check your gauge and measure as you go. If the hat seems too small, add a few stitches to the foundation chain; if too large, reduce the stitch count slightly.
Crochet beginners sometimes struggle with the shamrock clusters, especially when combining multiple stitches in one space. Take your time, and refer to the diagrams included in the PDF pattern—they provide a visual guide that can make complex stitches easier to understand.
Managing multiple yarn colors can also be tricky. Use yarn bobbins or small balls to prevent tangling when switching colors between shamrocks and the background.
Finally, finishing the hat neatly is essential. Weaving in ends securely and blocking the finished piece can elevate a homemade hat to a professional-quality accessory.
Q1: Can beginners make the Shamrocks in a Row Crochet Hat?
Yes! While it includes patterned shamrocks, the instructions are clear, and beginners can complete it with patience and practice.
Q2: What type of yarn is best?
Worsted weight yarn is recommended, but soft acrylic, cotton, or wool blends all work well. Choose colors that contrast for the shamrocks to stand out.
Q3: How long does it take to crochet this hat?
Depending on experience and available time, it can take 4–8 hours. Beginners may take longer but will enjoy the process.
Q4: Can I adjust the size?
Absolutely! Simply change the foundation chain and row count to fit children, teens, or adults.
Q5: Do I need special crochet skills?
Basic crochet knowledge is sufficient. The shamrocks use simple clusters, chains, and slip stitches, all explained in the pattern PDF.
Q6: Can I sell hats made with this pattern?
Yes, most PDF patterns allow finished products to be sold, but always check the designer’s licensing terms included in the download.
The Shamrocks in a Row Crochet Hat is a fun, versatile, and visually appealing crochet project. From selecting materials and following step-by-step instructions to customizing colors and sizes, this pattern allows crafters to create a wearable piece of art that’s perfect for holidays, gifts, or everyday wear. By understanding the tools, techniques, and troubleshooting tips, you can confidently craft a hat that looks professional and showcases your creativity.
We hope this guide has inspired you to try the Shamrocks in a Row Crochet Hat. Leave your honest opinions and suggestions in the comments, and share your unique creations to inspire fellow crafters. Happy crocheting!


