
Crocheted house-shaped cookie for Christmas tree

The Santa Napkin Ring – Crochet Pattern is a charming and festive way to add handmade warmth to your Christmas table décor. Starting your holiday celebration with a beautifully decorated dining setup makes the moment even more special, and a crocheted napkin ring shaped like Santa brings joy, creativity and personality to every place setting.
Whether you are planning a cozy family meal or hosting a larger Christmas gathering, this project adds a delightful touch that everyone will notice. The Santa Napkin Ring – Crochet Pattern is simple, quick, and fun to make, making it perfect for both beginners and experienced crocheters.
One of the most appealing things about this project is that it requires only a small amount of yarn and very little time. With just basic stitches and a few simple assembly steps, you can create an adorable Santa-themed piece that instantly elevates your table decoration.
The Santa Napkin Ring – Crochet Pattern also makes a wonderful handmade gift. You can create sets of four, six, or more, giving them to friends, neighbors or family members who love festive accessories. Because the pattern is highly customizable, you can adapt the colors, size, and details to match different Christmas themes.
Another advantage of the Santa Napkin Ring – Crochet Pattern is how versatile it is for holiday décor. You can use it with cloth napkins, paper napkins, or even as a decorative ring for small towels in your kitchen or bathroom during the season. It adds a joyful, playful mood to any environment.
The pattern can be made in classic Christmas colors such as red, white, and black, or you can experiment with gold, silver, or textured yarn to give Santa a more modern look. With creativity and a few scraps of yarn, you can create truly magical table decorations.
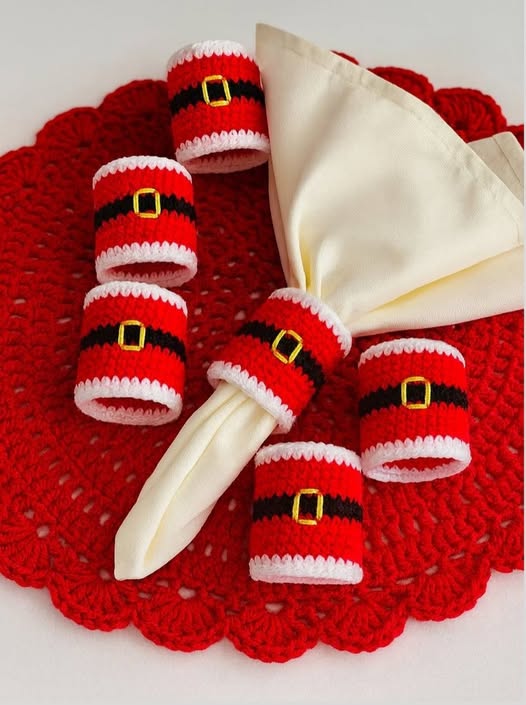
To begin the Santa Napkin Ring – Crochet Pattern, gather your materials. You will need medium-weight yarn in several colors. Red is essential, as it forms Santa’s classic suit. White yarn is used for the fluffy details like the belt trim and hat border. Black yarn is necessary for the belt, and yellow or gold can be added for the buckle. Using cotton yarn gives the napkin ring a firm structure, but acrylic yarn can also be used if you prefer flexibility and softness.
You will also need the appropriate hook size for your yarn. Most crocheters choose a 4mm or 4.5mm hook for this type of small decorative project. Choosing the correct hook helps maintain neat stitches that hold the shape of the ring. A yarn needle is important for sewing pieces together and weaving in ends. Scissors and optional stitch markers help keep the work organized and clean.
If you prefer a sturdier ring, you may include a plastic ring inside the crochet base. Many makers repurpose small curtain rings or inexpensive craft rings to provide extra structure. This step is optional, but it can give your Santa Napkin Ring – Crochet Pattern a more polished and durable finish, especially if you will reuse the rings every Christmas.
Before starting the pattern, take a moment to check your tension. Working a small swatch ensures that your stitches are consistent. This is a small project, but maintaining even stitching will help the ring look neat and professional. Once your materials are ready, you can begin creating the main body of the napkin ring.
The base of the Santa Napkin Ring – Crochet Pattern is usually crocheted as a small band or tube that wraps around the napkin. Begin with a chain that measures the length you want the ring to be. For most napkins, a chain of 18–24 stitches works well. Adjust the number of stitches depending on how thick or wide you want the ring to appear.
After completing your starting chain, work rows of single crochet or half double crochet. These stitches create a tight and sturdy fabric that holds its shape. Continue crocheting until you have a rectangle long enough to wrap around a napkin comfortably. You may need 6 to 10 rows, depending on your tension. The goal is to form a band that is both flexible and structured.
Once your rectangle is complete, fold it so that the short edges meet. Use your yarn needle to sew the ends together, forming a loop. If you are using an internal plastic ring, simply crochet around it during your final row or sew it into place afterward. Make sure your seam is secure but as invisible as possible, keeping the outside of the napkin ring neat.
After forming the base loop, you can add the details that make it look like Santa’s suit. Start by attaching a strip of black yarn around the middle of the ring to create Santa’s belt. This can be crocheted as a thin strip and sewn on, or you can surface slip stitch directly onto the ring. Both options give a clean look that complements the overall design.
The belt buckle can be made with a tiny square or rectangle of yellow yarn. Some crocheters prefer to embroider the buckle using simple stitches for a sharper finish. Once attached, the base will already resemble Santa’s classic outfit. The next steps include adding decorative elements such as the trim and hat.
The details are what make the Santa Napkin Ring – Crochet Pattern stand out as festive, adorable, and unmistakably Christmas-themed. Begin by adding the white trim. Using white yarn, crochet a thin strip of single crochet or slip stitch, then sew it to the top or bottom edge of the ring. This creates the fluffy look of Santa’s coat trim.
For extra detail, you can also add a small Santa hat to attach to the ring. Start with a tiny red triangle crocheted in rows or rounds. Add a white border across the bottom and a white pom-pom at the top. The hat can be sewn onto the side of the ring or placed firmly in the center for a playful effect. This cute addition gives the napkin ring a cheerful personality.
Another fun detail is adding a tiny beard shape or mustache motif. This is optional but can give the ring a more complete Santa appearance. A small oval or cloud-like shape created with white yarn can be sewn onto the front. Keeping the beard small ensures the ring remains functional and not too bulky.
If you want Santa’s suit to have buttons, simply crochet or embroider two or three small black dots above the belt. Using French knots or small crocheted circles works beautifully. These little touches add dimension and make the Santa Napkin Ring – Crochet Pattern feel even more handcrafted.
Once all the embellishments are attached, take a moment to tidy your work. Weave in any loose ends, position the decorative elements neatly, and reshape the ring if needed. At this point, your napkin ring will be festive, adorable, and ready to display throughout the holiday season.
One of the best things about the Santa Napkin Ring – Crochet Pattern is its flexibility and potential for customization. You can adapt the basic structure to create variations such as elf napkin rings, reindeer-themed rings, or even snowman rings. By changing the color scheme or adding holiday motifs, you can create an entire set of themed holders.
Color customization is another fun option. Classic Christmas colors like red, white, and green look traditional and timeless. For a modern or elegant look, try using cream, gold, or metallic yarns. Pastel colors can create a soft, whimsical theme perfect for modern holiday décor.
The size of the ring can also be adjusted easily. If you use thicker yarn or increase the number of rows, you can create a wider band for a more dramatic presentation. Smaller rings work best for slim napkins or décor pieces. Larger rings can even hold rolled towels or ribbons for decorative displays.
Adding embellishments such as tiny bells, embroidery, glitter yarn, or small bows can make each ring unique. Just ensure that any added details are securely fastened so that they do not fall off during use. These creative touches turn the Santa Napkin Ring – Crochet Pattern into a beautiful piece of handcrafted art.
These napkin rings also make wonderful gifts. You can create sets packaged in pretty holiday boxes or wrap them around festive napkins for a personalized handmade touch. They are lightweight, quick to make, and always appreciated by those who love unique Christmas décor.
Is the Santa Napkin Ring beginner-friendly?
Yes, the Santa Napkin Ring – Crochet Pattern is very beginner-friendly and uses simple stitches and small components.
What yarn is best for this project?
Cotton or acrylic medium-weight yarn works best because it offers good structure without being too stiff.
How long does it take to make one napkin ring?
Most people can finish one in 20–40 minutes, making it a fast project for gifting or decorating.
Can I wash the napkin rings?
Yes, hand washing is recommended, especially if there are small embellishments attached.
Can I adjust the size of the ring?
Absolutely. Just add more chains or rows to fit your napkins more comfortably.
Do I need a plastic ring inside?
It is optional. The ring will hold its structure without it, but a plastic insert adds durability.
The Santa Napkin Ring – Crochet Pattern is a joyful and creative project that brings Christmas charm and handmade elegance to your holiday table. With simple materials, easy stitches, and fun customizable details, this pattern is perfect for beginners and experienced crocheters alike. It’s quick, festive, and full of personality, making each dining setting feel magical.
I hope you enjoyed this tutorial and feel inspired to create your own set of Santa napkin rings. Please share your honest opinion and suggestions—I would love to know how your project turned out and what creative ideas you added!


