
Crocheted house-shaped cookie for Christmas tree

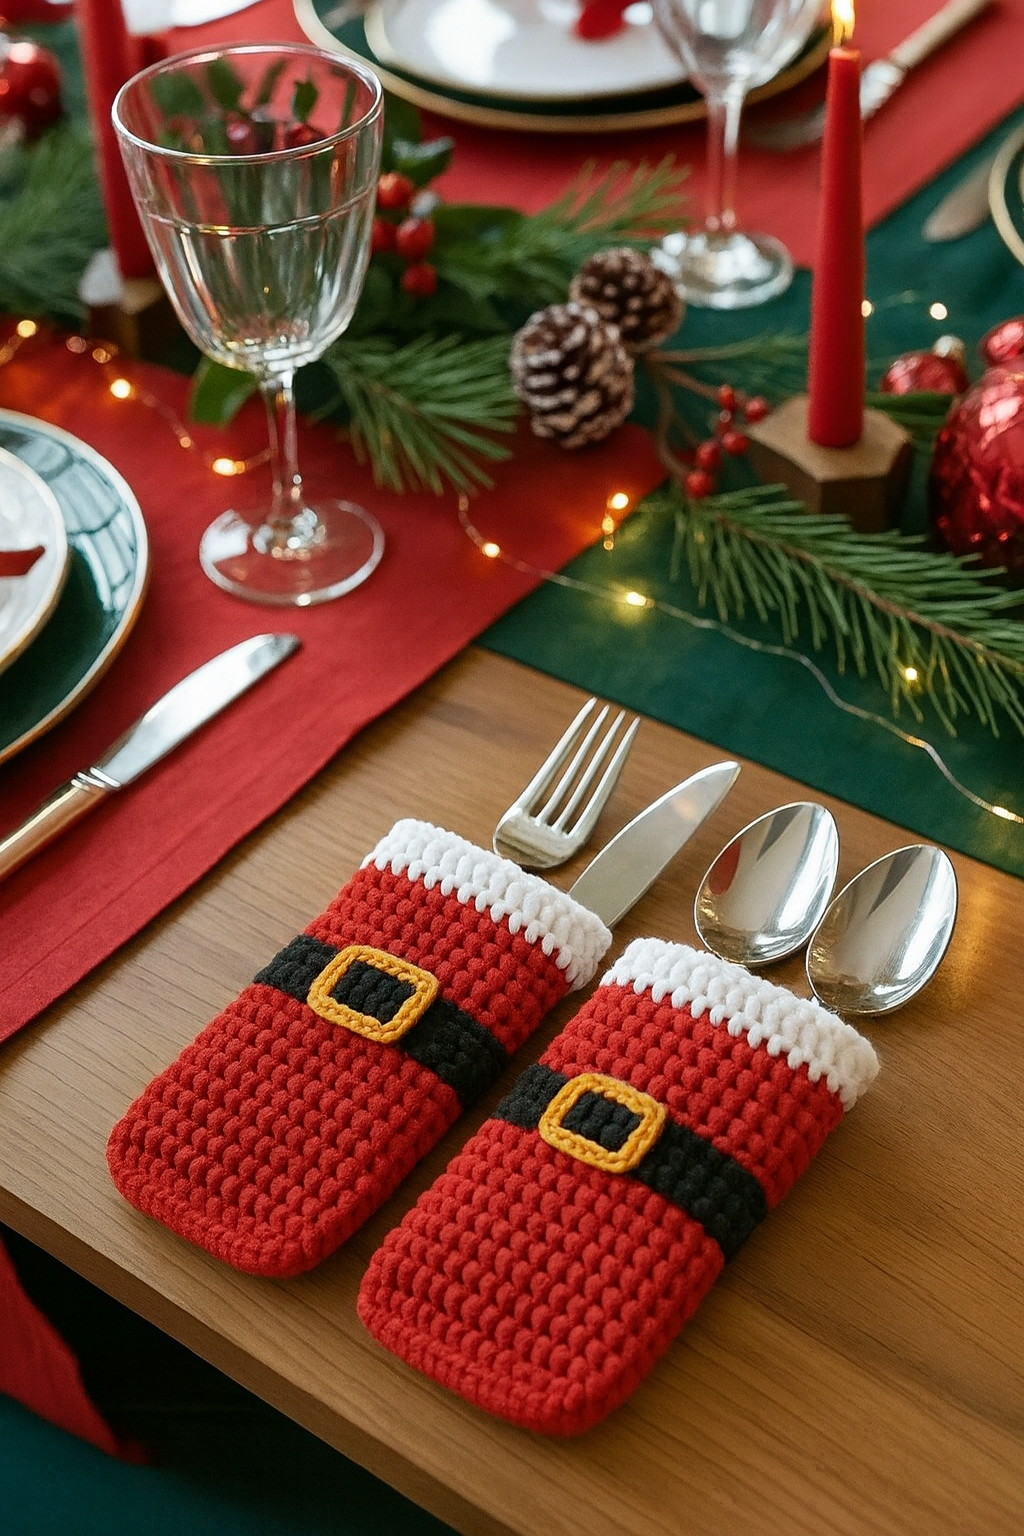
Santa Belt Cutlery Holder – FREE Crochet Pattern is a festive and charming way to add a personal touch to your holiday table. This Santa belt cutlery holder combines practicality with creativity, transforming ordinary utensils into a delightful Christmas display.
Using this free crochet pattern, you can make a set of holders that match your holiday décor, impress your guests, and bring a cozy, handmade touch to every meal.
The cheerful red and black design, accented with a gold or yellow buckle, mimics Santa’s iconic belt, adding an instantly recognizable holiday flair.
Creating a crochet cutlery holder is not only fun but also a thoughtful way to show your holiday spirit. Whether you’re a beginner or an experienced crocheter, this project is manageable, quick to make, and highly customizable.
By choosing your favorite yarn colors, you can adjust the size and style of the holders to fit forks, knives, and spoons perfectly. This free crochet pattern offers detailed instructions, making it easy to follow along and create professional-looking results.
In this article, we will guide you through every step: selecting materials, crocheting the Santa belt shape, assembling the cutlery holder, and adding finishing touches. We will also provide tips for customization and durability, ensuring your Santa belt cutlery holder looks festive year after year. By the end of this guide, you’ll be equipped to craft a set of charming, handmade holiday table decorations that are sure to delight family and friends.
To create your Santa belt cutlery holder, you will need some basic crochet supplies. The main materials include worsted-weight yarn in red, black, and gold (or yellow) for the buckle. A crochet hook suitable for your yarn, polyester fiberfill (if you want padded holders), a yarn needle, and scissors are also essential. Optional items include stitch markers for keeping track of rows and a measuring tape to ensure proper sizing.
Selecting the right yarn color is crucial for achieving the classic Santa belt look. Bright red for the main holder, black for the belt strap, and a contrasting gold or yellow for the buckle will make the design instantly recognizable. You can also experiment with different shades for a personalized or themed table setting.
The crochet hook size affects stitch tightness and final dimensions. Following the hook recommendation on your yarn label ensures consistency. A tighter stitch helps maintain the shape and prevents your crochet cutlery holder from stretching when holding utensils.
Other optional decorations like small buttons or beads can add extra charm. For example, a tiny gold button in the center of the buckle creates a more polished look. These simple embellishments make your Santa belt cutlery holder stand out on the holiday table.
Prepare your workspace before starting. Organize yarn, tools, and patterns for easy access. Good lighting is also important for seeing stitch details, especially when working with darker yarns like black. A tidy workspace improves focus and reduces mistakes during crafting.
Finally, review the pattern notes carefully. Understanding stitch counts, increases, decreases, and assembly instructions before beginning saves time and frustration. By planning ahead, you ensure your Santa belt cutlery holder turns out beautifully and functions perfectly for holiday use.
Start your Santa belt cutlery holder by creating a rectangular base in bright red yarn. Use single crochet stitches to achieve a dense and uniform texture. The size of the rectangle depends on the length of cutlery you want to hold, typically around 6–8 inches long and 2–3 inches wide.
Next, crochet the black belt strap. This narrow rectangle should fit across the center of the red base. Attach it to the red rectangle with simple slip stitches or sew it in place with a yarn needle. This forms the classic Santa belt look, which is the signature feature of your Santa belt cutlery holder.
For the buckle, use gold or yellow yarn. You can crochet a small square or rectangle and attach it to the center of the black belt. Optional embroidery or stitching details can enhance realism, making your holders look polished and festive.
After completing the buckle, fold the red rectangle around your cutlery and test the fit. Adjust the size if necessary. Ensure that knives, forks, and spoons slide in comfortably without stretching the yarn. This step ensures your free crochet pattern is functional as well as decorative.
Secure the ends with yarn or stitch buttons to keep the holder in place. Some crafters add a small flap or button closure for extra security. These finishing touches make your Santa belt cutlery holder not just cute, but practical for repeated use.
Finally, repeat the process for as many holders as you need for your holiday table. Making a complete set in matching colors creates a coordinated and festive display, perfect for family dinners or Christmas parties.
Customizing your Santa belt cutlery holder allows you to match your holiday décor perfectly. Use different shades of red or add glittery yarn for a sparkly effect. Even subtle changes in size or shape can create a unique set that reflects your personal style.
Adding embroidery or applique details can enhance the design. Snowflakes, stars, or festive initials stitched onto the red base make each holder truly one-of-a-kind. These small touches turn a simple crochet project into a standout holiday decoration.
Consider making themed sets, such as coordinating with your table runner, napkins, or tree decorations. Matching colors and styles bring a cohesive and elegant look to your holiday table, making your Santa belt cutlery holders a central feature of your décor.
Using alternative materials like felt or small beads for the buckle is another way to customize. These elements can give a more textured or luxurious appearance while still following the original free crochet pattern.
For gifting, place each holder in a small bag or wrap them around utensils in a festive bundle. Handmade crochet gifts like these show thoughtfulness and creativity, making them ideal for family, friends, or coworkers.
Finally, experiment with layering techniques, like adding extra padding or combining yarn textures. Different textures not only enhance the look but also improve durability, ensuring your Santa belt cutlery holder lasts for years of holiday celebrations.
Consistent tension in your stitches is key to a neat and professional finish. Uneven tension can distort the rectangle or buckle, making the Santa belt cutlery holder look uneven.
Take your time with small details like the buckle. Precision in size and placement elevates the final result, making your holders visually appealing and functional.
Use stitch markers to keep track of rows and edges. This is especially useful when working with dark yarn like black, which can make it harder to see individual stitches.
Avoid overstuffing or stretching the base. Crocheted rectangles need some flexibility to wrap around utensils but should not be loose. Proper fit ensures functionality and durability.
Plan your color changes in advance. Switching yarns too often without preparation can create messy joins or uneven tension. Smooth transitions make your free crochet pattern holders look polished.
Finally, enjoy the process! Crocheting holiday decorations is as much about creativity and relaxation as the finished product. Take pride in your handmade Santa belt cutlery holder and share it with loved ones as a unique and charming touch to your festive table.
Q1: Can beginners make this Santa belt cutlery holder?
A1: Yes! The free crochet pattern provides simple, step-by-step instructions. Basic single crochet skills are enough to create these festive holders.
Q2: What materials do I need?
A2: Red, black, and gold or yellow yarn, a crochet hook, scissors, yarn needle, optional stitch markers, and optional polyester fiberfill for padding.
Q3: How long does it take to make one holder?
A3: Depending on experience, it can take 30 minutes to an hour per holder. Completing a full set may take a few hours.
Q4: Can I adjust the size for larger utensils?
A4: Absolutely. Increase the length and width of the red rectangle to accommodate bigger knives, forks, or spoons.
Q5: Are these holders washable?
A5: Hand washing is recommended to maintain shape and color. Avoid machine washing to prevent damage.
Q6: Can I make them in different colors?
A6: Yes! You can use any colors for a modern, fun, or thematic holiday table. Red and black remain classic, but feel free to customize.
The Santa Belt Cutlery Holder – FREE Crochet Pattern is a simple, festive, and charming project that adds personality to your holiday table. From selecting materials to crocheting the red base, black belt, and gold buckle, every step is easy to follow and adaptable. Customization options allow you to match your décor, create gifts, or experiment with textures and colors.
This project not only enhances your Christmas table but also offers a fun and relaxing way to practice your crochet skills. Try making a full set for family gatherings or as thoughtful handmade gifts. Share your experiences, tips, and photos in the comments—we’d love to hear your honest feedback and creative ideas!


