
Crocheted house-shaped cookie for Christmas tree

Creating a quick and easy fish crochet keychain step by step is one of the most enjoyable and rewarding small projects for both beginners and experienced crafters.
If you love crafting, especially DIY crochet keychains, this project offers a fun way to practice your skills while making a useful accessory. In this guide, we will explore every detail, from materials to finishing touches, ensuring you can create a beautiful little fish keychain in no time.
The charm of this project lies in its simplicity. With just a few basic crochet techniques, such as single crochet, chain stitch, and slip stitch, anyone can craft a lovely fish keychain.
These small creations are not only adorable but also make excellent gifts, party favors, or even handmade items to sell online. Learning to make a fish crochet keychain step by step opens doors to countless other miniature crochet designs as well.
Moreover, working on easy crochet projects like this fish keychain helps improve your hand-eye coordination, patience, and creativity. Even if you are a beginner, the step by step crochet instructions in this article are designed to be clear and easy to follow. By the end, you’ll have a charming accessory ready to attach to your bag, keys, or backpack, adding a personal handmade touch to everyday items.
Before diving into the quick and easy fish crochet keychain step by step, it’s essential to gather all necessary materials. Having everything ready ensures a smooth crafting experience.
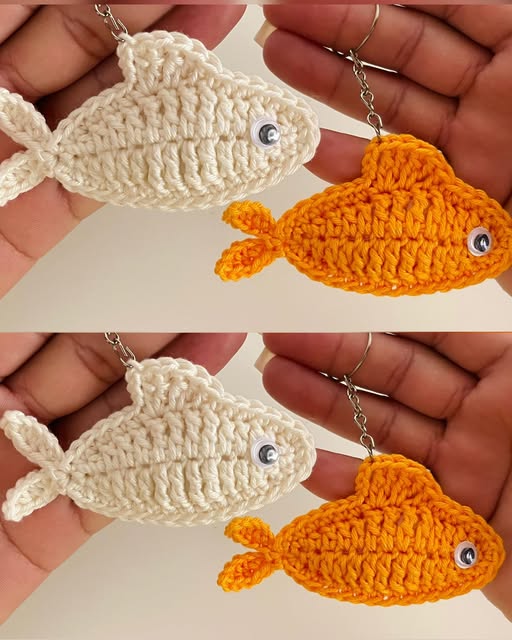
For this project, you will need yarn, preferably cotton or acrylic, in your choice of colors. Typically, two contrasting colors work best: one for the body and another for the fins and tail. Crochet hooks are also essential, with sizes depending on your yarn choice; for small keychains, a 2.5mm to 3.5mm hook usually works well.
You’ll also need stuffing material, such as polyester fiberfill, to give your fish a plump and rounded shape. Small keychain rings or clasps are required to attach the finished fish to keys, bags, or backpacks. Scissors, a yarn needle, and stitch markers can make the process smoother, especially for beginners.
Using high-quality materials not only makes your DIY crochet keychain more durable but also enhances its overall appearance. Choosing the right yarn texture and color can elevate a simple keychain into a charming handmade accessory that stands out.
Experimenting with different color combinations or yarn textures can make each fish crochet keychain unique. You can even make a set of fish in varying colors, creating a playful underwater-themed keychain collection.
Remember, preparation is key. Having all the materials ready before starting your step by step crochet ensures you can follow the tutorial without interruptions, making the crafting process enjoyable and stress-free.
The core of the quick and easy fish crochet keychain step by step guide lies in following each instruction carefully. Even beginners can achieve excellent results by taking it one step at a time.
Start with a magic ring and crochet a small circle for the fish’s body. This technique helps create a tight and neat base, preventing any holes from appearing in your keychain. Follow up with single crochet stitches, gradually increasing to form a rounded fish body.
Once the body reaches the desired size, begin shaping the tail by decreasing stitches methodically. Add small fins on each side by crocheting mini triangles, which will be sewn or attached to the fish body. Using contrasting yarn colors for the tail and fins gives a more realistic and visually appealing effect.
After completing the body, tail, and fins, stuff the fish lightly with polyester fiberfill. Ensure it is evenly distributed to maintain a smooth shape. Be careful not to overstuff, as it can stretch the stitches and distort the fish.
Finally, attach the keychain ring securely through the top of the fish. A few reinforced stitches help ensure the ring stays in place, making your DIY crochet keychain durable and functional.
Finishing touches include weaving in all loose ends and adjusting the shape to ensure symmetry. At this stage, your fish crochet keychain is ready to be admired, gifted, or used as a charming accessory.
While creating a quick and easy fish crochet keychain step by step, a few tips and tricks can make the process smoother and more enjoyable.
First, always count your stitches carefully, especially when working with mini crochet projects. Accurate stitch counting prevents uneven shapes and helps maintain symmetry throughout the fish body.
Second, choosing the right crochet hook size for your yarn ensures neat stitches and a well-formed keychain. Smaller hooks with thin yarn create delicate and compact fish, whereas thicker yarn with larger hooks produces chunkier, more playful keychains.
Third, consider experimenting with different fin and tail shapes. Triangular, rounded, or even scalloped fins can give your fish crochet keychain a unique personality. Using multiple yarn colors adds visual interest and can make your creation more appealing.
Fourth, blocking is optional but can help smooth out your fish’s shape. Lightly shaping the fish with your hands or gently steaming it can create a polished appearance without affecting the yarn’s texture.
Finally, storing your keychains properly ensures longevity. Avoid direct sunlight and high humidity to keep colors vibrant and yarn fibers intact. Small handmade DIY crochet keychains are delicate but can last for years with proper care.
By following these tips, you will not only improve the outcome of your first fish crochet keychain but also gain confidence in trying more advanced miniature crochet projects.
After completing your quick and easy fish crochet keychain step by step, you might wonder how to make the most of it. There are countless creative ways to use and display your miniature creation.
One popular idea is gifting them as party favors or small presents for friends and family. Handmade keychains carry a personal touch that store-bought items simply cannot replicate.
You can also create a collection of fish in different colors, sizes, and patterns. Attaching them together forms a whimsical keychain garland or even a decorative hanging for your room.
Another idea is using them as zipper pulls for backpacks, pencil cases, or jackets. The fish adds charm and a splash of color to everyday items while showcasing your DIY crochet keychain skills.
For those who enjoy selling handmade items, these fish keychains can be an excellent product for online marketplaces. They are inexpensive to make, require minimal materials, and are universally appealing.
Finally, combining fish with other sea-themed miniature crochet creations can create a full aquatic set. Think starfish, seashells, and tiny crabs—all made with the same step by step crochet technique.
By exploring these creative uses, your fish crochet keychain transforms from a simple project into a versatile, functional, and decorative craft piece.
Q1: How long does it take to make a fish crochet keychain?
A: On average, a beginner can complete it in 1–2 hours. Experienced crocheters may finish in less than an hour, depending on the size and complexity.
Q2: What type of yarn is best for a keychain?
A: Cotton yarn is ideal for durability and neat stitches. Acrylic yarn is also suitable for vibrant colors and affordability.
Q3: Can I make the keychain without stuffing?
A: Yes, but the fish will be flat and less plush. Stuffing adds volume and gives a professional finish.
Q4: How do I attach the keychain ring securely?
A: Insert the ring through the top stitches of the fish and reinforce with a few extra stitches to ensure durability.
Q5: Can I make different fish shapes using this tutorial?
A: Absolutely! You can experiment with various tail shapes, fin styles, and body sizes to create unique fish designs.
Q6: Are these keychains safe for children?
A: Yes, but ensure small parts like rings are securely attached to avoid choking hazards for very young children.
Making a quick and easy fish crochet keychain step by step is a rewarding and fun project that combines creativity, practicality, and relaxation. From gathering materials to finishing touches, following this guide allows anyone to create a charming and functional accessory. These small crochet projects not only make wonderful gifts but also serve as an excellent introduction to DIY crochet keychains and miniature crochet crafting.
We hope this tutorial has inspired you to try this project and explore your creativity. Share your results, leave your honest opinion, and suggest new ideas for future crochet projects. Your feedback helps improve tutorials and encourages others to dive into the world of step by step crochet with confidence.


