
Crocheted house-shaped cookie for Christmas tree

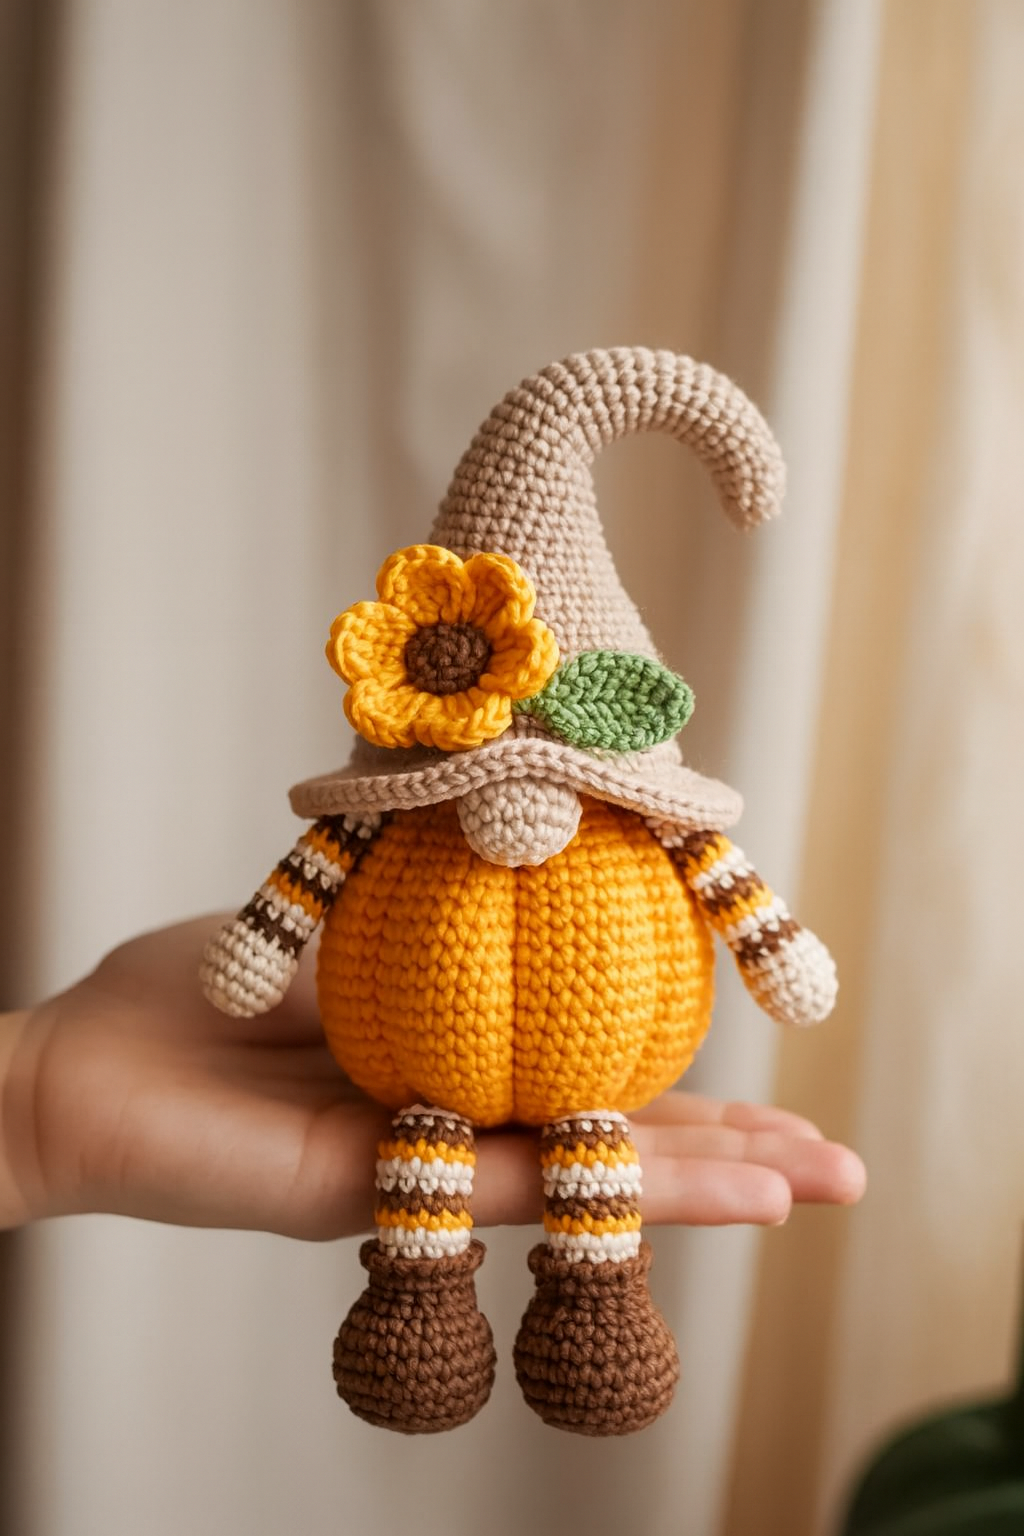
If you love cozy fall crafts, making a Pumpkin Gnome with Flower Hat – Free Crochet Pattern is one of the most delightful projects to welcome the season.
This adorable crochet pumpkin gnome combines the charm of autumn colors, the joy of handmade decoration, and the creativity that crochet lovers adore.
Whether you’re a beginner or an experienced crafter, this step-by-step guide will help you create a DIY crochet gnome that becomes the centerpiece of your crochet fall decor.
The best part about this free crochet pattern is that it allows you to express your creativity. You can personalize your flower hat gnome with different yarn colors, textures, or accessories like tiny leaves or buttons. The process of crocheting a gnome is not only relaxing but also rewarding when you see your finished creation come to life.
In this article, you’ll learn how to crochet your own pumpkin gnome, from the basic materials you need to the final decorative details that make it truly special. You’ll also find helpful tips for beginners, creative customization ideas, and answers to the most common questions about this autumn crochet pattern. Let’s dive into the cozy world of yarn, color, and creativity!
Before starting your pumpkin gnome, it’s important to gather all the necessary materials and tools. Having everything ready will make your crochet experience smooth and enjoyable.
First, choose a soft and durable yarn in autumn-inspired shades such as orange, green, brown, and cream. The orange yarn will form the pumpkin body, while green or yellow tones work perfectly for the flower hat gnome. Using worsted-weight yarn gives your gnome structure while keeping it lightweight.
Next, select the right crochet hook size for your chosen yarn—usually between 3.5mm and 4.5mm. Make sure your stitches are tight enough so the stuffing doesn’t show through, but not too tight that it becomes hard to work with.
You’ll also need polyfill stuffing to shape your gnome’s body and hat. Small amounts of felt or fabric can be used for details like leaves or flower petals. A yarn needle will help you assemble all the parts neatly.
Don’t forget small decorative extras! A tiny wooden nose, some embroidery thread for details, or even small buttons can add personality to your DIY crochet gnome. This is where your creativity can truly shine—each gnome can be unique and charming in its own way.
Lastly, have a pair of sharp scissors, a stitch marker to track your rounds, and a bit of patience. Creating a crochet pumpkin gnome is not complicated, but it does take time and care. With all materials ready, you can move on to crafting your cozy fall friend.
Creating your pumpkin gnome involves working through a few fun crochet steps, from shaping the body to designing the flower hat gnome. Even if you’re a beginner, you’ll find this free crochet pattern simple to follow with a little attention to detail.
Start with the gnome’s body, crocheting a small, rounded base using orange yarn. The pumpkin-like shape is achieved by increasing stitches in the first rounds, then decreasing toward the top. Keep your tension consistent so the pumpkin form looks even and full. Once the body is done, fill it with stuffing and close the top tightly.
Next, crochet a hat using green or brown yarn. This is where you can be playful—turn the hat into a flower design by adding petals or decorative leaves around the brim. The flower hat gnome is what gives this project its adorable charm. You can experiment with bright yellows or even deep reds for a more festive fall vibe.
Then, move on to the gnome’s nose and beard. Use beige or pink yarn for the nose, forming a small ball that sits just under the hat brim. For the beard, you can crochet chains and fringe them, or use soft white yarn for a fluffy texture.
Once all the pieces are finished, assemble your gnome using a yarn needle. Attach the beard first, then the nose, and finally secure the hat on top. Adjust the hat slightly to tilt forward—it makes your crochet pumpkin gnome look extra cute and cozy.
If you want, you can add decorative elements such as embroidered vines on the pumpkin body, or small crochet flowers on the hat. These extra touches make your autumn crochet pattern even more special and personalized.
Finally, take a moment to admire your work! You’ve just created a beautiful DIY crochet gnome that celebrates fall and adds handmade charm to your home.
One of the best things about the Pumpkin Gnome with Flower Hat – Free Crochet Pattern is how easily it can be customized. Whether you’re making it as a gift or part of your crochet fall decor, there are endless ways to make your gnome unique.
You can start by changing yarn colors. Try a cream-colored pumpkin with a dark green hat for a farmhouse look, or a vibrant yellow pumpkin for a more cheerful feel. Mixing different yarn textures, like cotton for the body and velvet for the hat, also adds depth and contrast.
Another idea is to adjust the size. By using thicker yarn and a larger hook, you can create a big, cuddly gnome that becomes a centerpiece. Or, use fine yarn to make mini versions perfect for garlands, keychains, or ornaments.
If you love details, consider adding tiny accessories—a small crochet sunflower on the hat, or a miniature broom for a Halloween touch. You can even make your flower hat gnome hold a little crochet pumpkin for a layered design.
For those who enjoy festive projects, this pattern can easily be adapted for other seasons. Replace the pumpkin with red and white colors to create a Christmas gnome, or soft pastels for a springtime version.
Don’t forget to personalize your gnome’s face. Some crafters like adding little embroidered eyes or blush using pink yarn or fabric paint. These subtle additions give your gnome even more character.
The creative possibilities are endless. Every DIY crochet gnome you make can tell a different story, making it the perfect project for year-round crafting fun.
Once your pumpkin gnome is complete, it’s time to show it off! Whether you use it as part of your crochet fall decor or as a handmade gift, knowing how to display and care for your gnome will help it last for years.
A popular option is to place your gnome on a mantel, shelf, or entryway table surrounded by mini pumpkins and candles. It creates a warm, autumnal atmosphere that instantly feels inviting.
If you enjoy making multiple gnomes, arrange them together as a seasonal collection. You can vary the colors and sizes for a whimsical display that catches everyone’s attention.
To keep your gnome looking fresh, avoid direct sunlight which may fade the yarn over time. Gently dust it off with a soft brush or lint roller to maintain its clean, cozy appearance.
If your crochet pumpkin gnome ever loses shape, you can lightly re-stuff it or reshape it by hand. Yarn is flexible, so with a bit of care, your gnome will stay in perfect condition.
When storing it after the season, wrap your gnome in tissue paper and place it in a dry box. This prevents dust and moisture from damaging your beautiful handmade piece.
Displaying and caring for your gnome properly means you can bring it out every fall, keeping your home filled with the warmth of handmade creativity.
1. Is this crochet pattern suitable for beginners?
Yes! This free crochet pattern is beginner-friendly. It uses basic stitches like single crochet, increase, and decrease, making it perfect for anyone new to crochet.
2. How long does it take to make a pumpkin gnome?
Depending on your skill level, it can take between 3 to 6 hours. Experienced crocheters may finish faster, while beginners can take their time to enjoy the process.
3. Can I sell gnomes made from this pattern?
Yes, handmade versions are great for craft fairs or online shops. Just make sure to credit the original pumpkin gnome pattern if required by its creator.
4. What type of yarn is best for a crochet pumpkin gnome?
Worsted-weight or medium-weight acrylic yarn works perfectly. It’s easy to handle and gives a nice, sturdy texture to your DIY crochet gnome.
5. Can I wash my crochet gnome?
It’s best to hand wash it gently in cool water, then air dry. Avoid washing machines or dryers as they might damage the stuffing or shape.
6. How can I make my gnome stand upright?
You can add small weights, like dried beans or rice, to the base before closing it. This helps your crochet pumpkin gnome stay balanced when displayed.
Creating a Pumpkin Gnome with Flower Hat – Free Crochet Pattern is a heartwarming and creative way to celebrate the fall season. You’ve learned how to choose materials, crochet each part, and personalize your gnome to fit your own style. This autumn crochet pattern is not just a craft—it’s a joyful expression of handmade artistry that adds charm to any home.
Now that you know how to make your own DIY crochet gnome, it’s time to grab your yarn and start crafting. Have fun experimenting with colors, details, and accessories to make each gnome uniquely yours.
If you enjoyed this tutorial, leave your honest opinion and suggestions in the comments below. Your feedback helps make future crochet guides even better—and it’s always inspiring to hear how creative makers like you bring these patterns to life!


