
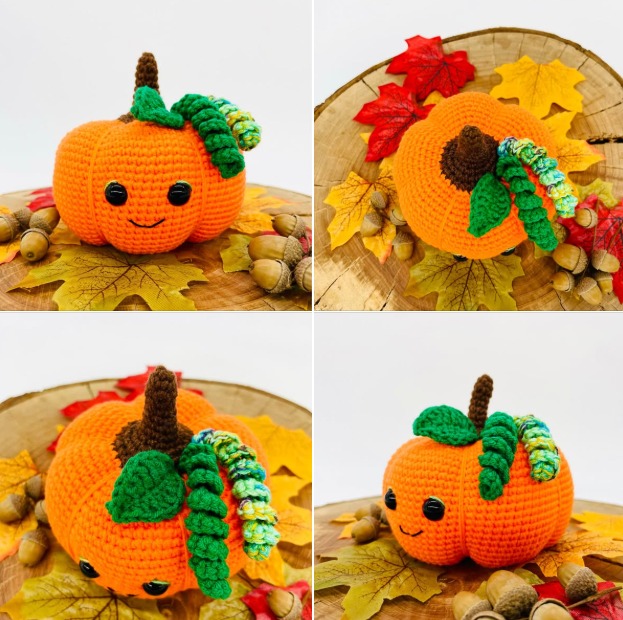
If you’re looking for a fun and cozy autumn crochet project, Pip the Pumpkin – Pattern is the perfect choice. This adorable pumpkin design captures the spirit of fall, combining creativity, warmth, and a touch of seasonal charm.
Whether you’re decorating your home for Halloween, Thanksgiving, or just adding a touch of harvest flair, this Pip the Pumpkin pattern is simple enough for beginners and satisfying for experienced crocheters alike.
With this Pip the Pumpkin crochet pattern, you can create a soft, squishy pumpkin that looks beautiful on shelves, tables, or as part of a centerpiece.
You can even make multiple sizes — from mini pumpkins for garlands to large ones that double as cozy décor pieces. Each pumpkin carries a handmade charm that’s far more personal than store-bought decorations.
Another wonderful aspect of Pip the Pumpkin is how customizable it is. You can choose traditional orange yarn for a classic pumpkin look or experiment with modern colors like cream, mustard, or even sage green. With this pattern, you can adjust the size, texture, and firmness to fit your decorating style or gift ideas. It’s a great way to celebrate fall and showcase your crochet talent at the same time.
Materials You’ll Need for Pip the Pumpkin
Before you start your Pip the Pumpkin pattern, make sure you have the right supplies on hand. Gathering your materials first will help you work smoothly from start to finish.
Start with worsted weight yarn — acrylic or cotton blends work perfectly for this project. Choose your main color for the pumpkin body and a contrasting shade for the stem. Traditional orange and brown are always a hit, but neutral or pastel tones also look charming for a rustic or modern vibe.
You’ll need a crochet hook that matches your yarn weight, usually a 4 mm (G) or 5 mm (H) hook. Using a slightly smaller hook than usual creates a tighter stitch, preventing stuffing from peeking through.
Don’t forget your fiberfill stuffing. This is what gives Pip the Pumpkin its round, plump shape. Make sure to use enough stuffing to keep your pumpkin full but still soft enough to squish. You’ll also need scissors, a yarn needle for sewing, and stitch markers to help keep track of rounds.
If you’d like to give your pumpkin a unique touch, gather a few optional decorations. Felt leaves, raffia bows, or even a little crocheted face can transform your pumpkin into a festive Halloween friend or a cozy autumn accent.
Finally, have a measuring tape handy. This ensures your Pip the Pumpkin pattern stays proportional if you decide to adjust the size. Larger pumpkins require more rounds, while smaller ones can be made by stopping earlier in the pattern.
Step-by-Step Instructions to Crochet Pip the Pumpkin
Now that your materials are ready, it’s time to bring Pip the Pumpkin to life. This project follows a simple sequence of rounds, increases, and decreases to form a plump, realistic pumpkin shape.
Step 1: Start with a magic ring.
Begin your Pip the Pumpkin pattern with six single crochets into a magic ring. Pull tight to close the center. This forms the pumpkin’s base and helps it stay perfectly round.
Step 2: Build the pumpkin body.
Work in continuous rounds, increasing evenly until the circle reaches your desired width. This determines the pumpkin’s overall size. Keep your stitch count consistent, and use a marker to note the start of each round.
Step 3: Add height.
After reaching the widest point, continue crocheting several rounds without increasing. This builds the pumpkin’s body and gives it volume. The more rounds you add, the taller Pip the Pumpkin becomes.
Step 4: Shape the top.
Begin decreasing in even intervals to close the top of the pumpkin. Before sealing it completely, fill the body firmly with stuffing. Be careful not to overfill — you want it soft but round.
Step 5: Form the stem.
Once the body is done, use brown or green yarn to crochet a short, tight cylinder for the stem. Sew it securely onto the top of your pumpkin.
Step 6: Add the signature ridges.
To give Pip the Pumpkin its realistic texture, use a long piece of yarn to loop vertically from top to bottom several times, pulling gently to form ridges. Knot securely at the top under the stem.
Now your basic pumpkin shape is complete! From here, you can personalize it in countless ways — playful, elegant, or festive.
Creative Customization Ideas
The beauty of the Pip the Pumpkin crochet pattern lies in its versatility. You can make every pumpkin unique by experimenting with colors, sizes, and accessories.
Use different yarn colors to match the season or your décor. Traditional orange is timeless, but pale pink, cream, or even teal pumpkins can look trendy and unexpected. Variegated yarns also create natural color transitions that mimic real pumpkins.
Try varied textures — use chenille, velvet, or bulky yarn for an ultra-soft pumpkin, or stick with cotton for a smooth, farmhouse look. The texture dramatically changes the final style.
Add fun embellishments. For Halloween, sew on a cute felt face or tiny crocheted eyes to turn your pumpkin into a character. For a fall centerpiece, tie a burlap or ribbon bow around the stem.
You can also play with different sizes. Make a full family of pumpkins — large, medium, and small — to display on your mantel or as a table arrangement.
Another creative touch is to make the stem removable and hide a small sachet of cinnamon or cloves inside the pumpkin. It will smell like autumn whenever you walk by!
Lastly, combine several Pip the Pumpkin pieces to form a garland, wreath, or centerpiece. Handmade fall décor always brings warmth and joy to any home.
Tips for a Perfect Pip the Pumpkin
To ensure your Pip the Pumpkin crochet pattern turns out flawless, keep these helpful tips in mind.
Maintain consistent tension throughout the project. Uneven stitches can distort the pumpkin’s shape or make one side bulge. If needed, practice on a small swatch first.
Use stitch markers to track your rounds — especially during the increase and decrease sections. This prevents miscounts that can affect symmetry.
When stuffing, take your time to shape the pumpkin evenly. Push small amounts of fiberfill at a time, making sure it fills all areas without stretching the stitches.
If you’re adding ridges, use a strong, matching yarn to tie around the pumpkin. Pull firmly but not too tight to avoid warping. These ridges give Pip the Pumpkin its signature look, so take care to space them evenly.
To make your pumpkin last longer, use high-quality yarn that won’t pill or stretch over time. Acrylic yarn is an excellent choice for durability and easy cleaning.
Finally, don’t be afraid to experiment with expressions. Give Pip the Pumpkin a smiling face, sleepy eyes, or simple embroidered features for added personality. Every pumpkin can tell its own story!
FAQ – Pip the Pumpkin Pattern
Q1: Is this pattern beginner-friendly?
Absolutely! The Pip the Pumpkin crochet pattern uses simple stitches — single crochet, increases, and decreases — making it perfect for beginners.
Q2: What yarn should I use?
Worsted weight yarn works best. Choose acrylic or cotton for easy handling and durability.
Q3: Can I make the pumpkin larger or smaller?
Yes! To make it larger, continue increasing for more rounds before shaping. To make it smaller, stop increasing earlier.
Q4: How do I get the ridges to look neat?
Use strong yarn and pull evenly from top to bottom. Secure knots under the stem to hide them.
Q5: Can I wash my Pip the Pumpkin?
Yes, if you use washable yarn. Hand wash gently and air dry to maintain shape.
Q6: How can I decorate my pumpkin for different holidays?
Add faces for Halloween, metallic thread for Thanksgiving, or pastel tones for spring décor. It’s endlessly adaptable!
Conclusion
Creating Pip the Pumpkin using this crochet pattern is a delightful and rewarding experience. You’ve learned how to gather materials, shape the pumpkin, add the signature ridges, and personalize it for any occasion. Each handmade pumpkin brings a touch of warmth and charm to your home, celebrating the joy of crafting and creativity.
Whether you’re making one as a gift, decoration, or part of your fall collection, Pip the Pumpkin will surely become a favorite project. Remember, every handmade item carries a piece of your personality — that’s what makes it truly special.
We’d love to hear from you! Share your thoughts, suggestions, and creative variations of Pip the Pumpkin in the comments. Your feedback inspires others to keep crafting and spreading cozy autumn vibes one pumpkin at a time.