
If you’ve ever wanted to make something special for a newborn, learn how to crochet baby shoes and you’ll instantly fall in love with the process.
Handmade baby booties are not only adorable but also carry a personal touch that makes them treasured keepsakes. Whether you’re crafting them as a baby shower gift, for your own little one, or to sell online, crocheting baby shoes is one of the most rewarding beginner projects.
The great thing about this pattern is that it’s simple enough for beginners yet customizable for advanced crafters who love adding creative details.
When you start to learn how to crochet baby shoes, you’ll discover that they can be made in various styles—from classic Mary Janes to cute sneakers and cozy boots.
Each pair tells its own story, and with the right yarn, color, and pattern, you can make something truly unique. Beyond being cute, crocheted baby shoes are functional; they keep tiny feet warm and protected while adding charm to any outfit. The pattern below will help you master the basic stitches, shaping, and assembly needed to create perfect crochet booties every time.
Before diving into the steps, let’s talk about what makes crocheting baby shoes such a timeless craft. The beauty of this project lies in its versatility—you can use leftover yarn, try new stitch patterns, or even add buttons, ribbons, and appliqués for decoration. With this guide, you’ll not only follow a complete baby shoe crochet pattern but also gain the confidence to design your own variations in the future.
Materials Needed to Crochet Baby Shoes
To begin your baby shoe crochet project, you’ll need just a few simple supplies that are easy to find in any craft store. The most important thing is to choose soft, baby-friendly yarn that won’t irritate delicate skin. Cotton and acrylic blends are ideal choices, offering both comfort and easy maintenance. Always make sure your yarn is washable and lightweight to keep your finished shoes durable and cozy.
Next, select a crochet hook that matches your yarn’s thickness. Most baby shoe patterns recommend a 3.5mm to 4mm hook for fine yarns, but you can adjust depending on your tension. A yarn needle will be useful for sewing pieces together, while a pair of scissors will help with trimming excess yarn. Don’t forget a few stitch markers if you’re working in rounds—they’ll keep your work neat and symmetrical.
When learning how to crochet baby shoes, you’ll also need a simple pattern. The pattern below is a basic version that’s perfect for beginners and can be adapted for any style. Feel free to experiment with colors or embellishments as you gain confidence. For example, you can add small bows for girls or tiny buttons to create a sneaker look for boys.
Lastly, prepare a measuring tape to ensure the size fits the baby’s foot. Most patterns fit newborns to 6-month-olds, but you can easily adjust by increasing or decreasing stitches. Remember, comfort and flexibility are key—your handmade booties should fit snugly but not tightly.
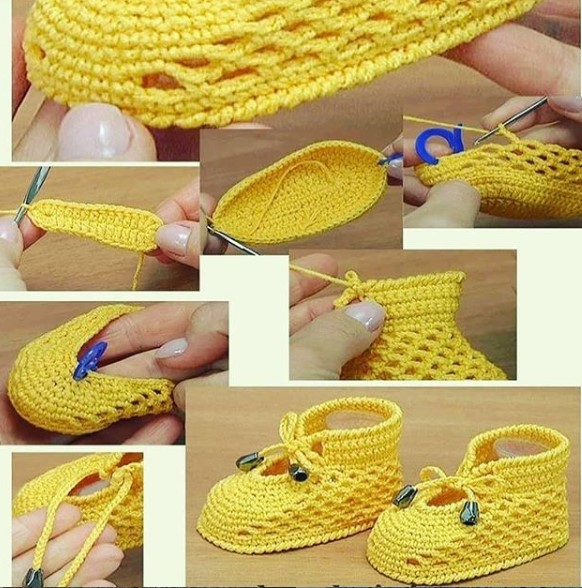
Step-by-Step Crochet Baby Shoe Pattern
The first step in the baby shoe crochet pattern is creating the sole. Begin with a magic ring or chain base, depending on your preference. Crochet a series of half-double crochets (hdc) and single crochets (sc) around the chain, increasing at each end to shape the oval. The sole is the foundation of the shoe, so take your time ensuring it’s even and lies flat.
Once you’ve completed the sole, move on to the upper part of the shoe. This section forms the sides that wrap around the baby’s foot. Work in continuous rounds, using single crochets or half-double crochets to build height. To shape the toe area, gradually decrease stitches near the front—this gives the shoe its classic rounded appearance.
The next part involves creating the shoe’s cuff or strap, depending on your chosen style. If you’re making Mary Jane baby shoes, you’ll crochet a simple strap and attach a small button. For boot-style shoes, continue crocheting upward to add extra warmth and coverage. Always test the flexibility of the cuff so it’s easy to put on and take off the baby’s foot.
When finishing, weave in all loose ends neatly using a yarn needle. It’s important that no threads are left exposed, as they can be uncomfortable for the baby. You can now customize your shoes with decorative touches like mini flowers, appliqués, or contrast-colored edges. With practice, your crocheted baby shoes will look store-bought—but even more special because they’re handmade with love.
Tips for Perfecting Your Crochet Baby Shoes
When learning how to crochet baby shoes, patience is your best friend. Every pair you make will help improve your stitch consistency, shape control, and finishing techniques. One common mistake beginners make is using yarn that’s too thick or stiff, resulting in shoes that are hard or bulky. Always opt for soft yarn that maintains flexibility.
Another tip is to keep track of your stitch count. Small errors in counting can lead to uneven soles or lopsided shoes. Use stitch markers to help maintain symmetry, especially when working in rounds. If you find that your soles are curling, gently steam-block them to flatten the base before assembling.
Pay attention to color combinations as well. Pastel shades are perfect for newborns, but don’t hesitate to experiment with modern tones like sage green, dusty pink, or cream. These subtle colors give your shoes a boutique-style look that’s very trendy. You can also create a two-tone effect by changing yarn colors midway through the project.
If you’re planning to sell or gift your handmade baby shoes, presentation matters. Consider packaging them in a small box tied with ribbon or adding a personalized tag. These small details make your handmade gifts feel even more meaningful.
Finally, remember that every crocheter develops a unique style. Don’t be discouraged if your first pair isn’t perfect. With time, you’ll master shaping, tension control, and decorative techniques that make your baby shoes truly your own.
Creative Variations and Custom Designs
Once you’ve mastered the basics of crocheting baby shoes, it’s time to experiment with designs. You can modify the sole length and height of the upper section to create different shoe types—like sandals, sneakers, or boots. Changing stitch types, such as incorporating puff stitches or shell patterns, adds beautiful texture.
For a classic winter look, make crochet baby boots using thicker yarn and higher cuffs. You can even line them with soft fleece or faux fur for extra warmth. For summer, open-toe crochet sandals are ideal—they’re lightweight and stylish. Simply adjust your pattern to include strap details instead of a closed toe.
Another creative idea is to personalize your crocheted baby shoes with initials or motifs. Crocheted appliqués like stars, hearts, or small animals add a playful charm. These details make your creations perfect for photoshoots or special occasions.
You can also make matching accessories like hats or mittens using the same yarn and color palette. This creates a complete handmade baby gift set that parents will cherish forever.
Don’t forget about eco-friendly options! Using organic cotton or recycled yarns not only makes your project sustainable but also gentle on a baby’s skin. This approach is increasingly popular among eco-conscious crafters.
Above all, enjoy the creative process. Every stitch brings your design to life and reflects your love and care. The joy of making something tiny yet meaningful is what makes crochet baby shoes a timeless favorite among crafters.
FAQ About Crocheting Baby Shoes
1. What’s the best yarn for crocheting baby shoes?
Soft cotton or acrylic blend yarns are ideal because they’re gentle, washable, and lightweight. Avoid rough or scratchy fibers.
2. Can I make baby shoes without a pattern?
Yes, once you understand the basic structure—sole, upper, and cuff—you can design your own versions by adjusting stitch counts and shapes.
3. How long does it take to crochet baby shoes?
Most beginners can complete a pair in about two to three hours, depending on the complexity of the design.
4. How do I adjust the size of the shoes?
You can increase or decrease the number of stitches in the sole and upper rounds to make larger or smaller sizes.
5. Are crocheted baby shoes safe for newborns?
Yes, as long as they are made from soft materials and free from small detachable parts that could pose choking hazards.
6. How should I wash crocheted baby shoes?
Gently hand wash with mild detergent and lay flat to dry. Avoid machine drying to preserve the shape and softness.
Conclusion
Learning how to crochet baby shoes is a delightful and rewarding journey for any crafter. From choosing the perfect yarn to adding finishing details, each step allows you to express creativity while making something truly meaningful.
These handmade shoes are not only practical but also heartwarming gifts that capture love in every stitch. Whether you’re a beginner or an experienced crocheter, this pattern gives you the foundation to create countless adorable designs.
We hope this guide helped you feel confident in starting your own crochet baby shoe projects. Have you tried this pattern or have creative tips to share? Leave your honest opinion and suggestions below—we’d love to hear your thoughts and see your beautiful creations!