
How to make crochet sun hat tutorial is one of the most searched topics among crafters and DIY enthusiasts, especially those who love handmade summer accessories.
A crochet sun hat is not only a beautiful and practical project for sunny days, but it also allows you to express your creativity and style. Whether you’re a beginner or an experienced crocheter, learning how to crochet a sun hat step by step can be both relaxing and rewarding.
In this complete guide, we’ll explore everything you need to know — from choosing the right yarn and hook size to adding finishing touches that make your hat look professional and stylish.
Creating your own crochet sun hat is a fun project that blends art, patience, and skill. The process teaches you essential crochet techniques like increasing, joining rounds, and shaping a brim that offers perfect sun protection.
This guide is designed to help you make a sturdy, lightweight, and fashionable hat that fits perfectly. Plus, it’s a sustainable way to craft your own accessories rather than buying mass-produced ones. With just a few materials and some creativity, you can design your unique crochet hat that complements your wardrobe and personality.
In this crochet sun hat tutorial, we’ll go through the essential steps to make your project a success. You’ll learn what tools and materials you need, the basic stitches involved, and how to assemble everything beautifully. The goal is to make this guide easy to follow, even for beginners. Let’s start by understanding what makes crochet sun hats so special and how you can make one that stands out with style and comfort.
Choosing the Right Materials for Your Crochet Sun Hat
Before you begin crocheting, it’s essential to choose the right materials. The quality of your yarn and hook will determine how comfortable, durable, and visually appealing your sun hat will be. Selecting the right combination ensures your hat maintains its shape while still being breathable and soft enough for everyday wear.
First, focus on the yarn type. For crochet sun hats, cotton yarn is the best option. It’s lightweight, breathable, and holds its shape well. Unlike acrylic yarns, cotton won’t make you feel hot under the sun. You can also try raffia yarn or blended fibers for a more rustic or beachy texture. Always pick yarn that feels comfortable against your skin, since this hat will be in direct contact with your face and head.
Next, you’ll need to choose the appropriate hook size. The crochet hook size usually depends on the yarn weight. For most cotton yarns, a 3.5 mm to 4.5 mm hook works best. A smaller hook gives you a tighter stitch, helping your hat maintain its shape and structure. If you use a larger hook, your hat may become too floppy. Always make a small sample swatch before starting the main project to check your stitch tension.
Another key material is stitch markers. These help you keep track of your rounds and ensure even increases. A measuring tape is also necessary to make sure the hat fits perfectly. You’ll also need a yarn needle to weave in the ends neatly and a pair of scissors for trimming excess yarn.
Finally, consider adding accessories such as a ribbon, crochet flower, or shell decoration to give your sun hat a personalized touch. These finishing details make your project unique and can transform a simple hat into a stylish summer statement piece.
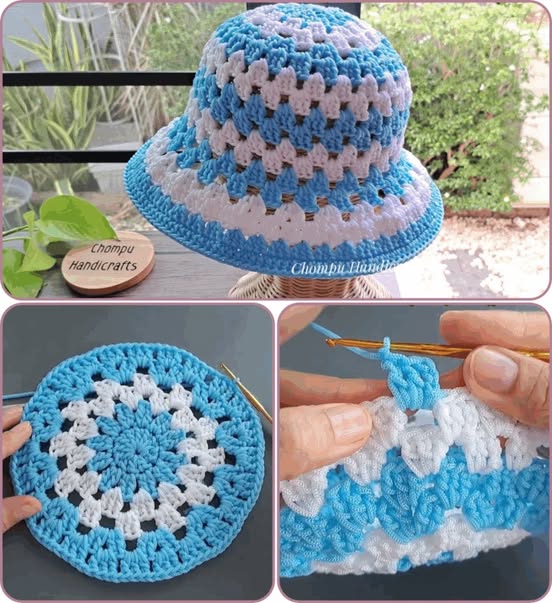
Step-by-Step Crochet Sun Hat Instructions
Once your materials are ready, it’s time to start crocheting your sun hat step by step. Even if you’re new to crochet, following these instructions carefully will help you achieve professional results. Take your time with each step, and remember — consistency is more important than speed.
Begin with the magic ring technique to form the top of your hat. This technique allows you to pull the circle tight, leaving no hole at the crown. Chain two, then make 10 double crochets into the ring. Join the round with a slip stitch. This forms the foundation of your sun hat.
For the next few rounds, you’ll need to increase evenly. Crochet two double crochets in each stitch for the second round. On the third round, make one double crochet in the first stitch and two in the next — continue this pattern until you reach the desired crown size. This part determines how the hat fits on your head, so measure frequently to ensure accuracy.
After finishing the crown, continue crocheting without increasing to form the sides of your hat. Work evenly in rounds until the hat reaches your desired depth — usually about 4 to 5 inches for adults. You can experiment with stitch patterns like single crochet, half double crochet, or textured stitches to give your hat character.
Now it’s time to create the brim — the most recognizable feature of a crochet sun hat. Start by increasing gradually to make the brim widen smoothly. For instance, make one double crochet in the first two stitches and then two in the next. Continue this increase pattern around until the brim is about 3 to 5 inches wide. To make the brim stiffer, you can use raffia yarn or apply starch spray once the hat is finished.
Once the crochet part is done, weave in all loose ends using a yarn needle. You can then block your hat — shape it properly and let it dry — so it keeps its form beautifully. Finally, add your chosen decorations such as ribbons, beads, or flowers.
Tips and Tricks for a Perfect Crochet Sun Hat
Creating a perfect crochet sun hat requires a few tricks that experienced crocheters often use. These little techniques can make your project look more polished and last longer.
The first tip is to check your tension regularly. Uneven tension can make the hat too tight or too loose. If you notice that your stitches are inconsistent, take a break and adjust your hand positioning. Maintaining a steady rhythm ensures a uniform fabric texture.
Another important trick is to use stiffening techniques if you want your brim to hold its shape. You can mix a little fabric glue with water and brush it on the brim, or use starch spray. Let it dry completely before wearing it. This helps your hat keep that classic wide-brim look even after multiple uses.
When it comes to color selection, light shades such as beige, white, or pastel colors work best for sunny days because they reflect sunlight. You can also mix multiple yarn colors for a striped or ombre effect. The goal is to make the hat visually appealing while maintaining its functionality.
Also, always measure your head circumference before starting. Every person’s head size is different, so taking measurements ensures a custom fit. You can easily adjust the pattern by adding or removing a few rounds before shaping the brim.
For a travel-friendly hat, consider making a foldable crochet sun hat. You can use flexible cotton yarn and avoid stiffeners, making it easy to pack in your bag without losing shape. It’s perfect for vacations and outdoor adventures.
Lastly, take good care of your finished hat. Hand wash it with mild soap and reshape it while it’s damp. Avoid wringing or machine drying, as this can damage the stitches or alter its shape. Proper care ensures your handmade crochet sun hat stays beautiful for many seasons.
Creative Design Ideas for Crochet Sun Hats
Once you’ve mastered the basics, you can experiment with creative design ideas to make your crochet sun hat unique. Crocheting allows endless possibilities when it comes to patterns, textures, and embellishments.
One popular idea is to add a crochet flower or bow to the side of the hat. You can make small daisies or roses with leftover yarn and sew them onto the brim. This gives your hat a feminine and elegant look, perfect for beach days or garden parties.
You can also try striped patterns using different colors of yarn. Alternate two or three shades for a fun summer vibe. For a more minimalist look, use a single neutral color and focus on textured stitches like shells or puff stitches.
Adding a ribbon or fabric band around the crown adds a stylish touch. Choose a matching or contrasting color and tie it into a bow. You can even switch ribbons to match different outfits.
If you love boho or rustic aesthetics, use natural raffia yarn. It gives your hat a woven straw-like appearance, ideal for tropical vacations. Just remember that raffia can be less stretchy than cotton, so adjust your pattern accordingly.
Another creative touch is to make custom brims — wide floppy brims, short brims, or asymmetrical shapes. You can even crochet a wire edge into the brim for adjustable shaping.
Finally, consider adding beads or shells to the edge of the brim. This creates a charming handmade look and makes your crochet sun hat truly one of a kind.
FAQ – Frequently Asked Questions About Crochet Sun Hats
1. What yarn is best for a crochet sun hat?
The best yarn for a crochet sun hat is 100% cotton yarn. It’s lightweight, breathable, and holds its shape well under the sun. Raffia yarn is another good option for a natural, straw-like finish.
2. How long does it take to make a crochet sun hat?
Depending on your skill level, it can take 4 to 8 hours to complete a hat. Beginners may take a bit longer, while experienced crocheters can finish one in a single day.
3. Can I make a crochet sun hat without a pattern?
Yes, you can. If you understand basic crochet stitches and increases, you can freestyle your own hat. However, following a crochet sun hat tutorial helps you achieve consistent results.
4. How do I stiffen the brim of a crochet sun hat?
You can use starch spray, fabric stiffener, or diluted glue applied to the brim. Let it dry completely before wearing. Alternatively, you can crochet a thin wire along the brim’s edge for structure.
5. Can I wash my crochet sun hat?
Yes, but always hand wash it gently in cool water with mild detergent. Avoid wringing or using a washing machine. Lay it flat to dry and reshape it while damp.
6. What size hook should I use?
A 3.5 mm to 4.5 mm crochet hook is ideal for cotton yarn. Adjust your hook size depending on how tight or loose your stitches are.
Conclusion
Learning how to make crochet sun hat tutorial projects is an enjoyable and fulfilling experience. You now know how to choose the best materials, follow step-by-step instructions, apply helpful tricks, and explore creative designs. A handmade crochet sun hat is not only a stylish accessory but also a reflection of your craftsmanship and personality.
VIDEO TUTORIAL
If you found this guide helpful, please share your honest opinion and suggestions about what kind of crochet tutorials you’d like to see next. Your feedback helps improve future guides and inspires more people to start their crochet journey. Happy crocheting!