
If you’ve ever wanted to create unique and colorful crochet patterns, learning how to crochet a spiral granny square is a perfect starting point.
This technique adds a fun twist to the traditional granny square, producing a visually stunning spiral design that can be used in blankets, scarves, bags, and other creative projects.
In this guide, we will walk you through every step of the process, ensuring that even beginners can follow along confidently. By the end, you’ll have the skills to add a spiral effect to your crochet creations.
The beauty of a spiral granny square lies not only in its visual appeal but also in the versatility it offers. You can experiment with colors, yarn types, and hook sizes to create truly personalized pieces.
Unlike standard granny squares, the spiral granny square creates a continuous flow of stitches, giving your work a dynamic and modern look. Whether you’re aiming for a vibrant rainbow effect or a subtle monochrome design, mastering this technique opens a new world of possibilities.
Moreover, learning how to crochet a spiral granny square enhances your overall crochet skills. It teaches you how to manage color changes smoothly, maintain consistent tension, and understand the geometry of your stitches. These skills are transferable to other advanced crochet projects, making the spiral granny square an excellent exercise for both beginners and experienced crocheters.
Understanding the Basics of a Spiral Granny Square
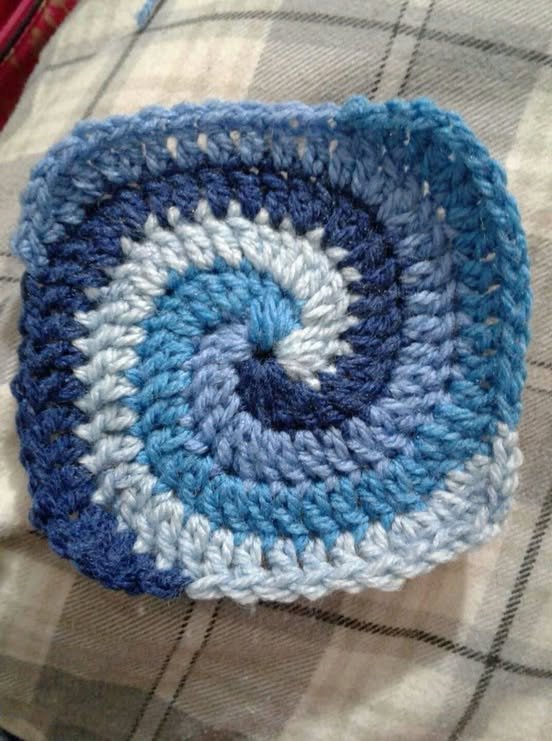
Before diving into the step-by-step instructions, it’s essential to understand what makes a spiral granny square different from traditional granny squares. A standard granny square consists of separate rounds, often requiring slip stitches to join each round. In contrast, a spiral granny square is worked continuously in a spiral without joining rounds, which results in a seamless, swirling pattern.
Working in a spiral requires maintaining consistent stitch placement and counting to ensure that your square remains even and symmetrical. Many crocheters find it helpful to use stitch markers at the beginning of each round to keep track of their progress. Additionally, choosing the right yarn and hook size is crucial for achieving a smooth spiral that lies flat rather than curling at the edges.
Color selection is another important factor in how to crochet a spiral granny square. Using multiple colors can emphasize the spiral effect, while a single color creates a subtle, textured pattern. You can even experiment with gradient or variegated yarns for an ombré spiral effect, adding depth and interest to your project.
Materials You Will Need
To start your spiral granny square project, you’ll need some basic crochet materials. First, choose a yarn type that suits your desired project. Cotton yarns work well for projects requiring structure, while acrylic yarns are versatile and easy to care for. The thickness of the yarn will determine your hook size and the overall appearance of your spiral square.
A crochet hook is another essential tool. The size of your hook should match your chosen yarn, as indicated on the yarn label. Using the correct hook ensures even stitches and a balanced square. Beginners often start with a medium-size hook to make handling the yarn easier.
You will also need scissors to cut your yarn and a tapestry needle to weave in ends. Optional tools include stitch markers to mark the beginning of each round and a measuring tape to monitor the size of your square. Having all materials ready before you begin ensures a smoother and more enjoyable crocheting experience.
Step-by-Step Instructions
Now that you have your materials, let’s dive into the process of how to crochet a spiral granny square. We’ll break it down into manageable steps so you can follow along without feeling overwhelmed.
Start by making a slip knot and chaining four stitches to form a small loop. This loop will serve as the center of your spiral granny square. Next, work three double crochets into the loop. These three stitches count as the first cluster, forming the foundation of your spiral.
Continue by chaining one and making another cluster of three double crochets into the center loop. Repeat this pattern until you have four clusters separated by chain spaces. This completes the first round of your spiral. Unlike a traditional granny square, do not join the rounds with a slip stitch; instead, continue working in a spiral.
In the next round, make a double crochet in the chain space of the previous round, followed by a chain of one, and another cluster of double crochets in the same space. Repeat this process for each chain space around, carefully counting stitches to maintain symmetry. The spiral will gradually take shape as you continue working in this manner.
To expand the square, increase the number of clusters in the corner spaces by adding an extra chain space and cluster. This ensures that your spiral granny square remains flat and doesn’t curl at the edges. Continue adding rounds and changing colors as desired until your square reaches the desired size.
Tips for Perfecting Your Spiral Granny Square
Crocheting a perfect spiral granny square requires patience and attention to detail. One helpful tip is to maintain consistent tension throughout your project. Uneven tension can cause the spiral to warp or curl, affecting the final appearance.
Another important tip is to plan your color changes carefully. Changing colors at the beginning of a new round or in the middle of clusters can create a striking spiral effect. Many crocheters use contrasting colors to highlight the spiral pattern.
Using stitch markers can also make a significant difference. Place markers at the beginning of each round or at the corners to keep track of where you need to increase or adjust stitches. This helps maintain a balanced, symmetrical spiral.
Blocking your finished square is another valuable technique. By gently wetting and shaping your square, you can correct any curling or uneven edges. This step ensures that your spiral granny square looks polished and professional.
Experimenting with different yarn textures and hook sizes can lead to unique spiral patterns. Fuzzy or textured yarns may add depth, while finer yarns create delicate, intricate spirals. Don’t be afraid to try new combinations and let your creativity guide you.
Lastly, practice is key. The more you crochet spiral granny squares, the more comfortable you will become with stitch placement, tension, and color changes. Each attempt will improve your skills and result in more visually striking projects.
Creative Projects Using Spiral Granny Squares
Once you’ve mastered how to crochet a spiral granny square, you can apply this technique to a wide range of projects. One popular idea is creating a colorful blanket or throw. By joining multiple spiral squares, you can create a vibrant, eye-catching piece that showcases your crochet skills.
Another creative use is making pillow covers. Spiral granny squares add texture and dimension, making simple home decor items more visually appealing. You can mix and match colors to complement your interior design or create bold statement pieces.
Bags and totes are also excellent projects for spiral granny squares. Adding these squares to your bag design introduces a playful, artistic element that makes your accessory unique. Spiral squares can serve as panels or accents for a custom-crafted bag.
Scarves and shawls benefit from the spiral granny square technique as well. By combining several squares in a linear pattern, you can create wearable art that showcases color transitions and intricate design. This is a fun way to make gifts for friends or family.
Wall hangings are another creative option. Spiral granny squares can be framed or joined into a tapestry to create a textured, decorative piece. This project allows you to display your crochet skills as home art.
Finally, experiment with mixed-media projects. Combining spiral granny squares with embroidery, beads, or appliqué adds a unique twist to your creations. The versatility of this technique ensures endless possibilities for innovative projects.
FAQ – Frequently Asked Questions
1. Can beginners crochet a spiral granny square?
Yes, beginners can create spiral granny squares with patience and careful attention to the steps. Using stitch markers and following a step-by-step guide makes the process more manageable.
2. How do I prevent my spiral granny square from curling?
Maintaining consistent tension, properly increasing at corners, and blocking your finished square are key methods to prevent curling and ensure a flat, balanced square.
3. What type of yarn works best for a spiral granny square?
Medium-weight acrylic or cotton yarns are ideal for beginners. They provide structure while being easy to handle. However, experimenting with different yarn textures can create unique effects.
4. How do I change colors in a spiral granny square?
Change colors at the beginning of a new round or cluster. Cut the old yarn, attach the new yarn with a slip knot, and continue crocheting, ensuring smooth transitions for a clean spiral effect.
5. Can spiral granny squares be joined together?
Absolutely. You can join multiple spiral granny squares using slip stitches, whip stitch, or sewing to create blankets, pillow covers, or other projects.
6. What hook size should I use for spiral granny squares?
Follow the yarn label recommendation. A medium-sized hook, such as 4mm or 5mm, works well for most medium-weight yarns and provides consistent stitch tension.
Conclusion
Learning how to crochet a spiral granny square opens up a world of creative possibilities. From understanding the spiral technique to experimenting with colors, yarn types, and project ideas, this guide has provided a comprehensive roadmap for beginners and experienced crocheters alike. The key takeaways include maintaining consistent tension, planning color changes, using stitch markers, and practicing regularly to perfect your technique.
Now that you know the process, it’s time to put your skills into practice. Try creating a few spiral granny squares, experiment with colors, and incorporate them into your favorite projects.
Your journey into the world of spiral crochet is just beginning, and the possibilities are endless. Share your creations, leave a sincere opinion, and offer suggestions for future projects to inspire other crochet enthusiasts.