
Crocheted house-shaped cookie for Christmas tree

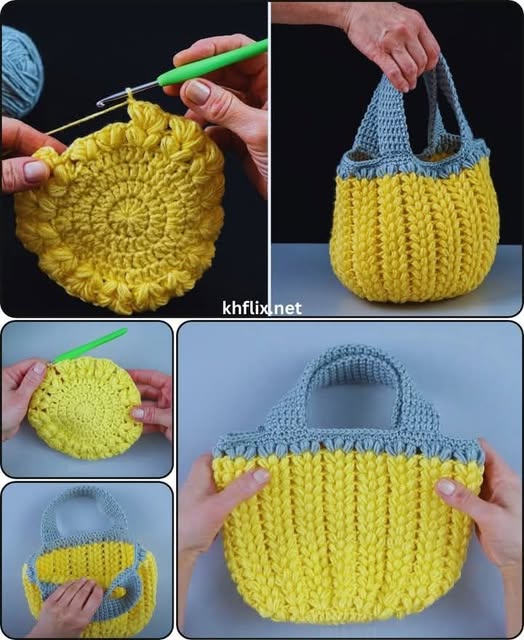
The How to Crochet a Cute Mini Tote Bag – Pattern project is a fantastic way to combine creativity, practicality, and relaxation into one rewarding experience.
Crocheting your own cute mini tote bag allows you to design something both stylish and functional while enjoying the satisfaction of making it yourself.
This type of project is perfect for beginners who want to learn the fundamentals of crochet and for experienced crafters looking to create something adorable and useful.
Whether you plan to use your tote for carrying small items, cosmetics, or accessories, this free crochet pattern provides everything you need to make a beautiful handmade piece that reflects your personality and style.
The process is simple, the materials are easy to find, and the end result is a charming DIY crochet tote bag that you can proudly show off or gift to a loved one.
What makes crocheting a mini tote bag so appealing is its versatility. You can choose from various yarn textures and colors to achieve completely different looks — from bright, playful designs to elegant neutral tones. This project also offers plenty of opportunities to experiment with decorative stitches, unique handles, or embellishments such as buttons, tassels, or embroidery. With only a few hours of work, you can transform a few skeins of yarn into a chic and functional crochet tote bag that looks professionally made. It’s also an eco-friendly option, as reusable bags help reduce waste and promote sustainable crafting habits.
Another reason to love this free crochet pattern is how portable and accessible it is. You don’t need a large workspace or fancy tools — just your favorite crochet hook, some yarn, and a bit of patience. Each step in the process helps improve your skills, from maintaining even tension to shaping corners and creating sturdy handles. Crocheting your own handmade tote bag is both therapeutic and rewarding. Once completed, you’ll not only have a practical item but also a beautiful reminder of your creativity and craftsmanship.
To start your cute mini tote bag, gather all the essential materials. You’ll need medium-weight cotton yarn, which provides durability and structure while keeping the bag lightweight. Cotton is ideal because it holds its shape, withstands frequent use, and is easy to clean. Choose two to three complementary colors if you want to add stripes or accents to your DIY crochet tote bag. Alternatively, stick to one color for a minimalist, elegant design that matches any outfit.
The recommended crochet hook size for this project is usually 3.5mm to 4mm (E or G hook), depending on your yarn thickness. Using the correct hook ensures your stitches are tight and consistent, which helps the mini tote bag maintain its shape. Other helpful tools include scissors for trimming yarn ends, a yarn needle for weaving in tails, and stitch markers to keep track of rounds or pattern sections.
You’ll also need a bit of lining fabric if you want to reinforce the inside of your tote. Lining gives the handmade tote bag extra strength, especially if you plan to carry heavier items. Choose a lightweight cotton fabric that complements your yarn color. Fabric glue or a simple hand-sewn stitch can attach the lining neatly inside the bag. Optional accessories like buttons, tassels, or decorative patches can be added later to personalize your tote. Once you’ve assembled your materials, you’re ready to begin creating your free crochet pattern project.
Start your cute mini tote bag by crocheting the base. Begin with a foundation chain that matches your desired width — usually between 25 to 35 stitches. Work single crochet stitches into each chain, then continue to crochet around the base to form an oval shape. This technique creates a strong bottom that can support your items. Make sure to count your stitches and use stitch markers to maintain symmetry.
After completing the base, start crocheting upward to form the body of the DIY crochet tote bag. Switch to half-double or double crochet stitches, depending on the texture you prefer. Continue working in rounds until the bag reaches your desired height, usually around 20 to 25 rows. You can create decorative patterns by alternating colors or using different stitches, like shells or puff stitches, to add visual interest. This is your chance to experiment and make your free crochet pattern uniquely yours.
Once the body is complete, it’s time to add handles. There are two popular methods: crocheted handles or attached rope handles. For crocheted ones, simply chain the desired handle length and skip a few stitches on each side, then continue crocheting above them to secure. Rope handles can be attached with sturdy stitches or metal rings for a stylish finish. Ensure the handles are even and strong enough to support the weight of the bag’s contents.
After you’ve attached the handles, check for any loose ends or uneven stitches. Use a yarn needle to weave in all tails neatly. If you plan to line your handmade tote bag, cut the fabric slightly smaller than the bag’s dimensions and attach it inside using fabric glue or a slip stitch. Adding lining gives the tote a professional look and extends its lifespan. Finally, block your bag by gently dampening and shaping it to ensure the edges are even and crisp before letting it dry completely.
One of the best things about this DIY crochet tote bag project is how easy it is to customize. You can change the size of the bag simply by adjusting the starting chain and adding more rounds for height. Want a large beach tote? Just increase your stitch count and use thicker yarn. Prefer a small handbag? Reduce the stitch count and use finer yarn. Every adjustment allows you to create a new variation of the cute mini tote bag while practicing different techniques.
Color combinations are another fun area to explore. Try mixing neutral tones with bold accents, or create color blocks for a trendy, modern design. You can even use leftover yarn scraps to make a multicolored striped tote that looks cheerful and eco-friendly. If you enjoy texture, incorporate special stitches like bobbles or popcorns into your free crochet pattern to give the bag dimension and personality.
Embellishments can elevate your handmade tote bag to the next level. Attach wooden buttons, crochet flowers, or small tassels to add a touch of flair. For an elegant finish, you could sew lace trim around the top edge or attach a small charm to the handle. Adding a fabric lining with a fun print, such as florals or polka dots, gives your tote a surprise element every time you open it. Customization is where your creativity truly shines — making your project a reflection of your personal taste and style.
While making your cute mini tote bag, a few common mistakes can occur, but they’re easy to avoid with practice and patience. One frequent issue is uneven tension, which causes the sides of the tote to become wavy or distorted. To prevent this, check your tension regularly and keep your hands relaxed as you crochet. Practicing on a small swatch before starting the actual project helps establish consistency.
Another mistake is miscounting stitches, especially when working in rounds. Skipping or adding extra stitches can alter the bag’s shape, so it’s crucial to use stitch markers and recount after each round. Misaligned handles are another common issue — always measure and mark handle placements before attaching to ensure symmetry. A DIY crochet tote bag with uneven handles can look unbalanced and feel awkward to carry.
Choosing the wrong yarn type can also affect the outcome. Stretchy or fuzzy yarns may not hold shape well, leading to a floppy tote. Stick with medium-weight cotton or sturdy blends for structure. Finally, rushing through the finishing process can leave visible knots or loose ends. Take your time to weave in ends neatly and block the bag for a professional finish. By following these tips, your free crochet pattern project will turn out strong, stylish, and perfectly shaped.
Q1: Is this pattern beginner-friendly?
Yes! The free crochet pattern is simple enough for beginners while offering room for creativity and customization.
Q2: How long does it take to make a mini tote bag?
Depending on your skill level, the DIY crochet tote bag can take between 3 to 5 hours to complete.
Q3: What type of yarn should I use?
Medium-weight cotton yarn is best. It provides durability and helps your handmade tote bag hold its shape.
Q4: Can I make this bag larger?
Absolutely. Adjust the foundation chain and number of rounds to create a larger version of the cute mini tote bag.
Q5: How do I clean the tote bag?
Hand wash with mild detergent, reshape, and lay flat to dry. Avoid machine washing to preserve the structure.
Q6: Can I sell the bags I make?
Yes, you can sell them! Just make sure to credit the free crochet pattern if required by its creator.
Making your own Cute Mini Tote Bag – Pattern is not only enjoyable but also deeply rewarding. This DIY crochet tote bag allows you to combine style, functionality, and craftsmanship in one beautiful handmade project. Whether you use it as a small handbag, a gift, or a daily accessory, your handmade tote bag will always carry the charm of your personal touch.
With the guidance from this free crochet pattern, you’ve learned how to select materials, follow step-by-step instructions, customize designs, and avoid common mistakes. The final result is a durable, stylish, and eco-friendly bag that showcases your creativity. We’d love to hear your thoughts — share your sincere opinion about this project, and feel free to suggest new crochet ideas you’d like to see next!


