
Crocheted house-shaped cookie for Christmas tree

Learning how to crochet a classic granny square is one of the most rewarding skills for anyone interested in crafting. Granny squares are versatile, timeless, and perfect for creating blankets, scarves, bags, or even clothing.
By mastering this skill, you not only gain the ability to create beautiful handmade items but also develop a foundation that can help you explore more advanced crochet patterns.
Whether you are a beginner or an experienced crafter, understanding the step-by-step process of making a classic granny square is essential.
The beauty of how to crochet a classic granny square lies in its simplicity and adaptability. This project is often the first one a new crocheter attempts because it teaches essential stitches, including chains, double crochets, and slip stitches.
Moreover, a granny square allows for endless creativity, as you can experiment with colors, yarn textures, and different sizes. Once you understand the basic technique, the possibilities are limitless, and the sense of accomplishment from completing your first square is immensely satisfying.
Many people wonder why granny squares have remained so popular over decades. The secret is in their classic design and versatility. They can be connected to form large projects, like afghans or table runners, or used individually for smaller crafts. Additionally, learning how to crochet a classic granny square is an excellent introduction to understanding how to read crochet patterns and diagrams. By following this guide, you will gain confidence in your ability to create beautiful, handmade pieces while also developing a deeper appreciation for the art of crochet.
Before you begin learning how to crochet a classic granny square, you need to gather the proper materials and tools. The first essential item is the yarn. For beginners, medium-weight yarn (also labeled as worsted weight) is recommended because it is easy to handle and see the stitches clearly. You can choose any color, but using two or three contrasting colors can make your first square more visually appealing.
Next, you need the right crochet hook. The size of the hook depends on the yarn you choose, but a 5 mm or H-8 hook is ideal for beginners working with medium-weight yarn. The crochet hook must feel comfortable in your hand because you will be holding it for extended periods while forming loops and stitches. Having a smooth, ergonomic hook can reduce hand fatigue.
Another important material is scissors to cut your yarn cleanly when switching colors or finishing your square. Additionally, having a yarn needle is crucial for weaving in the ends of your project neatly. By preparing your tools and materials in advance, you ensure a smoother and more enjoyable crochet experience while learning how to crochet a classic granny square.
A key part of learning how to crochet a classic granny square is understanding the fundamental crochet stitches. The most common stitches used in a granny square are the chain stitch, slip stitch, and double crochet. The chain stitch forms the foundation of your square, providing the base loops to build upon. Practicing the chain stitch will improve your tension and ensure your square maintains a consistent shape.
The slip stitch is used to join rounds and secure your work without adding height. It is essential for creating the neat, finished look of a granny square. Mastering the slip stitch allows you to connect your stitches seamlessly, which is especially useful when joining multiple squares later.
The double crochet stitch is the primary stitch used to create the clusters that define a granny square. By learning how to make consistent double crochets, you can form the iconic pattern of the square. Practicing these stitches individually before starting your first granny square can build your confidence and make the process much easier.
Another tip is to understand the concept of rounds versus rows. Granny squares are worked in rounds from the center outward, which is different from working in straight rows. This technique ensures your square grows evenly on all sides, creating a symmetrical and professional-looking piece.
Color changes are another aspect to consider when mastering how to crochet a classic granny square. Introducing new yarn colors between rounds adds variety and visual appeal. By experimenting with different combinations, you can personalize your squares and make them unique.
Finally, counting your stitches accurately is crucial. Consistent stitch counts prevent uneven edges and maintain the square’s shape. Using stitch markers can help track corners and rounds, ensuring that your granny square looks clean and professional.
Now that you understand the materials and basic stitches, let’s dive into how to crochet a classic granny square step by step. Start by creating a slip knot and forming a chain of four stitches. Join the chain with a slip stitch to form a small loop, which will serve as the center of your square.
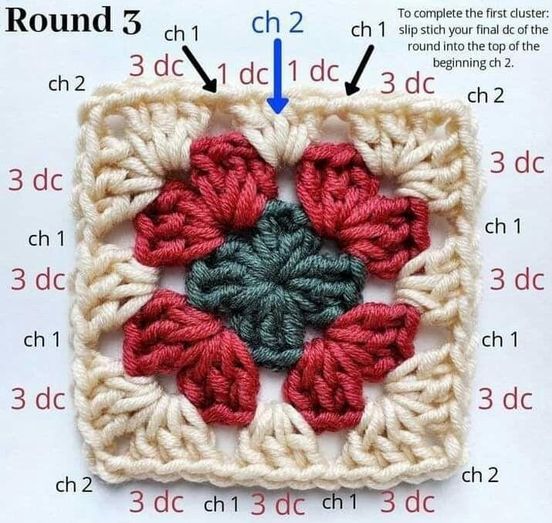
Next, create your first round of double crochet clusters. Make three double crochets into the center of the loop, followed by a chain of two stitches to form the first corner. Repeat this process three more times, placing three double crochets followed by a chain of two stitches in each corner. Join the round with a slip stitch to complete the first layer of your granny square.
For the second round, choose a new color if desired. Slip stitch into the corner space and chain three to begin your first double crochet cluster. Work two more double crochets in the same corner space, chain two, and create three additional double crochets. Repeat this for each corner space around the square, joining the round with a slip stitch.
Continue adding rounds, following the same pattern: three double crochets in each side space, three double crochets, chain two, three double crochets in each corner. Gradually, your square will expand, maintaining a perfect shape with clearly defined corners. Remember to change colors between rounds for a vibrant, dynamic look.
Once your granny square reaches the desired size, fasten off the yarn and weave in all ends using a yarn needle. This finishing step is crucial for creating a polished, professional-looking piece. Properly finished squares can then be joined to form larger projects, or used individually for small crafts and gifts.
Learning how to crochet a classic granny square opens up countless creative possibilities. One of the most popular uses is making blankets or afghans. By creating multiple squares in different colors and joining them together, you can design a large, cozy blanket perfect for gifting or decorating your home.
Another idea is to create scarves, shawls, or ponchos. Granny squares can be connected in long strips or sewn together strategically to form wearable accessories. This approach allows you to experiment with textures and colors, turning simple squares into fashionable items.
Granny squares also work wonderfully for home décor projects, such as pillow covers, table runners, or wall hangings. By mixing and matching colors and sizes, you can add a handmade, cozy touch to any room.
Smaller projects, like bags, pouches, or coasters, are ideal for beginners who want to practice their skills without committing to large projects. These items are functional, customizable, and make excellent gifts.
Another creative option is using granny squares for clothing items, such as vests or crop tops. This modern take on a classic technique demonstrates the versatility of granny squares and their ability to evolve with fashion trends.
Finally, joining different textured yarns or experimenting with multicolor combinations can produce visually stunning effects. The possibilities for creativity are endless, and the skills learned while making granny squares translate to virtually all crochet projects.
Q: What yarn is best for a classic granny square?
A: Medium-weight yarn (worsted weight) is ideal for beginners, as it is easy to handle and allows your stitches to show clearly. You can choose any color combination to suit your project.
Q: Can I use a different crochet hook size?
A: Yes, the hook size should match the yarn you use. A 5 mm or H-8 hook is perfect for medium-weight yarn, but adjust if you prefer tighter or looser stitches.
Q: How do I join multiple granny squares?
A: Squares can be joined using slip stitches, whip stitching, or sewing with a yarn needle. Choose the method that works best for your project and desired look.
Q: How do I change colors between rounds?
A: To change colors, finish the last stitch of the round before the color change, pull the new color through the last loop, and continue crocheting with the new yarn.
Q: Can I make a granny square any size?
A: Absolutely! By continuing additional rounds, you can make your square as large as you want. Adjust yarn and hook size to achieve the desired dimensions.
Q: How do I keep my granny square even?
A: Count your stitches carefully, use stitch markers for corners, and maintain consistent tension. This ensures neat edges and a symmetrical square.
Mastering how to crochet a classic granny square is a foundational skill for any crocheter. This timeless technique introduces essential stitches, teaches pattern reading, and opens up a world of creative possibilities. From blankets to clothing, granny squares can be adapted to virtually any project, allowing for endless experimentation with colors, textures, and sizes.
By following this guide, you now know the materials required, the basic stitches, step-by-step instructions, and multiple creative uses for your granny squares. Don’t forget to practice patience, maintain consistent stitch counts, and have fun experimenting with colors.
We encourage you to leave a sincere opinion on your experience learning this technique and share any creative suggestions you have for projects. Your feedback can help other crafters enjoy the art of making classic granny squares while inspiring more unique and personalized creations.


