
Crocheted house-shaped cookie for Christmas tree

Learning how to crochet a box stitch is an exciting way to expand your crochet skills and create beautiful, textured designs. The box stitch is versatile, easy to learn, and perfect for creating items like blankets, scarves, and home décor projects.
With this free crochet pattern, you can follow step-by-step instructions to master the technique and make your own stylish crochet pieces. Understanding the fundamentals of the box stitch allows you to craft intricate designs that appear complex but are actually simple to achieve.
Crocheting is more than just a hobby; it’s a relaxing and rewarding activity that promotes creativity and mindfulness. By learning how to crochet a box stitch, you gain the ability to produce elegant textures that stand out in any project.
This stitch is ideal for both beginners and experienced crocheters because it combines straightforward techniques with visually appealing results. Once you master it, you’ll find endless ways to use it in various crochet patterns.
The box stitch also adds dimension and structure to your projects. Unlike flat or simple stitches, it creates a subtle 3D effect that makes your work look professional and polished. Following this free crochet pattern, you can practice the stitch, experiment with different yarn types, and see how small changes in tension, hook size, or yarn weight can dramatically alter the final appearance of your piece.
Before starting how to crochet a box stitch, it’s important to gather the right materials. You will need yarn suitable for the project you want to create, whether it’s a blanket, scarf, or small decorative item. Medium-weight yarn is ideal for practicing the box stitch because it shows the texture clearly while being easy to work with.
A crochet hook that matches your yarn weight is essential for consistent stitches. Using the correct hook ensures that your box stitch pattern comes out evenly and looks professional. You may also want a tape measure to track the size of your project, stitch markers to mark rows or pattern repeats, and scissors for clean yarn cuts.
Yarn needles are necessary for weaving in ends neatly and finishing your work. Additionally, keeping a small notebook to record your stitch counts and pattern variations can help you maintain accuracy and track your progress as you learn how to crochet a box stitch.
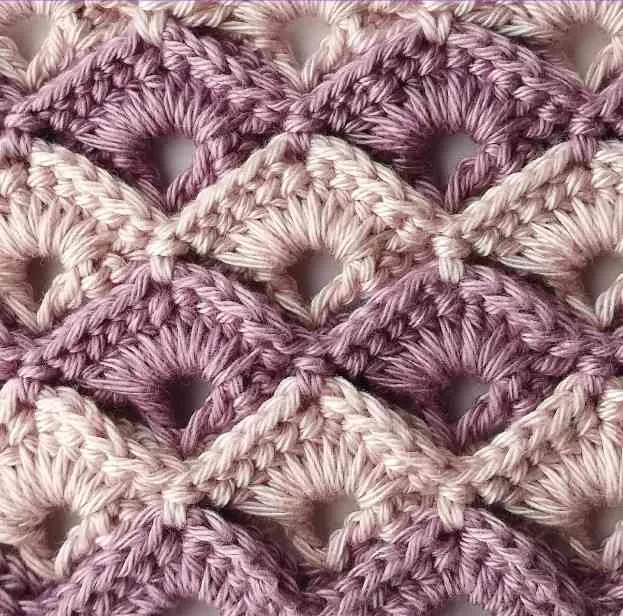
To begin how to crochet a box stitch, start by making a foundation chain with an even number of stitches. This ensures that the pattern works correctly across your project. The box stitch is worked over four rows, creating a textured square effect. Each box is formed by alternating front post and back post double crochet stitches.
In the first row, double crochet across the foundation chain normally. On the second row, you will work front post double crochet around the first stitch, then back post double crochet around the next. This alternating pattern continues across the row, forming the characteristic box texture.
For the third row, you repeat the same front and back post double crochet pattern, aligning the stitches so the boxes appear stacked and uniform. The alternating stitches create depth, which is the hallmark of the box stitch.
The fourth row completes the box by continuing the front and back post pattern. Once this four-row sequence is repeated, the texture becomes consistent and visually appealing. Maintaining an even tension is critical for the boxes to look neat and symmetrical.
You can practice with small swatches first to understand how the stitch works before starting a larger project. This approach helps you master how to crochet a box stitch without committing to a full-size blanket or scarf immediately.
Finally, finish your project by weaving in all yarn ends with a yarn needle. Blocking your work can enhance the texture and make the box stitch stand out even more. By following these steps, you will create a polished and professional-looking crochet piece.
Maintaining consistent tension is key when learning how to crochet a box stitch. Uneven tension can distort the boxes and make your work look uneven. Practice slowly at first, focusing on the placement of front and back post stitches.
Use stitch markers to help track your rows and pattern repeats. This ensures that you don’t accidentally skip a stitch or misalign the boxes. It’s especially helpful for larger projects like blankets or shawls.
Experiment with different yarn types to see how the box stitch responds. Softer yarns create a plush, cozy texture, while firmer yarns give more definition to each box. This flexibility allows you to customize the pattern for a variety of projects.
Pay attention to hook size relative to your yarn. Using a larger hook produces a looser texture, while a smaller hook results in a tighter, more defined box. Adjusting your hook size can dramatically change the final appearance of your crochet piece.
Practice with small swatches before starting a large project. This approach helps you understand the stitch mechanics, experiment with color combinations, and refine your technique.
Finally, don’t rush the process. The box stitch may feel intricate at first, but with patience and practice, it becomes easier and highly rewarding to work with.
One common mistake in how to crochet a box stitch is confusing front post and back post stitches. Misplacing these can disrupt the box pattern and affect symmetry. Carefully follow the instructions and double-check your stitch placement.
Skipping or adding extra stitches can also distort the boxes. Count stitches regularly and use stitch markers to maintain accuracy. Maintaining consistency ensures that your finished project has clean lines and professional texture.
Another common error is inconsistent tension. Uneven tension causes boxes to appear irregular or misshaped. Practice maintaining the same tension throughout, especially on long projects.
Crocheting too tightly can make the fabric stiff and difficult to work with, while crocheting too loosely can reduce the definition of the boxes. Aim for a balanced tension to achieve the best results.
Failing to block your project can affect the final appearance. Blocking evens out stitches and enhances the texture, making your box stitch pattern stand out beautifully.
Finally, rushing through the rows often leads to mistakes. Take your time and work patiently to create a polished, professional-looking project.
Q1: Is the box stitch suitable for beginners?
Yes, beginners can learn how to crochet a box stitch, though it may take a little practice to get the alternating front and back post stitches correct.
Q2: What projects can I make with the box stitch?
The box stitch is perfect for blankets, scarves, hats, pillow covers, and even bags, providing a textured, 3D look.
Q3: What yarn is best for this stitch?
Medium-weight yarn works best for beginners, but you can experiment with different weights to achieve various textures and thicknesses.
Q4: How do I maintain the box shape?
Consistent tension and proper placement of front and back post stitches ensure the boxes stay defined and uniform.
Q5: Can I use multiple colors?
Absolutely! You can change yarn colors between rows or blocks to create colorful patterns while still using the box stitch texture.
Q6: How do I fix mistakes?
Carefully unravel the stitches row by row, keeping track of your pattern. Using stitch markers can prevent errors before they become permanent.
Mastering how to crochet a box stitch opens the door to creating textured, visually stunning crochet projects. From understanding the basic front and back post stitches to practicing tension and stitch placement, this free crochet pattern allows both beginners and experienced crocheters to craft professional-looking items. By following these instructions, tips, and FAQs, you can confidently incorporate the box stitch into blankets, scarves, home décor, and more.
We hope this guide has been helpful and inspires you to try new projects. Share your creations, feedback, and suggestions to help others learn and enjoy the art of crochet. Your opinion matters and can encourage creativity within the crochet community.


