
Crocheted house-shaped cookie for Christmas tree

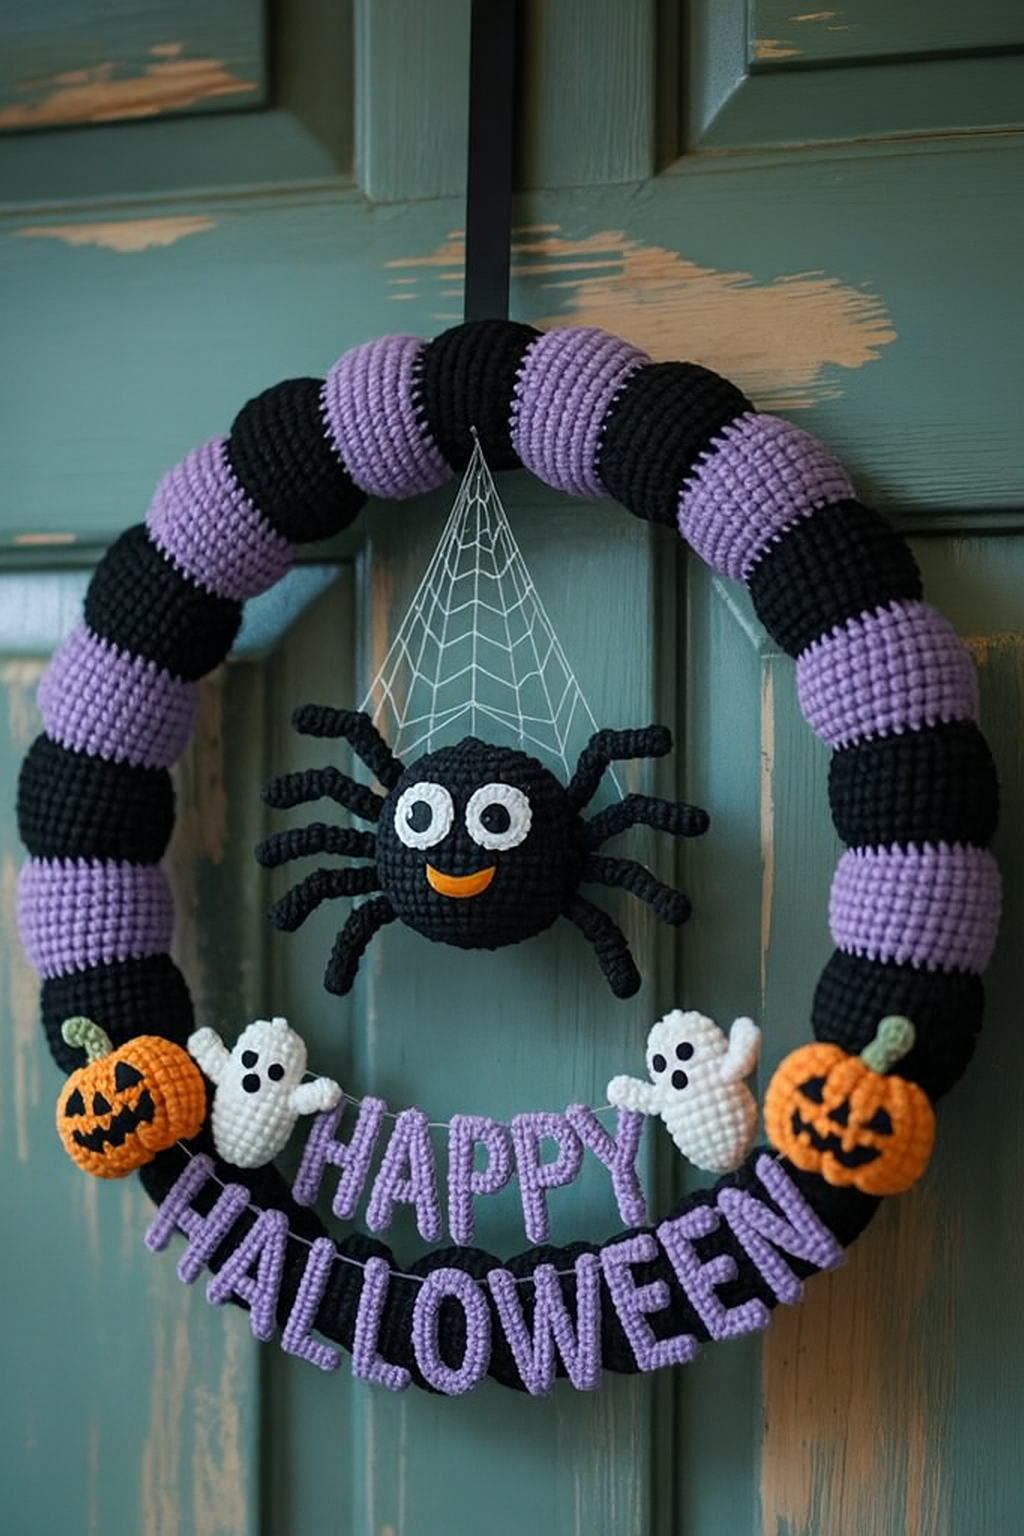
Creating a Happy Halloween wreath – FREE crochet pattern is the perfect way to bring festive charm and handmade warmth to your home during the spooky season.
Whether you’re a beginner or an experienced crocheter, this crochet wreath tutorial allows you to craft a vibrant, unique decoration that can be displayed on doors, walls, or even as a table centerpiece.
A Happy Halloween wreath is more than just decoration; it’s an expression of holiday spirit and a chance to showcase your crafting skills. By making your own DIY Halloween decor, you can incorporate colors, textures, and elements that reflect your personal style.
Whether it’s classic orange and black, gothic purples, or whimsical patterns, this FREE crochet pattern provides a foundation to bring your Halloween vision to life.
Crocheting a Halloween wreath is also a fun and relaxing activity. It’s perfect for spending time with friends or family, creating gifts, or simply enjoying a creative evening. With this crochet wreath tutorial, you can craft a piece that adds personality and charm to your home while celebrating the Halloween season.
The first step in creating your Happy Halloween wreath is gathering the right materials. Yarn choice is crucial for both appearance and durability. Acrylic yarn is a popular choice for DIY Halloween decor because it comes in a wide variety of colors, is easy to work with, and is machine washable. For added texture or sparkle, consider specialty yarns with metallic threads or fluffy textures.
You will also need a basic set of crochet tools. A crochet hook in the recommended size for your yarn, scissors, stitch markers, and a yarn needle will help you complete the crochet wreath tutorial efficiently. Having the proper tools on hand ensures smooth progress and professional-looking results.
Don’t forget the wreath base. Foam or wire wreath rings are commonly used to provide structure. Using a base makes it easier to attach crocheted pieces and ensures your FREE crochet pattern maintains its shape. You can wrap the base with yarn for a seamless look, providing a sturdy foundation for your design.
Choosing complementary colors is essential for a festive Halloween aesthetic. Classic orange and black are always popular, but purple, green, and white can create a more whimsical or spooky feel. This palette decision impacts the overall visual appeal of your Happy Halloween wreath.
Additional embellishments can enhance your wreath. Consider adding small felt bats, spiders, or fabric pumpkins. These extra touches can be sewn or glued onto the crocheted sections, giving your DIY Halloween decor extra dimension and charm.
Finally, prepare your workspace. Lay out all yarns, tools, and pattern instructions in a well-lit area. This organized setup helps you follow the FREE crochet pattern accurately and ensures a fun, stress-free crafting experience.
Start your Happy Halloween wreath by creating the base using your FREE crochet pattern instructions. Typically, a chain stitch foundation is worked in a circle or oval to match the wreath base. This initial step forms the structure for attaching additional layers or decorations.
Use single or double crochet stitches depending on the pattern’s recommendation. Consistency in stitch size is key to achieving a uniform look. This ensures that the final wreath looks polished and professional. Following the crochet wreath tutorial step by step guarantees proper shaping and stability.
After forming the base, attach it to your wreath ring. Use yarn and a yarn needle to secure it evenly, making sure it covers the foam or wire completely. A well-covered base provides a clean surface for adding decorative elements and makes your DIY Halloween decor more durable.
Next, consider adding texture to the base. Alternating stitch patterns, such as popcorn stitches or bobbles, can create depth and interest. These textural details elevate your FREE crochet pattern, giving your wreath a handmade, intricate feel.
Once the base is complete, check for any gaps or uneven areas. Fill in spaces with extra yarn stitches to ensure a seamless look. This careful attention to detail enhances the overall aesthetic of your Happy Halloween wreath.
Finally, secure all yarn ends with a yarn needle, weaving them into the back of the work. This prevents unraveling and keeps your wreath looking neat and tidy for display.
The magic of a Happy Halloween wreath comes from its decorative details. Begin by crocheting pumpkins, ghosts, bats, or other Halloween-themed motifs using your FREE crochet pattern. These can be attached directly to the wreath base or sewn onto small backing pieces for stability.
Color choice for embellishments is crucial. Bright orange pumpkins, stark white ghosts, and black bats provide striking contrasts that enhance the festive appeal. By using your chosen colors strategically, your DIY Halloween decor becomes eye-catching and whimsical.
Texture adds dimension to your wreath. Combine smooth stitches with bobbles, clusters, or fringe. These subtle variations create a more dynamic look and make each element stand out against the base. Following the crochet wreath tutorial ensures these textures are incorporated neatly.
Placement of decorations is important for balance. Arrange elements evenly around the wreath, mixing large and small motifs. This symmetry helps the Happy Halloween wreath feel cohesive and visually appealing.
Optional accessories like ribbons, beads, or small LED lights can enhance your creation further. Incorporating these details makes your FREE crochet pattern more festive and interactive, perfect for Halloween parties or trick-or-treat displays.
Finally, step back and review your wreath. Adjust positioning as needed and ensure all decorations are securely attached. A well-finished DIY Halloween decor piece will last for many Halloweens to come.
Once all decorative elements are attached, finalize your Happy Halloween wreath by securing any loose ends and reinforcing weak points. Use yarn or glue to make sure every piece stays in place. This ensures durability, especially if the wreath will be displayed outdoors.
Consider adding a hanging loop. A simple yarn loop at the top of the wreath allows it to be easily hung on doors, walls, or windows. This step makes your crochet wreath tutorial more functional and ready for display.
Storage and care are also important. Keep your wreath in a dry, cool area when not in use to prevent fading or damage. Proper care extends the lifespan of your DIY Halloween decor, allowing you to enjoy it year after year.
If gifting the wreath, wrap it in cellophane or a decorative bag to protect it. Handmade gifts are always special, and a FREE crochet pattern wreath is a thoughtful, personalized Halloween present.
Consider adding final embellishments like bows, faux spider webs, or small charms to enhance the festive vibe. These final touches bring your Happy Halloween wreath to life, making it a centerpiece of your Halloween décor.
Finally, display your wreath proudly. Whether on your front door, in your living room, or as part of a Halloween centerpiece, it will serve as a creative and cheerful decoration crafted by your own hands.
1. What yarn is best for a Halloween wreath?
Acrylic yarn is ideal because it comes in many colors, is durable, and is easy to work with. Specialty yarns can add texture or sparkle.
2. Can beginners make this wreath?
Yes! This FREE crochet pattern is beginner-friendly, with step-by-step instructions and simple motifs that are easy to follow.
3. How do I attach the crochet pieces to the wreath base?
Use yarn and a yarn needle to sew pieces securely, or use hot glue for added stability. Ensure even placement for a polished look.
4. Can this wreath be used outdoors?
Yes, but it should be kept in a sheltered area to avoid exposure to rain or harsh sunlight, which can damage the yarn over time.
5. How do I store the wreath after Halloween?
Store it in a cool, dry place, ideally in a protective bag or box to prevent dust, fading, or damage.
The Happy Halloween Wreath – FREE Crochet Pattern is a fun and creative way to celebrate the season. By following this crochet wreath tutorial, you can make a festive, personalized piece of DIY Halloween decor that will delight friends and family. From selecting yarn to adding decorative touches, every step allows you to express your creativity and craft something truly unique.
We hope this guide inspires you to start your own Halloween wreath project. Share your experiences, ideas, and suggestions below—we love seeing how your Happy Halloween wreath turns out!


